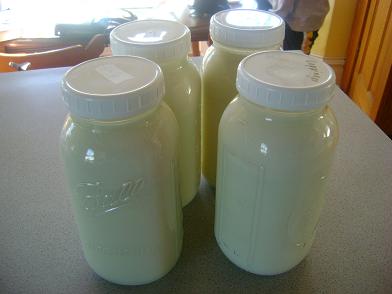
Want to know what makes me excited (besides little plastic drawers)? The fact that with only two gallons of milk…I can squeeze out THREE great dairy products. With the two gallons of raw milk you see pictured below, I was able to make three eight ounce balls of mozzarella cheese…a half pound of butter…and about a cup of ricotta cheese.
Talk about milking something for all it’s worth! (Whoa…very cheesy joke.) (Which I feel is appropriate because this post is about making…cheese. Cheesy-ness abounds.) Anyway…
Even if you don’t think you’ll ever make your own mozzarella cheese…you may still have fun reading about how it’s made!
To make Mozzarella Cheese you will need:
- Two gallons of milk (I use raw, organic) (As far as I understand, you can use pasteurized and homogenized milk too…although you won’t get the butter and ricotta out of it since the cream doesn’t rise to the top.)
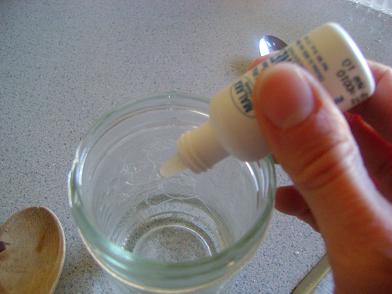
- 2 teaspoons citric acid dissolved in 1/4 cup water
- 1 cup cultured buttermilk
- 30 drops vegetable rennet mixed with 1/4 cup water (I get my rennet from Azure Standard or Wilderness Family Naturals.)
- 1 gallon water
- 1/2 cup sea salt
- Large stock pot
- Long knife
- Food thermometer
- Strainer
- Tea towels
Okay, ready to make cheese? You’ll need to block out about two and a half to three hours of time…but most of that time is wait time, not work time!
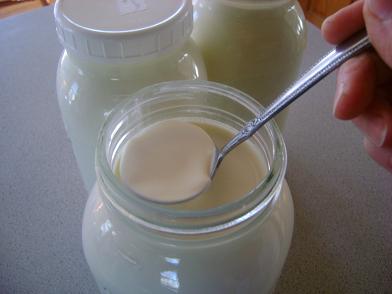
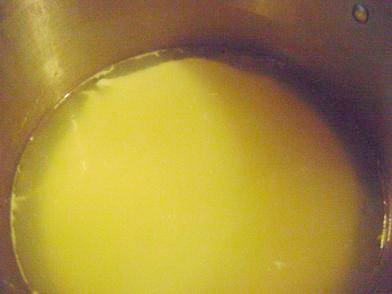
First, if you’re using raw milk…skim off the cream. You know I’m usually big on leaving in the fat…but the fat separates itself out of the cheese while you’re making it for some reason. So, skim it off, put it into another jar and save it for making butter!

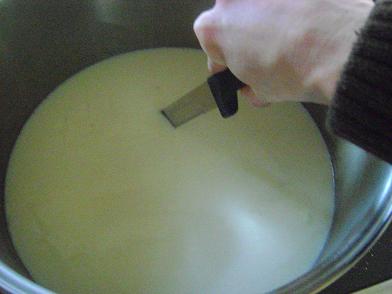
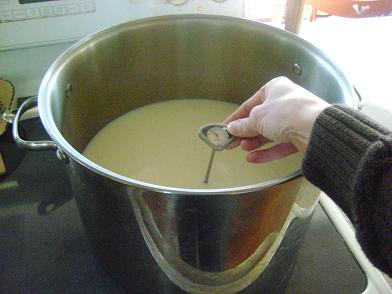
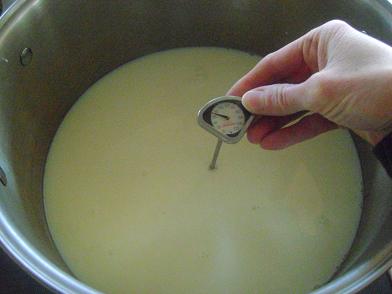
Pour the milk into a large pot (I use my big stock pot). Stir in the buttermilk and citric acid mixed with water. Heat to 91 degrees. Remove from heat, put the lid on and let it sit for one hour.
Add the rennet mixed with water to the milk. Allow it to sit for at least 15 minutes, or until the milk solidifies slightly and it able to be “sliced”.
Use a long knife to “cut the curd” into one inch squares.
Let the curd sit about five minutes.
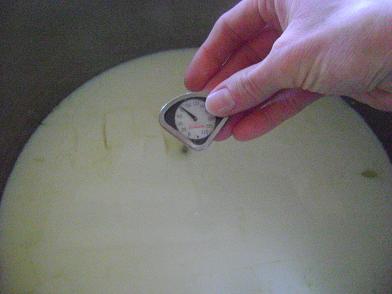
Heat the curd to 91 degrees. Remove from heat, place the lid on the pot and allow it to sit for one hour. After one hour, the curd and the whey should have separated.
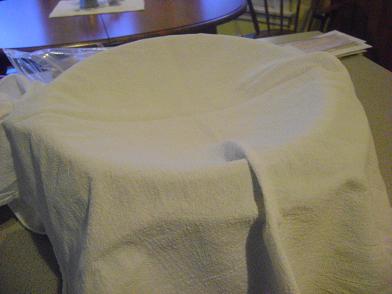
Place a strainer into another large pot and cover it with a tea towel.
Pour the curds into the strainer/tea towel…straining out as much whey as you can. Save the whey!!
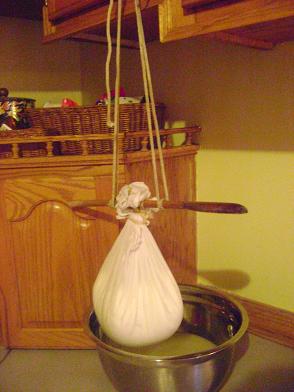
Rig up something fancy like this to hang your curds, making sure you have a bowl underneath to catch more whey that will drip out. I usually leave mine overnight as it takes several hours for all of the whey to be removed.
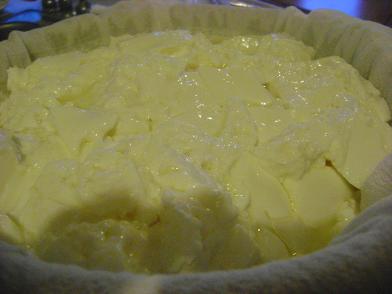
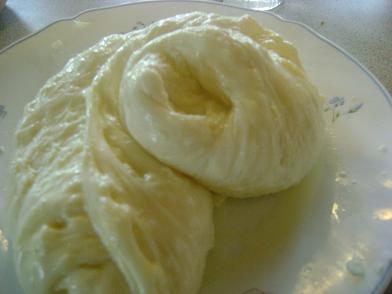
In the morning…remove the tea towel. Wow, a big hunk of cheese! Now…the fun part begins!
In your large pot…heat one gallon of water mixed with 1/2 cup salt. (Hint: I use Redmonds Real Sea Salt and it can be too chunky if I don’t try to dissolve some of it first. Therefore, I put my water and salt into a jar and shake it well, then pour it into the pot. The residue from the salt remains in the jar, leaving only salty water…without chunks!
Heat the salt water to 170 degrees. Meanwhile…
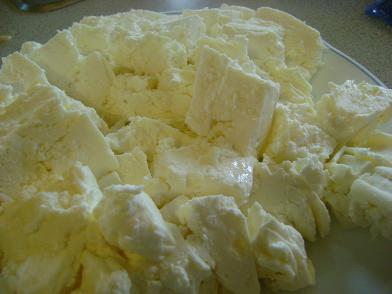
Cut the cheese (oh, my boys think it’s SO FUNNY when I say that…) into 1-2 inch squares.

Once your water reaches 170 degrees, remove it from the heat and dump in your cheese. Kind of stir it around for a minute or two until the cheese softens and begins sticking together.
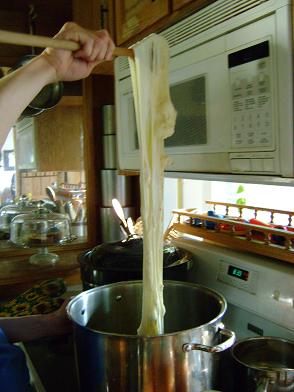
Use a big wooden spoon to catch the cheese from the water. It should start sticking together and forming a blob on your spoon. Stretch the cheese. This part is SO COOL!! Dip it down into the hot water every once in a while to reheat the cheese so that it will continue to stretch, but try not to keep it in the water too long. Keep on stretching and dipping the cheese until it is shiny. This stretching process will take about 8 minutes. (Every once in a while I get a batch of cheese that just won’t stretch. It’s a bummer. The cheese still tastes fine…it just doesn’t look as pretty, shred as well, or melt as nicely. We eat it anyway!)
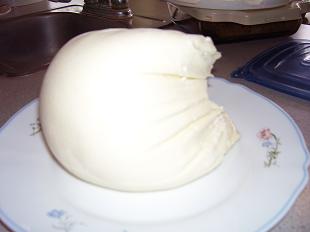
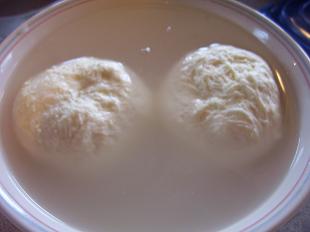
After you’ve stretched your cheese and it has formed a big long shiny wad, take it out and put it onto a plate.
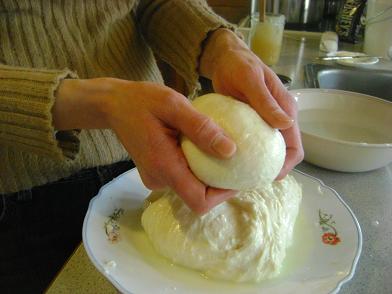
I divide my cheese into three blobs. Squeeze out the excess water and shape the cheese into nice balls.
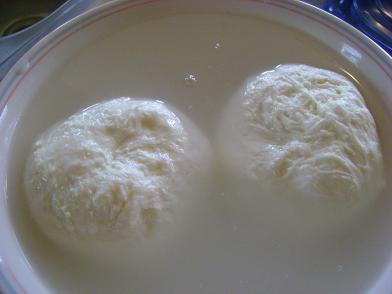
Place the balls into a bowl of cold water. This will take out the heat and help them hold their shape.
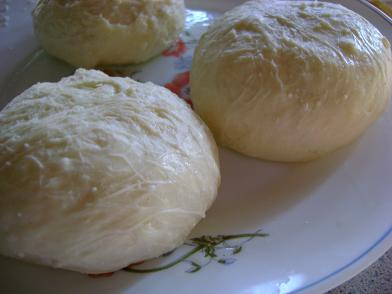
Tada!!! Mozzarella Cheese!
I’ll take time during my next two Frugal Friday posts to share how I make butter with the leftover cream…and ricotta cheese with the leftover whey!
So…have you ever made cheese before? Do you think this process looks like something you could do? You wanna come over and make cheese with me some time? (Then we can say “cut the cheese” together and laugh like we’re really funny.)
———————————————-

Oh, I so want to do that sometime!! Just have to check out our natural foods store for the rennet and citric acid. Also, do you get cultured buttermilk left after making the butter? Or is that different? Do you use store-bought buttermilk?
You can get both rennet and citric acid at any grocery store. Rennet is in the pudding/jello aisle bbecause it can be used for ice cream and rennet custard. Look for a small box of tablets, usually by a company called “junket”. Citric acid is with the bakery items. If they don’t have citric acid, I have been wanting to experiment with “fruit fresh”. It is ascorbic acid (vitamin c) and citric acid. It should work. But then vinegar, lemon juice, etc, any acid will work if you know how much to add to bring the ph down. Indian stores are the cheapest place I have found to buy spices, and in huge bags if you want. They usually have a large bag of citric acid that will last youquite a long time. Lastly, if you have a beer/wine home brewing store, they will have starter culture, citric acid, etc since it is a similar process.
Oops, sorry about that. I put the link there now for buttermilk. And, in case you missed it in the post, I’ll put it here too: https://www.heavenlyhomemakers.com/making-cultured-buttermilk-kefir-and-sour-cream
I would love to hang out with you and learn from you :) I can’t wait to try this recipe.
Not only is this just plain interesting, your photos are fantastic!
Neat operation. I make my own cheese all the time, except it’s non-dairy cheese and it seems easier to make than this process. Your method looks fascinating, though… how neat.
how do you make non-dairy cheese?
You are my hero, Laura! :) I’ve been wanting to make mozza cheese for quite some time (and have the rennet in my fridge to prove it), but haven’t gotten around to learning how to.
Thank you so much for that incredibly awesome tutorial! If I lived close to you, I would definitely come over and make some cheese with you, and laugh like crazy every time you said “cut the cheese”. Just to humor you, of course. :)
Oh that looks sooo fun!
I’ve been hoping for this since I found U!
Thanks so much for posting!
I have an old, old book here that is very similar… it said rennet can be found in drug stores or something? Have you ever been able to find it in some sort of local store or pharmacy?
I’m also curious as to what your outcome is in quantity. How many cups of cheese? Cups of whey? …
Thank U for taking the time to post for us cheese-hungry gals!
WOW! I have to admit that I am intimidated. I would love to learn how to really do it but it looks over my pay grade whic is funny. I have never been intimidated before by making anything. I have to think on this one.
Wow this is amazing! Now can you shred that mozarella to use on pizza and stuff? I love mozarella!
When we were studying colonial times we learned that the people didn’t use milk as a beverage like we do, but as food. After they got all the food they could out of it, whatever was left would go to the pigs! Isn’t that funny. I guess they didn’t have cereal back then!
Thank you so much for sharing this!
Joelle,
Would you share your non-dairy cheese recipe? What do you substitute with? Can cheese be made using rice milk?
That’s great. I might just try that. Well, when out stock of cheese goes down anyway.
God Bless,
Katie
http://www.1200ayear.blogspot.com
Oh my does that look delish! I would love to make my own cheese! There is a dairy farm right down the road from me–I wonder if they would sell me some raw milk. We eat a lot of cheese, especially mozzerella, so this would definitely be handy.
For the rennet and the citric acid, would a natural food store carry those, or just an online retailer. I live in no mans land, so I don’t know if they would or not. Guess I should just check it out.
Thanks!
Oh, yum! You make it look so easy. I actually have a cheese making kit from New England Cheesemaking Company that’s been sitting in my pantry for nearly a year or more even. But I can’t seem to get up the gumption to actually try it. I’ve been wanting to do this–especially when we were getting raw milk. Maybe some day. . . :)
Oh, and I’m expecting my third little boy in July and our house is already filled with boy humor. Sometimes, I think I need a little girl just to even it out a bit.
Well, it still looks way to hard for me to do, but it looks a lot easier than when they showed it in Gourmet magazine a few months ago!
Thanks for the great tutorial – you make it look SO EASY!
OH my goodness!! That looks incredible. I can’t wait for the next two posts.
I just made homemade yogurt for the first time and I feel so crafty and frugal — imagine if I made cheese! :)
Thanks so much!
That looks like fun! The cheese looks awesome!
Hello,
What a great tutorial! I love your sourdough series and look forward to reading about the ricotta cheese and butter.
Take Care,
Trixie
Hey Joelle–ditto on the dairy free cheese. Care to share your recipe?
Cause you know that the ‘packaged’ ones are beyond Nasty. Nasty.
and Laura, I think everyone who reads her wants to be invited to come over and spend some time in your world learnin from the mastah. :)
Amen to that April. I would so love to spend time in her world and learn.
Laura, what about cheddar. Can you teach us that one too.
I am learning so much. I love it. Thank you for all you do and share with us.
Kathy
How cool and fun! I would LOVE to come over and make some cheese with you and my son would probably love to laugh with your boys as they tell jokes and “cut the cheese”! Oh my! This is so interesting and neat and I just can’t wait to try it for myself. Thank you for making it look so fun and relatively easy! I love the pictures.
Very cool! I’m too lazy to do that – but still very cool :)
It’s like science lab for grown-ups! I can’t wait to try it, am still looking for a raw milk source here. Would be easier if we still lived in Nebraska, huh.
Are you an Italian or a Nebraskan? Both? That looks like so much fun- sImilar to making paneer- but paneer lacks the stretching- can’t wait til the cows milk picks up and I can get extra!
You timed this post perfectly! I had made my usual batch of yogurt last weekend, but the starter was too old & weak, so the yogurt was very watery and didn’t set. Today I decided to try again with the same milk-yogurt, and new starter (which is just plain yogurt I get at the store). I heated it up, but the curds started separating from the whey…so I had to quickly switch gears and make “cheese” instead!! So I just poured the whole pot into a strainer lined with a tea towel, which I set over a bowl to catch the whey. So, I guess it’s “yogurt cheese”! I was trying to decide what to do with it…but in the meantime, my husband has discovered it and loves it!
So now I have all this whey…and I didn’t know one could make ricotta from whey until I read your post…so I think I’ll give that a try right now!
Thank you for this post!!
Wow, great post. It’s interesting to see the process.
Wow, this is wonderful! I’m saving it in my bookmarks for the next time I’m feeling adventurous. :)
Wow! So neat. I wish I had ordered more milk for my next pick up. I really want to try this and I think my girls will get a kick out of it!
Thanks for sharing.
Wow! This cheese recipe will totally take our homemade pizza to the next level of goodness! Thanks for sharing.
I’ve also been using your Honey wheat bread recipe for pizza crust and cinnamon rolls! talk about great! thanks for sharing.
Wow! You have perfect timing! I just read about making cheese in Barbara Kingsolver’s ‘Animal, Vegetable, Miracle.’ As soon as I read about it, I wanted to make it and you answered so many of my questions with your detailed post. The pictures are a tremendous help. I can’t wait to make my own cheese! Thank you!
Oh wow, I love mozzarella, it’s my favorite type of cheese! I would really love to try this out. You make it look so easy!
http://www.adlynmorrison.blogspot.com
Wow – thank you! I should be picking up my first milk “shares” of the spring on Monday, and I will definitely plan to try this soon!
I just found your blog. Yes, I would love to come to your house and make cheese! I just made my first batch of yogurt last week and would love to try this sometime. Thanks for the instructions.
thanks for your wonderful instructions I really apreciated that, its perfect, i start to make my cheese at home, just one a week. i would like to know if you have any infomations about how to use R704. if yes please give me more informations.
thanks and God bless you all
Almeida, hamilton Canada
thanks for the post! it looks really interesting. i’m keen to give it a go. nice pictures too, i really like the one wher u are stretching the cheese! and i now understand why the expensive artesanal mozzarella balls always come in … well, that ball shape!
Hi Laura!
I just wanted to let you know that I just made this! I only used 1 gallon of raw milk, so I halfed all the ingrediants. But, I didn’t have buttermilk, so I used kefir. I also didn’t have citric acid, so I used lemon (which I didn’t half as I figured the citric acid was in powder form and concentrated) deluted in water.
I halfed the rennant, but after 15 minutes nothing happened, so I added the full amount and 20 minutes later (a total of 35 min.) it was just right!
I thought you might like to know that alternatives that I used in case someone else asks!
Thanks for all your work!
I love you posting. You really have a knack for explaining the process in a concise and humorous way :o). Thanks!
I made my 3rd batch of mozzarella this weekend, the first double batch with 2 gallons. Of course, it was the first one I totally screwed up! :( When I added the mozzarella to the hot water, it cooled the temp down so much, and I was trying to get it back up to temp quickly, but the cheese stayed in the water Way. Too. Long. It never recovered. I have a double batch of mozz that crumbles like feta and doesn’t melt. Shucks. So if someone out there is trying this, remember to follow Laura’s advice and DON’T leave the cheese in the water very long at all!
I actually tried a different mozz recipe first, and the flavor wasn’t nearly as good as this one (no buttermilk involved), but I did like one part of it. Instead of water, the stretching is done in the hot whey (before making the ricotta). This way whatever comes off the cheese into the liquid ends up in the ricotta – where you get 1/2 cup of ricotta, I would get one or even 2 cups. You can also add a cup of whole milk to the whey before heating to get more ricotta, if you don’t know what to do with a half cup but could make a lasagna with 2 cups!
I’m hoping next time I get it right – I felt so badly because I told my son I finally understood how to do it so he could help stretch the cheese…and then nothing stretched. He was disappointed!
:) Katie
Thank you so much for the wonderful tutorial! It is very interesting to me too! I was wondering if there is a way to get string cheese out of this? This is all new to me and I haven’t tried to make any dairy products on my own yet, but look forward to trying. I think it will be a great educational tool for my kids. Thanks again!
I think there is a way, and I’ve experimented a little bit trying to form little cheese sticks. They don’t turn out perfectly, but we still eat them!
I started this tonight — it’s hanging to drip now. Friday is pizza night at my house. My kids are “dairy allergic” but tolerate raw milk. My daughter’s worst reaction was to the pasteurized, processed mozzarella so we haven’t had pizza here in a long time. I have sprouted spelt flour (can’t do unsprouted grains either) and now mozzarella and we are having pizza!! I can’t wait. Tomorrow I’m going to borrow Katie’s idea to stretch the cheese in the whey so I can make lots of ricotta. Now I just have to decide…butter or whipped cream?? :)
I love this tutorial. So does my mom. So, several ladies in our milk coop started last week a rotation of an extra two gallons of milk so they could take turns making cheese from it. I went to my mom’s house on Thursday to give this mozzarella, ricotta, cream (we made sour cream instead) thing a try.
Well, we had two issues with it, and I’m going to run them by you to see if you have any ideas. First, the ricotta didn’t curd in the whey by heating it. Eventually, we added some apple cider vinegar and, when that failed, more raw milk. The milk finally curded (?), and we gleaned less than a cup of ricotta (which seemed to be from the milk). The whey was really milky. Later, when it settled some, there seemed to be cheese forming at the bottom of the strained whey. We aren’t sure why that happened. Any ideas?
Second, when we went to stretch the mozzarella in the hot water, it sort of disentigrated and made the water all murky. Mom quickly ladled out as much as she could get and stretched and kneaded it on a wet plate, but she could only really get two small lumps out of it rather than three. The salt water was really milky. We used it for soup. :) Our theories are: too much water (she didn’t measure a gallon) or too hot water (she took the temperature, but it could have raised before lowering again). Any theories of your own?
Also, the sour cream packet she ordered from Cheese Making.com just made the cream a little thick, not actually sour cream consistancy. :( A bit of a discouraging day.
So, have you ever had these things happen and do you have any suggestions?
Thanks so much!
Hello!
I too have tried your recipe twice now and both times the cheese has not stretched. The first time I heated the milk too high and thought that was the problem, but this second time I did everything perfect and it still didn’t stretch. Any ideas?
Also, the first time around the ricotta didn’t work either…I haven’t tried this time yet as I have to make the dough for my pizza
Wow, that is SO frustrating. Beyond the water being too hot, I’m not sure what to blame it on. When mine decides not to stretch, I never really can figure out what’s the matter with it. Sometimes it seems to be that all of the whey hasn’t dripped out. Otherwise, I just don’t know enough about all the variables. Grr!
Cheesemaking is chemistry, so temperature and acidity level are critical. Having the right equipment helps also, vs. the “hit or miss” method of guesswork. The disolving curds, the “my
mozzarella won’t stretch” etc, are usually due to dead bacteria in your starter, poor temperature
control, or wrong ph.
There are 2 main types of starter culture, mesophilic and thermophilic. The difference is the
temperature at which the 2 types of bacterium due best. As its name implies, thermophilic likes
higher temperatures. So for Mozarella, you want mesophilic. Buttermilk = mesophilic, Yogurt =
thermophilic. In either case, if you get the brands without live cultures, of if they aren’t
healthy, no cheese. So make sure you have fresh, live culture starter. Either buttermilk or
yogurt from the store that has been sitting in the frigde, usually does not have enough bacteria.
You should let it sit in a covered container on the counter at room temp for at least 6 hours.
Better than either of these is to buy cheese starter online. For hard cheeses especially, you
will notice the taste difference for the kind of cheese you want to make.
Next, a digital candy thermometer or a quality regular thermometer is a must. Do not heat the
milk past the recipe temperature for your bacteria type. Go past the temp, kill the bacteria,
no acid production, no cheese. Buy a ph meter, or at least some ph test strips. If the ph is not
right for the cheese, you will have problems. The reason for letting the curds cure overnight is
to let the bacteria, that you hopefully haven’t boiled to death, do their work and lower the ph
to an acidity level of 5.3 or so. There is a range of about .6 either way, but if it isn’t acid
enough, your curds will never “spin” (stretch). If you are left with ricotta-like curds when
trying to spin the curds into mozarella, you may also have not drained enough of the whey from
the curds. Let them sit longer at room temperature and squeeze out some of the moisture. Also,
the brand of milk can matter. Depending on how they process your milk, some of the proteins
could have already been denatured, the calcium destroyed, or any number of things. Try switching brands. You need the calcium in the milk, so you might need to add some calcium chloride if you are using store bought milk.
Lastly, you could try taking your curds and heading them for 10 or so seconds at a time and working them in between to get the curds up above 140 degrees and below 160. Often that helps work out the whey and can get you to a point where they will sping together into the stretchy mass.
4th time tried, 4th time failed. Something is not adding up here.
Wow. To not have it work THAT many times is maddning! I’m so sorry! Wish I could come over and take a look and see what might be going wrong. :(
Wow! I have made cheese before, but a long time ago when I was growing up and we had a large supply of fresh goat milk. Now I live in the city and have a large supply of 2% milk, I have been trying to come up things to do with it, do you think this will work with pasteurized 2%?
Thanks for the article! :)
I don’t see why it wouldn’t work. Although I can’t promise since I’ve not tried it before!
No. It won’t work with 2% milk. Your mozzarella will be hard like a
hockey puck. But, you can use 2% milk with a pint of cream added. I use that for most of my cheeses that require whole milk since most of the whole milk around is
ultra-pasteurized and cannot be made into cheese. Even powdered milk with cream added works better than most of the whole milks out there – Since very few dairies are
labeling their products as UP.
Oh, you can get the dry milk recipe from WindDanceVineyard.com.
this is so cool! I doubt I’ll ever make it but I had no idea how it was made. maybe one day..
this is great i have been at a loss for what to do with the “skim” after i take the cream. I also want to say that i love your site and refrence it almost daily
Wow, this looks awesome and my GF loves mozzarella. Its amazong how far weve come that we will spend $25 on three balls of mozzarella, 1/2 pound of butter, and a cup of ricotta. When for about $6 we can get it all and its fun in the proccess. I think people dont appreciate what it takes to make their own food anymore. We are such a disposable society now. This recipe is a must try!!! Thanx
I been trying to make mozzarella cheese in several times….but I just got like fresh chesse….what I missing….I follow step by step but nothing close to mozzarella….help
I’m sorry…it’s hard for me to know what is missing without doing it alongside you. :( Mozzarella is finicky sometimes! Wish I knew how to help!
HA HA HA
I am fascinated by all of this, and have already tried a couple of your recipes……..LOVE THEM!!
I’m just wondering……..how did you ever learn to make all this stuff ( the dairy in particular)? How long did it take you to get it just right, and as for the butter, do you let the cream come to room temp before starting the process? I have made butter in the past, but have always let it come to room temp. first.
Thank you for sharing your gifts with us! You truly are an amazing steward of God’s blessings!
As far as dairy goes, it took me several months to figure all of this out, and some of it another friend and I worked at together. Cheese is no easy thing to make!!
I’ve never worried about getting my cream to room temp when I make butter, but maybe it would turn into butter faster that way…hmm.
Thanks for sharing this Laura! I found a way to make your own vegetable rennet that is free to nearly free if you have access to stinging nettles. (I have TONS right in my back yard!) http://www.ehow.com/how_6787149_homemade-vegetable-rennet.html Can’t wait to try it! :)
This is so cool…thank you!
Hi.. Just wondering if I want to be able to use the whey for making Ricotta afterwards, can I use raw milk that is not full-fat? The reason I ask is that I can buy raw milk from the local Sprouts Market that is either whole milk, cream or skim milk.. I’m assuming if I go with skim milk then butter is out of the question, but is Ricotta? If it helps, the milk is produced by http://www.organicpastures.com/
P.S. My wife is lactose intolerant and has painful bouts after eating cheese and milk products.. I ran across this while searching for something else and thought it might be of interest in favor of ditching pasteurized milk products :
http://rayshealth.com/milk-lactose-pus-steroids-facts/
Now I just need to find out about making my own cheddar since you’ve covered most other dairy products we use (sour cream, yogurt, cream cheese, etc)
When I make ricotta from the whey leftover from making mozzarella, it is with skim milk. I always make mozzarella from milk that has the cream skimmed off.
Yeah, I wish I knew how to make cheddar too!
Thanks for the reply.. Perhaps I’ll try my hand at Cheddar.. A quick
search turned up this site among others :
http://www.allotment.org.uk/allotment_foods/cheese-making/making-cheddar-cheese-home.php
Definitely a longer term process as it may take >6 months for a nice
sharp cheddar!
I buy raw milk sharp white cheddar cheese at the grocery store made by Organic Valley. It is the only cheese that I really use since it is made with raw milk. Just a suggestion since it would be easier and quicker than making your own :)
Hi! I was wondering how long the mozzarella would keep in the fridge once it is made? Also, do you know if you can freeze it? Thanks!
It should keep for about two weeks. I’ve not tried freezing it so while I assume it should freeze just fine, I don’t know first hand.
I see this is an older post, you may have already tried it, but yes it feezes great. We vacuum pack ours…but it really never lasts long enough to get it in the freezer at my house.
can you substitute lemon juice for citric acid?
Yes, I’ve never done it this way myself, but I don’t know why you couldn’t!
Adding citrus juice, lemon juice makes roseoto. Cheese I believe, it’s what they put in lasagna and it will not form a ball or melt of stretch, the best way to make this cheese is with viniger
I just read your blog post and laughed my tail off because today I just made Mozzarella for the first time, (this was before ever reading your post) with 2 gallons of raw milk and I got exactly the same yield as you: 3 medium balls o mozz, 4 cups of cream to make butter later tonight and 8 oz of ricotta…so you’re not the only one “milking it for what it’s worth” :-)
I am wondering about the use of the buttermilk. First I made mozzarella with thermophilic culture, not citric acid, and while it smelled really good, it did not make a blob of cheese. So next I made it from raw milk with citric acid, and while it made a nice stretchy cheese, it doesn’t have much flavor. I was considering a recipe using the citric acid and thermophilic culture, but then I saw yours with buttermilk. Now I think that I will have to try your recipe to see what the flavor is like.
Laura, I tried this recipe last fall, and had the no-stretch problem. Just now, debating enzymes and dairy and digestion with a friend, I ran across this article, which is a little over my head, but I saw this:
“Mozzarella cheese made from late lactation milk, which contains higher amounts of plasmin, has inferior stretchability and melting ability. ”
Well, that makes sense, as the cow was dried up in November and will calve this month! I had ‘late-lactation’ mozzarella! ha!
http://www.livestocktrail.uiuc.edu/dairynet/paperDisplay.cfm?ContentID=216
Hello,
Just a little FYI. We are in the process of making the mozzarella cheese and are having a hard time finding the citric acid. I called all our local health food stores and they all said they don’t have it. Luckily we happen to know someone who knows their way around the health food stores. She told us you have to ask for the pill people (the ones in charge of vitamins and supplements). Sure enough, we called back and two of the stores that said they don’t have it, do. I always like to share new pertinent information when I learn it. Happy mozzarella making.
I found citric acid at the cake makers specialty store. I used it to make homemade gum for my daughter’s science fair project. Good luck! I am loving making cheese!!!
I buy citric acid at the wine/beer making store. I live around
Atlanta and it is a common hobby to homebrew beer and wine so it’s
not hard to find one. Some of them even carry cheese supplies
You can buy Vitamin C crystals in the vitamin section at most stores. If you look at the ingredient list it says “citric acid granules”.
You can find the citric acid in canning supplies
Dumb question, will the cheese balls be to soft to grate? Like to use for pizza. Thanks I LOVE your site!
Alicia. I’ve not made it yet, but in my. Hunt I found someone who says fresh it is stretchy and soft. Refridgerate it and it becomes harder and can be grated.
It should grate just fine. :)
ughhh. i couldn’t get all the cream skimmed off and i added the rennet before i let it sit for an or hour, have i totally failed or can it be saved?
It’s probably still okay! Just pick up where you left off and keep at it!
Hi Laura. Thanks so much for your mozzarella cheese making instructions. We also get raw milk and so far I’ve made yogurt and ice cream (our special treat :-). I currently happen to have some very “old” milk (about 2 months old) in my refrigerator that I don’t want to throw out. I’ve been searching the Internet looking for something to do with it. Of course it has soured and the cream has separated and I think has solidified (going to be interesting trying to get it out of the glass bottles, but maybe I’ll be heating it which will help??). Do you know if I can make cheese or anything with this (e.g., cultured butter or sour cream with the cream, ??? with the whey)?? Any thoughts or suggestions you have would be greatly appreciated. All the best! Kristin
Still not quite sure what I’m going to do with my “old” milk, but I did find this: http://recipecircus.com/recipes/sheberry/Dairy/uses_for_sour_milk.html
Sincerely, Kristin
I’m thinking sour cream with the cream…and I THINK the skimmed milk will still make mozzarella…but not sure since I’ve never used old milk for this. Is the milk not stinky? I know raw milk lasts longer than milk from the store, but in my experience, milk that old has gone sour…too sour to drink or cook with at this point.
Laura:
I get two gallons of raw milk a week and have tried your mozz recipe and make butter da da dah and now I have gallons of whey which I have been making delicious smoothies. However I do watch my weight and cannot find a source to find out the caloric count of whey that comes from mozz then ricotta cheese. Calorie King doesn’t show that it is from a natural source or unsweetened. Would you know where to look? Martha
Does this help? http://www.thecaloriecounter.com/Foods/100/1112/Food.aspx
Can you use nonfat powdered dry milk to make the mozzarella???
We only have homogenized milk around here, so I buy non-homogenized (Organic Valley) nonfat drty milk.
Oh boy…I don’t know if it would work or not with dry milk. I wish I knew how to answer. I’ve never tried it with dry milk before!
You must add cream to powdered milk to make it work. Just use home milk it works well if I cannot find whole of raw milk,make sure if I use organic milk that it ain’t super pasteurized also it won’t work for ya
Wow, it is great to find this! thanks Laura. I bought our first hand milking dairy cow last year, and I practiced with easy butter, a few cream uses etc. I cant wait until she calves next week, so that I can get back to my new favorite hobby. I am also adding two dairy goats to my dairy habit- tat. lol Your directions look so easy. if you have simple instructions for other dairy goodies, I would love to see them
Here is the page listing all of the links to the dairy products I love to make!
https://www.heavenlyhomemakers.com/recipes-2/dairy
Anyone who is interested in watching a video of this process, I posted one on YouTube. I used this recipe to make it! Thanks Laura! Love your site. My wife using it all the time.
Here’s the video:
http://www.youtube.com/watch?v=hbaTPCP59Cw&feature=player_embedded
Hey Jason, Nice video and adorable kids. Looking forward to trying Laura’s recipe, you made it look easy. :)
I noticed you used a lot more water mixture (citric acid, buttermilk), that
than the heavenly homemakers version (1/4 cup dissolved citric acid;
cup buttermilk, and that’s for 2 gals. milk. You only used one gal.
milk.
In looking over the recipe above, you are right. I must have made a mistake in reading because it lists “1 Gallon of Water” and “2 teaspoons of Citric Acid”. I thought they went together. Opps. As you saw in the video, it still seemed to work, but I’m not going to use so much water next time.
The reason for the 1 gallon of milk – I “halfed” the recipe. I don’t have a big enough pot for 2 gallons of milk. So all the measurements in the video were cut in half. HOWEVER, I did not half the rennet drops because Laura says to use 30 drops of vegetable rennet and in reading online, I learned that vegetable rennet is double the strength of animal rennet. So I figured 30 drops of vegetable rennet = 60 drops of animal rennet and thus 30 would be half (someone correct me if I’m wrong).
It’s interesting reading some of the comments lately about the cheese not stretching. I’ve tried to make cheese 5 times now. The first 3 times worked perfectly (as in the video), but the last 2 have not stretched for me either. Laura did say above that once in a while she gets a batch that doesn’t stretch too, so I’m hoping that 3 of 5 is ok and we’ll see what happens with batch #6 next week.
Something that “might” have to do with the cheese not stretching is… On my last batch (that didn’t stretch), I did the first step out of order because I was rushing. I heated the milk up to 91 degrees, THEN added the Citric Acid. I think that was a mistake because the milk started to look like cottage cheese immediately and that had not happened before. I still got cheese out of it, but it wasn’t pretty. I think the key is to add the Citric Acid while the milk is cold, then warm it up slowly to 91.
Does that help? Someone let me know if I’m off.
I am having the worst time with homemade mozzarella. I bought a kit, and the recipe is much simpler than this, but I have been following it (and a couple others) to a T and every single time, my mozzarella won’t stretch. It looks beautiful, like I’m right on track, until you reheat it to start the stretching, and then it suddenly separates and looks like cottage cheese and there’s no saving it. I want to try your recipe but I am very discouraged – do you know what could cause it to be that way?
What kind of milk are you using?
Making cheese is pretty tough. Even though I’ve made it many times, it doesn’t always work for me everytime either. :( Try not to be discouraged!! It’s not an easy thing to make!
I had this same thing happen to me! Beautiful looking mozzarella,
and then when I added it to the hot water it disintegrated before my
eyes! I was using “Farmer’s All Natural Milk” Whole milk from Sprouts-
it doesn’t list whether it was pasteurized or not but an employee told
me it wasn’t. What did we do wrong?
I guess we’re failures at mozzarella making. Spent last night making they mozzarella, hanged overnight. Tried to stretch, first batch disappeared into the water, second batch just wouldn’t clump together. Ricotta was a failure too. We tried the 30 min. mozzarella kit, we failed at that too. :( At least we’re keeping the farmer happy.
Bummer…yeah, this mozzarella business isn’t as simple as making many other things in the kitchen. Even though I’ve made this many times, sometimes mine won’t stretch either…or it all falls apart in the water. :(
Thank you for posting a mozz recipe that does not require a microwave! Even though I see in the photos that you do have one. I have made mozz before with the 30 minute kit from Ricki the cheese lady with limited success. It made a good tasting cheese but the wrong texture, very solid, not with the strands you can peel apart like mozzarella should have. So next time I will try it your way.
Where do you find the right milk for this? I have tried it a couple times with store bought whole milk and I have made cottage cheese both times!!
I have been doing alot of reading on cheesemaking and I’m no expert by any means – but I have read/heard the if the milk is Ultra Pasturized, it won’t work. There are some gently pasturized milks out there. I’m going to try with that before investing in Raw Milk.
I used Raw Milk on the video I made. I had not tried Pasteurized milk, but I would be very surprised if you got cheese out of it. They really mess the milk up and there is zero benefit to drinking Ultra Pasteurized milk. See: http://www.realmilk.com for more info. Laura also uses Raw Milk.
Does anybody know if I can use kefir in place of the cultured buttermilk?
I think this should work just fine.
Or cultured/acid whey?
can I use animal rennet in place of vegetable??
Yes, I would imagine so.
Just bought a kit to make mozarella and ricotta and it is much quicker. After you heat the milk (I also use raw) to 90 degrees you add the rennet, let it sit up for 10 minutes or so undisturbed, then cut it with a long knife. Stir for 2 to 5 minutes slowly, drain off the whey and put the curds in a colander to remove most of the whey. Then you put the colander in a pot of water that has been heated to 185 and continue to flip it gently, until heated to 135. The stretching begins and then you form the way you want to, adding salt and any other seasoning at that point. I found that you can put it back in the hot water to reshape. Then 5 minutes in water that is nice and cold and 10 minutes in ice water. My kit came with rennet tabs that you quarter.
Laura.I have read your page its good to know how to make mazzarella at home.but for me its very hard to find kefer.so I can buy regular butter at the store?
Yes, that will be fine.
Do you know if there’s a way to make it without heating it to 190 degrees? Doesn’t that pasteurize the cheese? Thanks Laura, I love your site!
When making the cheese, you only heat it to 91 degrees, which keeps it raw. Then for the stretching part, you heat the water to 170, but the cheese is only in the water for a very short time to kind of melt it down. Plus, the water begins to cool imediately after you pull it off the heat. It is my understanding that this process keeps the cheese raw.
Thanks so much for the great recipe! I too had the “my cheese falls apart at the last step” problem. I decided in a last ditch effort to save the cheese to strain it through my tea cloth (t-shirt) one more time. After scraping the cheese out of the tea cloth (like the ricotta recipe), I had a really delicious, spreadable cheese that was awesome in lasagna and as a dip for chips. When all else fails, strain it again!
After two failed attempts at this recipe, I decided to go online to comment and realized that your recipe uses vegetable rennet and I have animal based. Do you know what the difference in amounts of rennet would be using the animal based rennet? The first batch wouldn’t stretch at all and the second stretched only slightly, but after sitting in a container overnight it has hardened and is only fit for doggie treats! It appears that if you are using animal based rennet the amount needed is far less than 30 drops. Please reply.
I’m sorry that I don’t know the difference. I’ve only used vegetable rennet and am unfamiliar with animal rennet.
A friend shared this site with me & I can’t wait to try it. I’ll have to locate the Rennet stuff before i can. But i have goats, so i get fresh raw milk every day :) And have a cream/milk separator so it’ll make separation of the cream easier (sort of as its a hand cranked machine LOL)I have made butter & ice cream, haven’t tried yogurt yet. But i am wanting to try as much stuff as i can to show that its worth while & cost affective to raise goats for milk (would prefer a cow though), but i have saved most of the other links listed & look forward to checking them out too.
Thanks :)
My husband and I have always wondered how to make cheese. Thank you! We can’t wait to try it!
Hi I came across this site while trying to figure out what i can do differently in making mozz! last year was my first year making mozz on a regular basis and never had any trouble with it! I am using the same ingredients this year and it is just not stretching! It is a new batch of citric acid, could that be it? A couple of my failed attempts made sense….then i thought i had the answer when i realized my digital thermometer was reading higher than it was…so got a new one…so thought today it would all work…but it is not. I am using the fiasco farms recipe too. with double strength veggie rennet, which is what i have used since i started making cheese 5 years ago (3 goats and they only had their babies in may so not late lactation)….everything looks great till i go to put it in the 170 degree water and it does not stretch! what could it be??? thanks!!
I wish I knew so I could be of better help! Sometimes my cheese stretches and sometimes it doesn’t and I’m never sure what exactly has gone wrong. :( It always still tastes great, even if it doesn’t stretch, it just doesn’t melt well if it hasn’t stretched.
I just got through making this mozzarella and I had the “no stretch” problem. I used raw milk and took as much of the cream off the top that I could. I got uninterrupted mid process yesterday afternoon and had to put the draining curds in the fridge (hanging from a wooden spoon over a pot) This morning I took it out and did the cutting, dipping and stretching part. I ended up stretching it by my hands ‘cuz it just wouldn’t fall off the spoon. It is also very rubbery; squeaks against the teeth. Any comments you can make on my mozzarella attempt will be appreciated.
Putting it in the fridge may have hurt the process a little bit, but otherwise, sometimes mine just doesn’t stretch either and I never know exactly why. Cheese making is certainly tricky!
sounds like you made cheese curds! We love it when they squeak. That means they’re fresh!
I tried melting my mozzarella on a slice of tomato under the broiler and it didn’t melt; just got harder and rubberier. What kinds of things can go wrong and where can I make adjustments?
Thanks! glad to know i am not the only one, but boy it is frustrating!!!
I am going to try your recipe today, wish me luck :o) (I have never used buttermilk instead of an LH culture…hmmmm)Of course, with goats’ milk cant really skim much, if any, cream off the top!
The only raw milk that I can find is homogenized. Will this still work? I’m guessing I just wouldn’t get to make butter?
Yes, I think that will work (I’ve not tried it myself though!).
We made Mozzarella with your recipe last night. It worked beautifully even after we mistakenly heated up the milk to 100 degrees instead of 90. We let it cool down and continued the process.
We just bought a jersey cow a few months ago so we’ve been looking for a way to use all the milk. This is perfect.
Thanks for the great post.
Doug
This looks great! I can’t wait to try this :) I have a question. How long does this keep and do you think it would freeze well? Great blog :)
This should keep for about 2 weeks in the fridge. It does freeze, but does not shred well after thawing.
I have tried three times to make mozzarella (not this recipe, but similar) and have been a complete failure all three! I finally went to a local dairy and asked the farm hands for a gallon of raw milk! I’m hoping I am just using milk that is too pasteurized and will get better results this time. I have noticed this exile calls for buttermilk, whereas the recipe I am using (and others I’ve researched) does not. Does this make a difference?
Not only have I wasted 3 gallons of milk, but the gas money I spent driving all over God’s cation looking for citric acid, rennet, and now the raw milk from the farm 30 miles away!
VERY frustrated, any advice would be appreciated!
I can’t answer your question about whether or not this will work better because of the buttermilk, simply because this is the only way I’ve tried making mozzarella. I actually have very little experience, just shared the little I knew on this post. This recipe doesn’t work 100% of the time for me, but it does usually work to stretch and make great cheese. However, even when it doesn’t stretch well, the cheese is still edible, meaning I’ve never had to throw out a batch!
There has been many people having problems with stretching the cheese. This video focuses on the stretching part from an experienced mozzarella maker.. It’s worth watching:
http://www.youtube.com/watch?v=1-y9X56ZlUU&NR=1
do you know how much 30 drops of liquid rennet is to the tablet rennet? Would it be 1/2 tablet or 1/4?
Thanks.
I’m not sure, I’ve never done it with tablets before.
Vegetable rennet is genetically modified, made from a GMO cow gene spliced into a bacteria, so “vegetarian” friendly “vegetable” rennet isn’t exactly accurate although they are allowed to say that legally, which is sad.
Awesome tutorial, thanks so much. I’m about to make the veg rennet from stinging nettles… hopefully it works out.
As a chemist might I suggest adding units to your temperature… that should help avoid some of the confusion. oC or oF.
Thanks again.
i am so sad. i drained the whey over night from my mozz, and it is all finished and in the fridge now, and i took a teeny bit… nasty! same with the ricotta i made with left over whey, nasty! the smell of whey alone is so gross to me, and thats all i can taste in both of my cheeses :( raw milk is expensive here and ive pretty much wasted it now. help :(
Bummer – I’m not sure what happened. :( Sounds like somehow it got sour, but I’m not sure why.
Trying to make mozzarella today! Praying it works ;) Thank you for this post!
Nicole
Tried it! Loved it! Thank you! God Bless!
Hi everyone I also tried to make the cheese but mine does not stretch there has to be a science to this just don’t know where we are going wrong.the only thing I can say is that my rennet called for 20 min wait after dissolving and I waited for 10 but the curds set in I just ended with a squeaky cheese which looks like cottage cheese.why can’t anyone find a cheese expert!
I did not use raw milk I thought that may be the problem but when I read yr posts looks like people with raw milk also have the same problem.
This is so much like making cydek (hrutka), an egg cheese which orthodox Christians make in different forms and flavors at easter:
-make double boiler with 2 stockpots.put a gallon of whole milk in the small pot; water in the big pot to about an inch up the side of the small pot. (i use commercial pasturized/homogenized.)
-add 1 dozen eggs and blend the whole mess with a electric hand blender till well blended. You can add a little vanilla and grated nutmeg to taste.
-heat pots until boiling, stirring constantly, then turn heat down to low (just so it doesnt spit.)
-keep stirring until it curds up and whey is well separated. (we like to call it “puud’ as in pudding.)
-Set up a large wire strainer over the sink or a bowl. line with 2 layers of cheesecloth. pour the curds in.
– draw the cheesecloth together to form a ball, squeezing as you twist the cloth tighter like a bag. CAUTION – do this by the sink with cold water running because you have to smooth the ball with your hands and you will have to douse them frequently to avoid burns!
-hang up overnight as you would mozzarella.
– unwrap and enjoy, refrigerate after using. you now have the makings for a cold cut scrambled egg sandwich, great w homemade bread and ham w a cream cheese shmear.
This makes on big ball (softball size+) or about 4 smaller ones.
Enjoy! jan
PS have the hanging strings precut saves frustration.
Hi again finally I discovered why some people don’t get the stretching after a lot of trial and error and reading here is the answer – if the cheese is not acidic enough it won’t stretch the curds have to be at 4.8 to 5 acidity this can be achieved by adding citric acid to the milk or when you get the curds leave at room temperature for 24 hrs this is important otherwise the cheese will not stretch.
I made a batch today with citric acid left it for 2 hrs to set after adding rennet and then put some in hot water some in micro got good results with both even though I did not leave the curds for 24 hrs.if you don’t put enough citric acid in the milk you will have to leave curds over night.I put 1 and 1/4 teaspoons in 1 gallon milk
http://biology.clc.uc.edu/Fankhauser/Cheese/MOZZARELLA_JOYCES.HTML
NICE HANNA! Thank you for that helpful information! I look forward to giving that a try.
hi
will anyone share the recipe to make Cheddar cheese?
Hi ! Lara
Thanks dear for sharing with us it really helped me , I never thought this was so easy to make. My kids loved it asked to thank u
Bye Bye ! take care..
My milk did not solidify. I first gave it the 15 minutes…then 1 hour. Should I just start over? : ( or wait even longer?
Hmm, you probably don’t have to start over, just add more rennet and try again?
I just add more rennet and it is fine afterwards. :)
I had a lovely ball of cheese in my tea towel, but when I cut it and added it to the 170 degree brine, it dissolved completely. It never stuck together. What did I do wrong?
Cheese is super finicky. It’s hard to know what went wrong. That has happened to me before too. Hopefully it still tasted okay!
I had that happen also. I saved the little crumbles…it reminded me of cottage cheese. It tasted like Mozzerella so we used it in lasagna as a layer and it tasted/worked great.
I’m looking forward to cheesemaking. I have access to a dairy cow and have made butter and some Ricotta — who knew! However, I’m looking at a wine cellar appliance to also get into some aged cheesemaking. I’m so excited. Just taking smaller steps first.
I love your site! I am a stay at home wife (kids are gone). My philosophy in the area of household finances is if I can make it myself I do. If I can repurpose something for something else we need, I do. If I can use it (as a starter) to keep perpetuating it without the need to keep purchasing some product commercially, I will. I see it as my responsibility to be economical and keep my husband and I healthy. It is in the true spirit of being an advantage to my husband as a helpmeet. I love it.
DOH! I didn’t read the post about making butter first! Oh well…I had the same “solidifying” problem with my milk, took your advice, added more rennet and “Whoo hoo, L@@KIE there!!” I have nice curds! Thanks for your lovely, informative posts (I used 2TBS of lemon juice…BTW….as I could not wait to get citric acid in the mail and I didn’t want to drive 30 miles to find it!)Today mozzarella, tomorrow ricotta! I am so happy!
I found citric acid at bi-mart of all places. Look for it with the canning supplies :-)
I tried making th e mozzarella cheese ,I followed every step. It all looked like your picture,until it was time to stretch it. It didn’t stretch. I ended up putting it into 3 balls then I put it into the water. What could have happened. Thanks Donna
Ugh, I hate it when all the steps go well and the cheese still doesn’t stretch. You likely didn’t do anything wrong – sometimes the temperature, humidity, and who knows what other elements keep the cheese from stretching. :(
Our mozzarella dissolved in the water when we tried to stretch it. Do you know what we did wrong? Also, when we left it to drain overnight, it didn’t hold its shape all nicely in the morning like yours did.
I saw another recipe that called for calcium chloride. What do you think of that?
Calcium chloride will prevent the cheese from stretching. So I don’t recommend it for mozarella cheese.
Laura’s does that sometimes too. She said it is fine to eat, although she understands the frustration!
We recently made mozzarella and it seemed to work fine except that the finished product was very very dense. It definitely wasn’t like a fresh mozzarella. Any ideas why?
Hmm, I’m not sure. I have made this cheese several times, but I definitely don’t feel that I am an expert by any means. While following the same instructions, sometimes mine turns out well and sometimes it doesn’t.
Quite possibly cut the curd too small. The larger your curd is to begin with the more moisture it will retain. Since mozzarella is a high moisture cheese you should cut the curds no smaller than an inch square. It may also help with the lack of “stretchability”
So, I was wondering if you could use the buttermilk leftover from the butter?
No, that won’t work for this. The buttermilk you use for making cheese needs to be cultured.
what if I make cultured butter? then it would be cultured buttermilk, would it not? it’s not quite as thick as the storebought kind, but it smells like it and use it in baking and stuff.
Yes, I’ve never done it this way – I usually use homemade, thick buttermilk. But I think it would work to use your thinner buttermilk from making cultured butter.
Will the rennet tablets work? Or must it be liquid rennet?
Yes, I think that will work.
Everything looked great until I put the ball of curds in the 170 degree water – then it disintegrated! I’ve made mozzarella before with other recipes that said not to heat the cheese warmer than 135 degrees. It seemed to me like the water was just too hot and it melted the curds. Is 170 degrees the right temperature? Otherwise, I was really impressed with the way the cheese seemed to be turning out.
I’ve done this successfully at 170 degrees, but maybe try it at 135 next time to see how it goes. Glad it turned out well otherwise!
I’ve seen other recipes without the cultured buttermilk. Will it still work if I leave it out?
I’ve never done it without the buttermilk, so I don’t know for sure.
How long will the cheese keep
For 3-4 weeks in the fridge.
Thanks for giving valuable information
Thanks Laura, your recipe has reached delhi, India, will give it a try for sure :)…Can I replace, citric acid with vinegar, rennet with yogurt and sea salt with regular iodised salt? Asking as wont be able to find above items in grocery stores in my area. Thanks in advnace for help and sharing such a wonderful recipe :)
Ummmmm, I think I can answer yest to all of your questions, but I’ve never tried it that way so I’m not entirely sure!
You can replace citric acid with yogurt. There’s no replacement for rennet if ou want curd formation unless you can find junket tablets in your area. I suggest you order some from nNew england cc cheesemaking supply company(That’s where I got mine). It’s not that expensive buying just the rennet tablets plus normal shipping. Just takes longer to arrive. And you do need a food thermometer. As for the salt, how about himalayan pink salt or rocksalt? Though salting it is of course optional..
please, you can not call mozzarella. if you want to eat real buffalo mozzarella I send I of Naples.
I was just wondering, what do/can you do with the left over whey ???? I saw you said to save it :-)
Thanks for the help. Also for the citric acid, can you use crushed up Vit.C? nobody sells it around here.
You can save the whey to use when fermenting vegetables, although I haven’t done much of that to be able to give details. :) You can try the crushed up vitamin C, but I haven’t ever done that to tell you if it works or not.
I use whey in making sauerkraut but it doesn’t use very much up. I am sure it could be used in baking breads or cakes in place of the liquid. Of course, it wrecks it’s probiotic properties then. You say ricotta is made with whey?
I’ve heard adding it to cultured dairy products extends their shelf life
tremendously. Like mayo and sour cream. Haven’t done it myself though
We tried this tonite and worked great. It did tart falling apart at the stretching step but we noticed it correlated with the temperature drop so we reheated the water back to 170 and it came back together and stretched fine. We tried to hold the temp around 170 til we were done with that step.
I want to know what is rennet ? and is an alternate of rennet ?
I use vegetable rennet, explained here: http://en.wikipedia.org/wiki/Rennet – but I’m not sure of an alternate.
Rennet (non-veggie) is from the lining of calves. Read Little House on the Prairie, Pa kills a calf to have some rennet for Ma to make cheese. Somewhere I think I heard that millenia ago they stored milk in (ugh) calves’ stomachs and when they were ready to use it, voila! They discovered cheese! However they figured it out, thank Jesus for His amazing creation! :)
Excuse me, I meant to say it is from the lining of calves’ STOMACHS. Sorry.
Hi. :) I came across your post searching for information on skimming raw milk for cheese. I just made my first cheese today and I wanted to ask if you really only get that much from 2 gallons. I used raw, whole milk (1 gallon). I was able to get 18 oz of mozzarella, 13 oz of ricotta and 2 1/2 quarts of whey left over. If I halved your output, I see I was able to more of both cheeses. However, since I did not skim, I did not any butter. Are you results here typical and do you think the cream made the difference in quantity yielded? Thanks for whatever or input you can share!
Yes these are typical results. I skim the cream because it separates out usually anyway when I’m making cheese, so I hate to waste good cream when I can use it for something else! It’s amazing how much milk it takes to make cheese. That’s why cheese isn’t terribly inexpensive. :)
Wow. Typos. I meant to say, did you think the cream removed from your milk resulted in the slightly lesser amounts than I was able to get. And thanks for whatever advice or input. Sorry about all that. I am typing on my phone at 2:20am. :)
I believe the product yield will vary based on the type of cow the milk came from. Jersey (brown cows) milk has a much higher butterfat content than Holstein (black and white cows) milk.
Hi, could you tell me how many teaspoons of rennet is 30 drops? I have tablets and it says 1/4 tsp = 1/4 tablet.
Also, I have looked at many other recipes before actually trying to make mozzarella and yours seems to be the only one that calls for cultured buttermilk and removing the cream. Could you tell me more about why you take those steps? At what point of the process does the fat separate from the cheese?
Thanks in advance
I am on a mission to make as much of my food from scratch, and learn as many food preparation processes as possible. I found your post because I googled “how to make mozzarella cheese.” Thanks for such an excellent tutorial, I can’t wait to try it!
I already get raw whole milk and make butter from the cream. Thrilled to hear I can make ricotta from the whey as I feel wasteful throwing that out. I am definitely going to do the mozzarella – just need to find some vegetable rennet in my part of the world.
Dogs and chooks love the whey from cheese making as long as it does not have vinegar/lemon juice added.
So I attempted making mozzarella and it won’t gel up to the custard like consistency to cut it. I used 1/2 junket rennet tablet was that the problem? Any way to salvage it?
I had the same issue and added another 1/2 tablet and waited another 15 min. and it worked!
I am totally new to cheesemaking and was wondering if there is a substitute for rennet and citric acid that most cheese recipes require. I do not have easy access to either product. I have read on different sites that rennin may be omitted resulting in a different consistency of product) or that it may be substituted with buttermilk or yoghurt. I appreciate your thoughts and recommendations on the matter.
I’ve only made it with rennet and citric acid so I can’t say for sure. :)
We have goats and have been making mozzarella. It is very good.
Debbie I’m tring to make motzarela this is the third time and the milk does not coagulate like when I make chees can u please email me your directions on how you make it please at [email protected] I’m using goat milk that I milk my self
If I make a smaller amount (2 litres – 4.22 pints) do I decrease all ingredients by the same ratio?
I believe so, but haven’t tried it in smaller amounts so can’t say for sure.
I will have to get game and give it a go. I will let you know how it works out. Diana
I am interested in the Italian recipie for Mozzerella. It uses a cultured soured milk instead of the citric acid step. I can get yougurt and sour cream for 50cents a pound.
The recipies with citic acid are know as American. I think all you need to do is acidify the milk. Any acid should work, vinegar, lemon juice etc. Fruit Fresh and sour salt are two products that you find in most in grocery stores that are basically citiric acid with a fancy name on it.
If you cook the whey a grainy cheese will settle out of it whick is riccotta.
Gary is right about using yogurt, cultured sour milk as acidifiers. I make mozzarella back in Ghana on a commercial scale. Citric acid and animal rennet are hard to come by. So I improvise using the gizzard lining of poultry for my rennet and yogurt as my acidifier. The results are good but timing is essential bcos u need to monitor the level of acidity to ensure a good stretch
I have read alot of recipes for making mozz but they never seemed quite comprehensive enuf. This is the best recipe I’ve seen. Thx for the pics & your directions. Hope to make this soon.
Can this recipe be doubled? And about how much cheese does the recipe yield. Weight wise?
I don’t recommend doubling it. It’s pretty tricky. I’d say it yields about 1 1/2 pounds of cheese…just a guess!
Has anyone made this without the buttermilk ? If so please post !
:)
I am 15 and I have been using this recipe for a long time and I use goats milk.
I am going to try cows milk with 4 gallons. I cant do goat milk yet because goats have not had babies yet. No babies, no milk haha
It is also fun to make the cheese and then make shapes out of them in Cookie cutters!!!
made it really fun for my nieces and nephews.