I mentioned that over the weekend I received millions and millions (okay, maybe not millions) of peaches from a lady in town. I’ve been busy preserving them for winter and thought I’d walk through the steps with you.
Please note: These peaches were so awesome and juicy, and since there were so many of them, I felt that none of us needed to hold back on how many we ate. So, as I was standing in my kitchen peeling and slicing peaches, and peach juice was running down my arms…I was also biting into peaches as I worked, because I just couldn’t resist. Therefore, I also had peach juice running down my chin. But with peach juice all over my hands and running down my arms, it’s not like I could do much about my chin, you know? Not one of my finer moments.
Thought you might like to picture that.
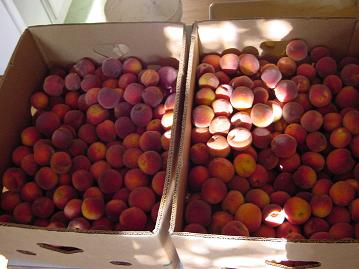
If you remember, I was given four boxes of peaches. (I did share a few with some friends.)
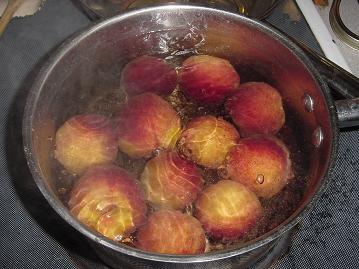
In the past, I’ve always peeled my peaches with a knife…and that’s been fine. But I had so many peaches this time, I went ahead and tried this method of peeling, and whoa was it a time saver! Just put your peaches into boiling water for about 30 seconds…pull them out…
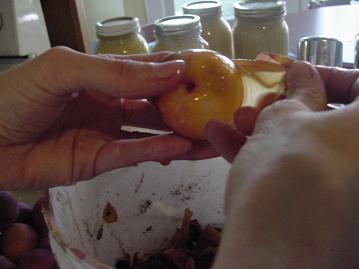
And those skins just peel right off!! It was awesome. Except for when they didn’t peel right off, which happened with a few of them for some reason. (Just thought I’d tell you that so that if not all of them peel right off for you, you’ll know that you aren’t the only one!)
(You don’t have to peel your peaches if you’re going to freeze them. They’ll be more nutritious if you leave the peelings on, and it will save so much time too!)
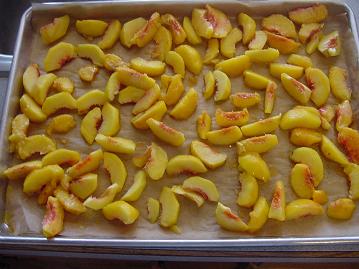
To freeze peaches, just peel, slice and lay the peach slices on a cookie sheet lined with parchment paper. Put the pan into the freezer until the peaches are frozen, about two hours. (Or longer if you forget they’re in there.) Then put them into a freezer bag and you’ve got great peaches for smoothies and slushies!! And cobblers and crisps! (If you feel like skipping this step and simply just putting your peach slices directly into a pan without freezing them individually like this first, you can…but you’ll end up with one big gallon sized frozen peach-sicle, and you may be very frustrated when you want only part of the rock hard peach-sicle for a smoothie. Just so ya know.)
Now…to can peaches…this is what I do. There are other ways to do it…this is just the way I do it! Please be sure to go back and read Canning 101 for the canning basics!
I make a honey/water solution on my stove…which is 2 T. honey to every 5 cups of water. Heat it on the stove and let it sit warm while you prepare your peaches.
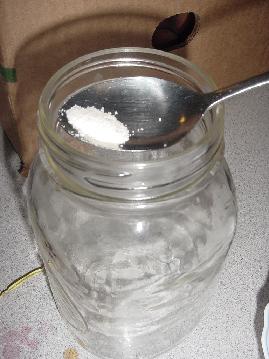
Take out a hot jar and put in about 1/16 teaspoon of ascorbic acid to keep your peaches pretty. Just dump it into the bottom of the jar. (Some people use lemon juice)
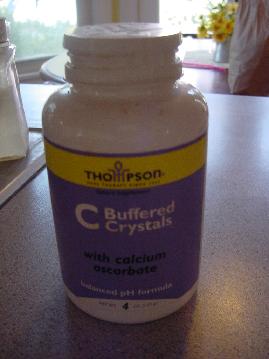
Ascorbic acid is powdered vitamin C. I get mine at a health food store.
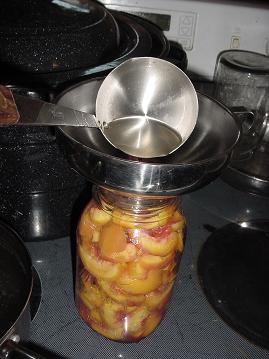
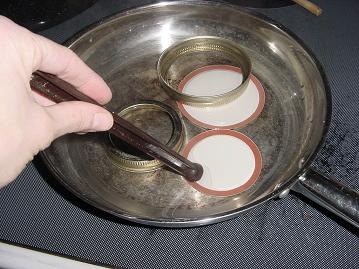
Fill the jar with sliced peaches. Then, use a funnel to pour your honey/water into the jar, to about a half inch from the top. Place a sterilized lid and ring onto the full jar.
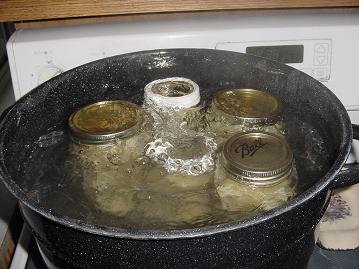
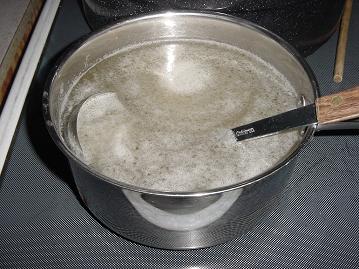
Now it’s time to give your full jars a hot water bath to seal the lids. Put your full jars into the water. Once the water is boiling, boil the jars for about 25 minutes. (And yes, this is actually a picture of applesauce jars boiling…I forgot to take a picture of the peaches boiling and I’m too tired to go can more peaches just so that I can go take a picture of the jars boiling.)
Oh, and boil your jars with the lid on the water bath pot…I just took off the lid for the picture. :)
After the jars have boiled for 25 minutes, take them out with tongs…or better yet, this cool gripping tool made especially for jars and hot water baths. Then you get to listen for the caps to seal. I can’t think of a way to blog the way it sounds…but after all your hard work, it sure is a cool sound to hear them seal! (Thhhhp!) (Or something like that!) You can be sure they sealed if you can push down on the top and it is down firm. It takes anywhere from 1 second to 30 minutes for the lid to seal after you’ve taken it out of the water.
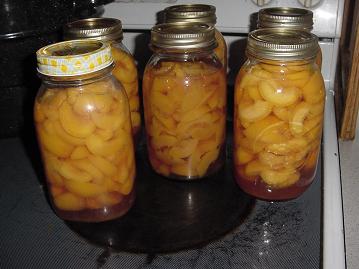
Then, just leave your canned peaches out on the counter for a few hours or several days so that you can admire them and smile and feel happy every time you walk into the kitchen and see them. (Okay, that’s what I like to do anyway.) (Because I’m weird like that.)

looks yummy! i just started canning this summer (only done pickles and jam so far). :)
That’s how I peel my peaches, too! :) (Except, I pop them into a bowl of cold water after taking them out of the hot water.) That’s how I peel tomatoes, too.
Blessings,
Michele
Just a note- When I put up peaches, I peel them, then I take the peach skin and simmer to get the juice out. I then take the juice and make jelly. The jelly is delicious and I feel like I haven’t wasted the skins! One of my ways of trying to be frugal (frugal sounds so much better than cheap- haha) and not waste anything.
Wow, this really works? I LOVE that idea. I’m trying to can peaches tomorrow for the first time and I just might try your jelly idea!
I did that last year…yes, it works. :)
Can you send me instructions for making the jelly? I love the idea on not wasting anything. Do you put water in with the peelings or just the peelings?
Have you ever saved up the peach skins, if you didn’t have enough of them for another recipe? I failed to save the skins from the 8 quarts I canned last weekend, and I found a fantastic recipe for peach honey that takes 6 cups of peach skins (that’s a lot of peaches). I’m wondering if they’ll freeze okay for use once I have enough of them.
My mom recently tried the following technique on peaches, and she says it really works. (I haven’t tried it myself yet):
Let whole, unblemished peaches ripen – dead ripe. (Do not wash first)
2. Arrange whole peaches on a cookie sheet and place in freezer.
3. After peaches have frozen solid; place them in a plastic bag.
4. When you are ready to use, removed the desired number of peaches from the bag, run cold water over frozen peach and slip off the skin.
5. Microwave for 10 to 15 seconds.
6. Slice peaches to use as you desire for cereal toppings, pies or cobbler, ice cream, or simply slice them, add a little sugar if needed and enjoy.
(She got this idea on some online forum, I think.)
Beautiful job Laura!I love Michelle’s idea with the skins. I’ve done that with apple peels and used the cores for juice/cider.
They look so good! Wish they were sitting on my counter for a few days, ‘cept U might not see then anymore thereafter ;-)
Thanks 4 sharing – you made it look so easy!
I kind of do what Joelle’s mom suggests, although I got the idea from my dad, and he wraps them in plastic wrap individually and puts them in a ziploc bag – no need to flash freeze that way, and no peach-cicles. :>) In addition to the things she mentions, I have also run them through the food processor for baby food, so the little one doesn’t miss out.
My friend just went to a produce auction and bought for boxes of peaches for $13. Her kitchen looked very similar to yours! Great idea to freeze some slices, and much cheaper than buying frozen peaches from the store!
Toni
I canned peaches last year but hadn’t thought about freezing them. Maybe next time I will!
BTW, I left an award for you on my blog: http://www.victoriahillfarm/blogspot.com
Yum! I would love to can some peaches…I would love to have someone give me four boxes of peaches…what a blessing. I have frozen them the way you showed so we can use them in smoothies. I wonder if you can do that and then use them for pies?
Thanks! I’ve never done peaches (except for jam and butter)…I’d like to try it this year!
Those look absolutely scrumptious!! :D
Great job Laura! I skipped peeling my peaches for freezing and canning and they turned out just fine. I found you can just slice up the peaches and layer them in one layer in ziploc bags without having to use the parchment paper and cookie sheets. They break apart very easily. Kept it real easy for me!
Loving the 101 sorts of posts!
I have a question for you. I decided on a whim to pick some peaches today. More than my family can eat in a couple days. Unfortunately, I dropped the box on my way to the car and quite a few of them have tears and open flesh. So I started in on the freezing process as soon as I got home (the few minutes of returning phone messages already had them swarming with fruit flies). They aren’t soft yet, being so fresh from the tree. The skins didn’t want to come off of most of the peaches, it was really a struggle, and I remember doing the boiling water thing with my mother-in-law in the past; I’m pretty sure I’m doing it right, especially after reading your post. And when I sliced them to freeze them, they were still very hard in the middle of many of the peaches.
Should I just wait a day or two for them to soften before I continue? Will frozen peaches be any good if they’re only partially ripened when I froze them? And is there anyway I can keep the dratted fruit flies away???
I’m really wondering about using honey when I can my peaches this year. The ratio and if the peaches will turn brown concern me.
If anyone has used honey and can help I would really appreciate it.
In response to keeping the fruit flies away…I always put a few peelings from the peaches into a paper cup, cover it with plastic wrap and secure with a rubber band. Poke a few little holes into the plastic wrap (I use a toothpick) large enough for the flies to get in and the fruit flies will be attracted to the cup, and they go inside, but can’t get out! When you’re done doing peaches just throw the cup away!
have you done anything with persimmons?
I have a question about your stove… it looks like a flat-top? I did some canning as a youngster, but recently I got together with a couple of friends to can some apple butter and apple wedges. The friend who hosted us has been canning for years, and she told me that I can’t can on my flat-top stove because of the pot that you use to process everything (i.e. the big pot for the water bath)… something about it being concave or extending more than 1 inch beyond the “eye” on the stove. But obviously you can, so maybe this hasn’t been a problem for you? :)
(i was looking at regular electric stoves yesterday, but it seems silly to replace my current one for that purpose, lol.)
Thank you for the information. I am new at canning peaches, and my question is can you peel & slice the peaches (adding Fruit Fresh) a couple days before you can? I was thinking of slicing them & putting them in the refrigerator.
Thank you
I dont have very good luck freezing peaches-discolor and soft,any ideas?
Hello and i love the way you explain the canning process. I have canned in the years past but was looking to be certain i hadn’t forgotten anything. Again you are so down to earth in you explanation anyone could learn to cann. Thank you so much. faith
Hello again. Some mistakes in the typing above, suppose i did not proof read duh!!!! I also like the notion of you not having an actual canner pan of which does run about $25.00 and up. Thanks for the idea of using honey also of which i would never have thought of. thanks again
Thank you for sharing about this. I don’t have any canning equipment (minus a big soup pot) but I look forward to freezing things like peaches and strawberries. My pot might be big enough to try a little bit of canning.
Just an idea that’s pretty quick: Place your bits and pieces, or any peaches that doesn’t meet you visual goals, into a carton (milk, cream, etc.) and push down but keep the juice in the carton. Fold over the top and tape or secure with whatever method you prefer. Freeze and when someone is ready for a treat, tear the carton down as far as you need and chop/slice off while frozen. Add cream or other items to make a quick peach ice treat. Any unused portion in the carton can be ziplocked and placed right back in the freezer.
Thanks for the great instructions. I’m going to try this tomorrow!
Do you put any thing on the sliced peaches to keep them from discoloring while freezing or does the freezing preserve their color? My neighbor has a peach orchard and is selling me the culls for little $$. I want to freeze some, can some, and use some for jams, jellies, and preserves. This is an daily activity right now. Every evening I pick up the ones that they did not place in their baskets. Hopefully we will have lots of good peaches to enjoy in the winter.
No, when I freeze them I have found that they retain their color nicely!
Have you ever canned peaches (or other fruit) in a fruit juice solution instead of honey/water?? I have white grape juice. I also have the citric acid (or ascorbic? Don’t remember which). I just picked up 2 pecks of peaches today that need canned and I do NOT want to use sugar. Would like to can in juice ideally. Diluted juice + honey? Ideas? Thanks!
I think it would be fine in juice…I just usually don’t have juice onhand. You probably wouldn’t even need honey if you use the juice…although of course the honey would make them that much sweeter and YUM!
I have a recipe that uses just unsweetened apple juice and the peaches. You do have to treat the peaches to prevent darkening. ..another recipe was for pears in white grape juice….it was just unsweetened white grape juice and nothing else was added. I hope that helps.
I’ve canned peaches w/o any sugar or honey. Just place one pit in your jar, fill with peaches and fill with water. Water bath as normal. The pit keeps the peaches from discoloring. The peaches are not as sweet, but my kids still loved them.
i had’t preserved anything for more than 25 years and was surprised the other day with more than 75lbs. of yummy peaches. so old supplies were searched for and found and i used the honey water to can and loved it. Yahoo, no refined sugar and you just really taste the sweetness of the fruit. about half of the jars contain peaches that i peeled and the other half i didn’t peel. all look wonderful and the one jar that my husband stole away came back with him singing my name and empty. so thank you for reminding me of my old passion. i now have shelves of golden beauty!
I’m glad I found this website. I just decided to can/freeze peaches now that I can buy them by the carton. I have never done the bath before, so I am wondering, does the water have to cover the lids? If I don’t get a response by the time I begin, I will search for the info at another source. But reading all of the ideas was great. My daughter has been raising honey bees for the last couple of years, and she will be delighted that I will use her honey.
Yes, it’s best for the water to cover the lids. Here’s a little more I wrote about canning in a water bath: https://www.heavenlyhomemakers.com/canning-101
Just received a bunch of peaches from Palisade. Used your boiling water, peal and freeze method and it was great! Thanks so much for extending our peach season into the fall and winter. Your devoted fan Judy.
How much honey in how much water do you use?
2 T. honey to every 5 cups of water
I’d like to know what you do with canned peaches? Do you have any
recipes?
Faythe, You can do anything with the canned peaches that you do with fresh. Pies, cobbler, cereal, sundaes or right out of the jar!
We eat them as is…or we add them to cottage cheese!
@ Faythe. One of my favorite recipes for peaches is the following. Get out your large Crockpot. Use two entire quarts of canned peaches only 1/4 cup of the juice* *I cut mine into bite sizes) save the juice for a fruit dip mixed with sour cream or whatever you desire. Dump in one yellow moist cake mix. (I always get ones with butter and pudding in the mix) Add 1/2 cube of butter diced. stir together gently….On the top, add 2 envelopes of instant oatmeal (I always use maple brown sugar) add a few dices of butter….THEN…place a paper towel over the top, do not stir once the oatmeal is on top—This will absorb the steam, and make it crunchy. Turn on the Crockpot, cook on med or high. I have done it both ways. Takes a few hours. Also I add chopped walnuts to mine….I have made this a ton of times. YUMMY stuff !!!!
Laura, just a quick question about lids sealing after the jars have been removed from the hot water bath. Is it normal for some jars, usually the larger jars that I am using, to take up to sometimes 1 to 2 hours later to seal? Should I be concerned about that? Or is it okay, as long as the lids have sealed?
Sometimes that happens…no need for concern.
I pack all my peaches firmly in the jar and put the juice over them, but still as the months go by, the top couple turn brown. I have soaked them in fruit fresh before they went in the jar and the jars are sealed. Why?
Hmm, that’s weird. Does the fruit stay completely covered by the liquid?
to begin with they are but usually one might float up to the top and turn brown. I try and pack as tight as I can with out crushing them.
Someone told me you could use a tablet of vitamin c in every jar. Is this true?
Yes, that would probably be fine!
When doing the water bath does the water need to cover the top of the jar or is it o.k. to boil just below at the place where the ring and jar are closed? I’d like to try canning this year.
It’s best for the water to cover the top of the jar.
Nothing to do with peaches, but do you ever can chicken or beef?
I haven’t done meat as it requires a pressure cooker instead of just a water bath. I’d like to learn to use a pressure cooker, but I haven’t yet taken the plunge.
i have canned chicken and sausage.it takes time but it taste good and is quick for dinner if you forget to take it out the freezer.just place raw chicken in the jar pour bbq sauce or water or broth over the chicken.put in pressure cooker for 1hr 45 mins.
does that cook the chicken inside the jar?
I have canned beef, chicken, and deer. It works great. It does take almost 2 hours but well worth the time. I don’t use bbq sauce, just the normal spices. I add the bbq sauce when I open the jar to eat.
Oh those are BEAUTIFUL! I am searching for a way to use less sugar and this could be it…have you ever used juice to can your fruit?
If you can pears, you can blanch and peel them just like you did your peaches. It is a HUGE timesaver. Happy Canning!
Many years ago (I mean MANY) my mom did not have a canning pot so she used her big soup pot but put a dish towel on the bottom. She thought this would take the place of the rack (which she didn’t have) that keeps the jars off the bottom. She canned for many years using this method. Thanks for all your tips. I’m going to get back to the more economical way than store-bought.
Maybe my peaches are too ripe but they are not as pretty as yours are lol! They did not slice well, very mushy so I canned what I could and will make fruit leather with the rest I guess. Maybe I picked them too ripe?
Has anyone tried the recipe posted by Lizzy? I was wondering how long it took to make? If you freeze peaches with the skin on, does the skin have the same texture later when you use them?
I want to share a delicious fast recipe for peach cobbler using Jiffy buttermilk biscuit mix!Put sweetened peaches in a casserole or oven proof dish.In another bowl put the jiffy mix,one egg,enough milk to make a creamy mixture,and beat slightly,add sweetener of your choice if desired,pour over the peaches and pop into a 400 degree oven for 15 or 20 minutes.Really yummy!
What is processing time for 4 oz jars? I see everything about pint and quart jars, but I want to can diced peaches in 4 oz jars. I’ve gone all organic and have a peach tree and am trying to mimic a cup of diced peaches as you would buy in the store. I only want them in 4 oz jars as that’s the amount I use at one time.
Yummy, this sounds so good! I’d say they probably need the same amount of water bath time as the larger jar, but that’s just a guess. I may steal your idea!
Well, I called my local office/help for canning, etc. We settled on 15 minutes – to do same as the pint/half pint jars. Out of 24, one didn’t seal, so I stuck it in fridge and ate it the next day as a “test” to see if I wanted to do it again, as I knew the next week would be a ton more peaches… Wow, I was amazing and awed that God got me to this… No more Dole or ANY diced peaches will I buy again!! Before my mom passed, she got me used to dumping a small, plastic container of Dole/Publix (whatever brand) diced peaches on my oatmeal as a way to flavor instead of sugar, etc. So, I cried a little last weekend as I made more of the 4oz jars of diced peaches – looking to Heaven and telling her how I wish she could see/taste these…
Do you know the amount of lemon juice to use if you don’t use the asorbic acid/vitamin C? Thanks!
Probably just about 1/4 teaspoon per jar would work!
I’m so grateful I found this site. I don’t know what I was thinking, but I was driving down a country road and suddenly my car was loaded with the most beautiful peaches. (That’s what I told my hubby). I want to freeze them without peeling (I LIKE THE TEXTURE OF THE SKINS IN MY SMOOTHIES), or using sugar. I’ve done the cookie sheet method for other fruits and wanted to be sure I could do it for peaches. Thanks for the info!
Yay! I just got a box of about 22 lbs of peaches for a great deal and am so excited about putting osme of them up :)
Thanks for the tips!!
Hey just wondering I don’t can very often. My mother sent me out some peaches to Hawaii and I want to freeze them using a wet pack. I want to use honey but I don’t know the ration on what it would be. Can someone help me with this.
I had a friend’s mom tell me how to do the water bath method that is lot less work then most of the instructions, & it works beautifully. She’s been canning this way for at least 30 years!
Run your jars, lids, & rings through dishwasher on high heat rinse & dry. Doing this the day before is a good idea so as to speed the process and not heat your kitchen up so much.
Then take a big roasting pan (the light weight, ceramic kind you put a turkey in) & put it over two burners on your stove.
Put hot water in it, about 1/2 full.
Put the jars in upside down. If you’re really ambitious, you can have two of these going, one on each side of the stove, but then you have no space to process the foods unless you are doing them in the oven or on the grill (yes, I did tomatoes on cookies sheets on the grill for spaghetti sauce & it was awesome!!).
Put the lids and rings in a cake pan on another burner with hot water. It makes getting them out a lot easier later if you put the ring in, then the lid, both facing up, then layer them like that. Do this before the water boils so you can stick your fingers in there to arrange them.
I have a 5 burner stove, so I put the roasting pan on one side, the square cake pan with the lids and rings in the center back, and the boiling pan with the fruit in it on the other side.
Turn on the burners. You need to boil the jars for 20 minutes or so to sanitize. Once this set up is done, then go get your fruit or vegetables to process, and the rest of the canning supplies.
Note: The upside down empty jars suck up the water into them and will leave the pan dry & it will burn if you don’t add more water. (Yes, I learned this the hard way). :) And yes, when you put the filled jars back in right side up, you will have to remove water to keep it from overflowing. I usually just ladel it out into the cake pan with the lids & rings, or into another canner once the last batch of food has been processed.
It doesn’t hurt them to let it boil longer than 20 minutes, but you will have to watch the water levels to make sure there is always water in it.
Once your food product is ready, pull the jars out, set right side up on your counter & fill. Put the lids & rings on, hand tighten. Wearing leather welding/gardening gloves keeps your fingers from getting burnt, but don’t get the gloves wet as then you will really burn your fungers with the heat! I usually wear one glove, and use it to tighten, etc., then use the tools with the bare hand.
As you fill up the jars, you will have to remove water. The tops of your jars will NOT be covered in water, the water only goes about 1/2-3/4 of the way up the quart jars, and sits on the edge of the lid on pint jars. Ever had water leak into a jar and then empty the product into & contaminate your water? This will never happen again unless your jar cracks/busts. Having water over the top of the jars is not necessary. She’s done literally thousands of jars this way, and I’ve done hundreds and it is easier. I do let everything go about 5-10 minutes longer than the recommended processing times. (5 on pints, 10 on quarts). I’ve also never had anything go bad this way, and have had with the total immersion method.
Just my 1 cent. Oh, and if you pour the left over boiling water on your kitchen sponges & rags as you’re dumping it out in the sink at the end, it’s a neat & tidy way to sanitize them easily. :)
Does anyone else do it this way?
My neighbor, Home Ec major had a great tip. Put your jars in the oven on 170 degrees to keep the sterilized and hot. I tried it and it worked great.
Poke a tiny hole in the skin first and the water gets in there. Helps the skin come off even easier.
That’s a great idea to poke a hole in the peach!
Do you have to peel the peaches to can them? What happens if you don’t?
Also, has anyone tried steaming them before peeling?
I’ve never canned whole/sliced peaches before and peeling looks like A LOT of work. I don’t peel before freezing, nor for peach butter… :)
Amy H. The method you are describing is not safe. Most of the time the food processed this way would be fine but there is no guarantee that the jars are not contaminated with things like botulism and processing them this way does not heat the contents enough to kill the contaminants. Please be safe and do not take shortcuts with food preservation!
Rachael, not all things are safe processing this way but for peaches it is fine.
Hi Rachel, thanks for the comment. I certainly want to be safe. But I also want to understand – why wouldn’t that heat the contents enough?
Perhaps I am misunderstanding the method but I don’t believe they would be covered by the minimum amount of boiling water to insure that the contents on the inside of the jars were heated enough during the actual canning part of the process. And, as I said in my original comment, most of the time this method would be fine but you only need to be wrong once to get deathly ill.
A great book that explains why Amy’s and a few other methods are unsafe is
‘Putting Food By’ – you can see it here: http://www.amazon.com/Putting-Food-Fifth-Ruth-Hertzberg/dp/0452296226/ref=sr_1_1?s=books&ie=UTF8&qid=1346464031&sr=1-1&keywords=putting+food+by
There is even a Kindle edition now! But, Rachel, you are right. The water
needs to surround and cover the jars by at least an inch (2 is better) and
be kept at a full rolling boil for the entire time. They are even wary of
doing quart jars in a standard water bath (such as pictured above) because
you can’t keep it at a rolling boil without water splashing out, which tends
to cause people to turn down the heat, which is a no-no.
And I completely agree – it only takes one bad jar to get people sick.
I wouldn’t want to be responsible for that!
I canned peaches for the first time this year. Great article!
I canned peaches today for the first time ever! Thank you for the helpful step by step tips. I want to make sure I’m not going to contaminate anyone so here goes- I never heard the “thwarp” sound of the jars sealing. When I checked them, there is no give in the lids, no way to push them down, but I’m nervous since I didn’t hear the sound. Am I ok or are these not safe to eat?
Thanks for your help!
Kim
If the seal is down, then they must have “thwarped” while in the water bath. So, they should be just fine!
Another way to describe the sounds is ‘pinging’ more like a snapping sound as the lid seals. I sure love that sound! I’m getting peaches next week. I’m sure they sealed, if you cannot push down on the lid. Another way to test is to remove the ring (it is best to store without the rings) and gently hold the lid and lift (maybe a half inch) and it should hold, no problem.
It’s best to store without rings, because the rings can retain moisture and cause rust.
We had some fresh peaches and we weren’t able to can them right away. They are peeled, sliced and frozen. Can we thaw them and still make jam? We want to can them and not do a freezer jam.
Thanks…I loved your article!
Yes, this should work just fine!
I canned for the first time this year and loved it! will do again every year now. But I havn’t been able to find anything that tells me how lng the Peaches are good for ONCE you open them? so say we want to just munch on them out of the jar.. how long are they good in the fridge after seal is broken?
I’ve found that they stay good for about 2 weeks in the fridge. :)
can you do the exact same recipe except use pears?
Yep!
Hi I tried the method you used to remove the skin but with Golden Queen peaches here in New Zealand. It didn’t seem to work. I think it’s because the skin is so much thicker than the peaches you have used. Unfortunately I am going to have to continue peeling the old fashioned way!
I can’t believe someone’s not explained the easiest way to peel a peach. Blanch the peaches thusly: cut a small X pattern on the bottom of the peach. Put whole peaches in a pot of boiling water for 30 seconds. Carefully and quickly take move the peaches to a bowl of ice water. After they’ve cooled enough to handle, remove the peaches and the skin practically falls off. You can use this same method to remove tomato skins.
Oops. I see the author already explained how to boil the peaches. Dunk in ice water for better skinning results.
I have a tree that has outdone itself this year and the limbs are starting to break from all the weight. Ive been canning and puting them in the freezer but I dont have any more room, I have a ton of cabnet space and im looking for a safe easy way to can them without having to freeze them. any suggestions?
If you boil your jars (after following the canning directions in this post) for 25 minutes in a hot water bath, that’s the simplest way to can them that I know of. https://www.heavenlyhomemakers.com/canning-101
I just got a box of FRESH peaches and I want to freeze them. By freezing them witht he skin on (30 sec. blanch) then (ice bath)….When slicing them do I need to use lemon juice the keep them from turning brown? I usually put them in a cookie sheet with wax paper and freeze them individually and then put them in a FoodSaver bag. Thank you for such a wonderful article. :D!!!
I never use lemon juice on my peaches and they don’t turn brown as long as I get them into the freezer right away. :)
the easy way to sanitize your jars is in the dishwaher…mind has a sanitize cycle, make sure jars are clean, run the cycle…the use your jars!
Do you have a peach jam recipe using sucanat?
Oops! Forgot to place a check mark to be notified. :)
Not yet…but eventually she might! :)
Yay!
I do! I use Pamona pectin available in some health food stores or online at Amazon. It allows you to make jam with minimal amounts of sugar. I use 3/4 cup sucanat for one batch. All the instructions on in the box making it very easy to follow. This pectin is also an all natural product so no nasty extras in the jam. You can even use honey or no sugar at all the pectin is quite versatile. I love it!
Thanks for sharing your peach canning method – I hope to try it again sometime!
I love canning, just found you after looking up how long to process my peaches in the hot water bath. I laughed when I read the part about the sound of the jars sealing. I practically dance to the music, and my daughter thinks I am crazy! Those jars pinging are so awesome, especially after a long hot day of processing food for winter.
can i just used crushed vitamin c..
I think that should work.
Thanks for all the information: I am 87 years old and my wife passed away a year age without passing on to me how to can or freeze food-stuff. I freeze the peaches on a sheet in the freezer and then bag them but have run out of freezer space so will start canning. I have a pressure canner — any information is welcome.
Great site with lots of info on preserving methods as well as the do’s &
don’t’s of canning.
http://nchfp.uga.edu/how/can2_fruit.html
I have a question. After very carefully making sure all the air out of my sliced peaches, when the jars cooled there seems to be a whole lot of air in the jars. What’s the best way to handle this? Can I reprocess them or just put them in the fridge and eat them quickly?
I’m sure they are probably fine as is. Refrigerate them if you’re worried, but if you were careful to get the air out ahead of time, I think you’re fine!
hi-just joining. get air out of peaches? when putting in the jars then, just press down pretty hard? Because I tried that, & there was no room for the syrup. OK, so pack them in tight, but leave an inch or more to fill with syrup then? Also, I have old rings & lids, from 20 yrs ago. are the lids still good? I remember the thwaaap sound too, or a click/pop. Cool. And yes, don’t want to get sick so I’ll immerse my peaches (I’m doing spiced peaches in vinegar syrup that’s very syrupy & heavy spices. Also did some crabapples & did a cold-pack, just filled the sterilized hot jars w/ the fresh fruit, poured the hot syrup in, put lids on, screwed on caps & they both sealed. Safe you think? I got that recipe from the Canadians: Putting Up With The Turnbulls)
They really should be processed in a boiling water bath (or is this what you meant by ‘immerse’?. Check this site for good instructions on times and adjustments for altitude. http://nchfp.uga.edu/how/can2_fruit.html
Another place to check is with your local county extension office.
If you did not process them in a water bath, the lids on jars will suck down and seem to be sealed just because everything condenses when it cools and pulls the lid down. However, this does not drive the air out of the jar to provide a vacuum environment where bacteria cannot
grow. Neither does it provide the best seal. Even the vinegar won’t help much if by ‘very syrupy’ you mean it has lots of sugar in it. You’d be best to keep them in the
fridge or reheat everything (jars, lids, peaches, syrup) and reprocess with
new lids (flats), if it hasn’t been more than a day. Hope this helps.
Also, as far as getting the air out of the jars, you should take something
plastic (metal will scratch & weaken your jars) and slide it down along the inside of the jar between the jar & your fruit and press against the fruit slightly to get the air bubbles out from
between pieces of fruit.
As for how much head space to use, double check the
instructions at the site I posted above or in a reliable canning manual, but
I believe for water bathing is is 1/2 inch and pressure canning is 1 inch.
As for what looks like air space at the top of the jar: if you don’t leave
enough head room, some of the syrup/juice may be blown out and leave a larger
space at the top, but if it seal properly it is probably just vacuum space.
Double check the seals on those jars after they are completely cooled by
setting the jar in a plastic bowl or tub and picking it up by the edge of
the flat with your fingertips. If it comes off easily or moves at all,
refrigerate the jar(s). Or reprocess as I mentioned above.
So, if I’m understanding correctly, the air bubbles (sorry, I forgot the word “bubbles” in my previous post) are nothing to be concerned about? That is a great relief. Thanks!
Hello, I saw on a comment above that it would be all right to peel, slice and freeze peaches and then thaw them and make and can peach jam with them. My question is: Can you thaw them and then just can them as regular peache slices or will they be too mushy? I’m worried I’ll be crunched for time when I get my lugs and won’t be able to can them right away and don’t want to freeze them long term. Thank you!
If they’ve already been frozen, they would be too mushy if you can them, unfortunately. :)
My mother always used a table knife to get all of the bubbles out. She would run it down the edges of the glass jar. Thanks for the great info. I’m waiting for the August peaches to start canning.
If you boil the Jars and keep steaming hot water in them in hot water like in a boiler or a sink, heat the lids and the if you process the syrup and peaches together – you can just put them in the jars and put on the lids tight and they will seal and keep just fine. if you want the lemon or citrus fresh in there just put it in before you fill the jars. and presto – you are finished and don’t have to muss around with water bath. I tried water bath with tomatoes and they did not seal had to re-do them like described above.
FYI especially to first-time canners: just because a particular method of
‘canning’ causes the jars to seal does not necessarily mean it is a ‘safe’
method to use for canning. Canning is just as much about killing bad
bacteria, etc., as it is about keeping them out.
RJ, can you point us to documentation that proves this method to be safe?
Everything I have read from those sources who have done years of testing say
that these types of shortcut methods are dicey at best.
Again, I will point everyone to a site recommended by many university extension
offices, the National Center for Home Food Preservation: http://nchfp.uga.edu/
as well as a book called ‘Putting Food By’ which can be previewed on Amazon:
http://www.amazon.com/Putting-Food-Fifth-ebook/dp/B0053YNF46/ref=sr_1_1?s=books&ie=UTF8&qid=1375126366&sr=1-1&keywords=putting+food+by
Cheryl R,
I understand that you feel compelled to tell people that they need to follow some sort of University Extension/govt. guideline. However I have tried the water bath method and the jars DID NOT SEAL. So I redid the water bath and still not seal – just wasted two set of lids for about a dozen jars and had to throw some away.
Bottom line is that if you put clean properly heated food into clean hot jars with hot lids and tighten the top – they will seal. So how can the contents be contaminated?
This is not a short cut as you say – it is being expedient.
Water bath canning is a tested, tried and true method for canning low-acid foods.
If you are having a problem with jars consistently not sealing, there must be something
amiss in the processing (i.e., too much/not enough head space; rims not cleaned after
filling jars with food; rings not tightened correctly, etc.).
The method you are describing is called “open-kettle” canning and has been deemed
unsafe by numerous food safety organizations. You can ‘get away’ with it much of
the time with high-acid foods if you have handled everything very cleanly in your
entire canning process. But there is plenty of information out there on how & why
this method is not satisfactory. Please be safe and do your own research.
Cheryl (below) did you mean “hi acid foods?”
Violet,
Yes, I should have typed ‘hi-acid foods.’ Sorry about that. Another reason to not believe everything you read! :)
I made peach juice and I will freeze the rest of the bushel I bought on Thurs/Fri. I really don’t want to peel them, even with the boiling water method (8 months pregnant with 2 under 4yo, oy my ankles!), so I’ll probably just slice, freeze and call it good :)
Thanks for your advice and instructions on this site Laura!
Cheryl R.
You asked for documentation – my family has canned this way for generations and never has there been a problem – of course once in a while a seal will release – but any one with common sense will spot that same as happens with any other method.
Processing fruit in the way I have described is processed until the fruit is semi-transparent or glassy looking. Thought that I should have included that above. Thanks.
I just canned some peaches today and the liquid does not cover the peaches all the way, but the jars are sealed.
Is that ok? If not is there anything I can do to fix it?
Thanks
I would say that if the juice ALMOST covers the fruit, you should be okay. If there is a lot less liquid than fruit, you may want to re-can it.
My mom-in-law always put a couple of pits into each jar to keep the peaches from browning. Works beautifully.
Really enjoy the education. This is first harvest of the peach picking season. My question is concerning preserving partial picks until I have enough accumulated to do a full batch. I was thinking of taking the whole peach as they come off of the tree and storing in 5 gallon pails filled with cold water. How much good or bad might this do?????? Thanks in advance.
Yes, storing them in a bucket of cold water would be fine. Storing them directly in the fridge until you’re ready to use them is a little bit better though.
Laura,,, When I was young ( many years ago ) growing up in Mississippi , I remember my family canning everything
making all kinds of jam’s jelly syrup you name it we made it , this year is the first time I have ever tried to put up anything and it was peaches I live in eastern North Carolina and it will stay HOT till early December , my question is do I need to keep my jams jelly canned peaches in a cool place or will they be ok in a dark dry place ( my garage ) average temperature I guess about out 75 to 80 degrees
Thanks for your Help ******** your recipe worked great
http://www.thesynergycompany.com/v/articles_vitc2.html
This is a website that will show you all the information regarding ascorbic acid and that it is NOT a natural substitute for Vitamin C. It has been a huge misconception for many years (way too long). All the products that are carried in Organic or Natural Health Stores are not always what they seem. It is up to us to do the research. Like any business they are in the business to make money.
I do love what you are doing with your site and enjoy your postings I just felt the need to say something when it came to your one statement. Thanks for all you do. Please check it out and see for yourself.
If I don’t have ascorbic acid and am planning on using lemon juice, how much lemon juice is needed for quarts of peaches and pints? Thanks!
I would just put 1/2-1 teaspoon of lemon juice into each jar. :)
I am going to can my peaches but with three young kids it’s hard to ask do at once. Do you think I chould peel them one day and can them the next? What should I put on them?
Since I posted this tutorial, I’ve learned to skip peeling them and just cut them directly into the jars as-is. If you do prep one day and can the next, I would sprinkle some powdered vitamin C over them, stir them around, and then store in the fridge. The vitamin c will keep them from browning.
Question: Can you freeze peaches to use for canning later? I want to can preach salsa, but can’t take the time now while peaches are in season. I want to freeze Palisade peaches to make the salsa later to can in jars for Christmas gifts.
Once the whole peach thaws, it is pretty mushy and best used in a smoothie or a cobbler. I don’t have confidence it would hold up well in a salsa unfortunately. :)
looks yummy! I’m trying to can peaches for the first time and I just might try your jelly idea! And thanks for sharing – you made it look so easy!