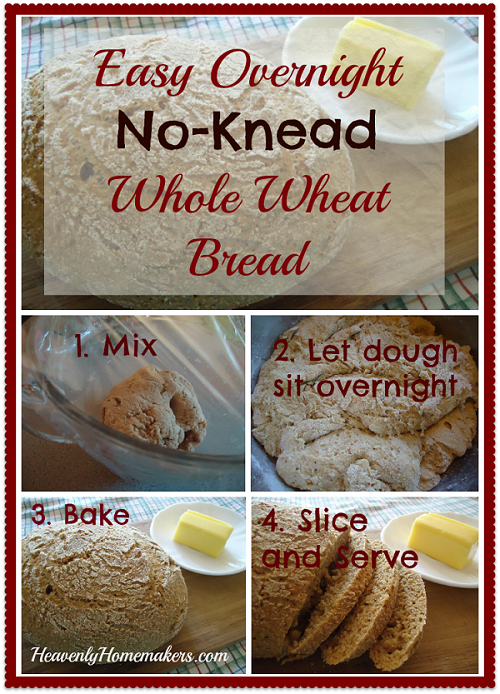
No Knead Bread. Let’s make life easier, shall we?
I love having smart friends.
Smart friends who give me great, easy, healthy recipes are my favorite kind of friends. As are my friends who give me chocolate. Or jars. Or hugs. Or the friends who listen to my constant and sometimes nonsensical chatter. And the ones who put up with my unreasonable freak-out moments of stress. And the ones who pray with me. And the ones who deal with me during soccer season when I can’t finish sentences.
Let me just pause and wipe a tear. I really have the best friends ever…
Well now. (stops to loudly blow nose and gain composure) I really brought all that up to say that one of my great friends, Nikki, shared this recipe with me. She’s one of my smart friends who I believe has done all of the above and then some (God bless her).
Once when I was at her house, she let me try some of the bread she had made that morning. It was great! And then she started telling me how she made it. How you don’t have to knead it. How you start it the night before and how it takes about three minutes to mix up. I think I grabbed her neck, hugged her fiercely, and knocked her over when she handed me the recipe. Not really. I truly can control myself. Usually. But hey, there was a great recipe involved, so no guarantees. See, I told you my friends are great to put up with me.
And now, the easiest bread recipe in the world…
No Knead Yeast Bread
- 3 cups flour (This recipe works a little better with unbleached white flour, but I prefer to use freshly ground hard white wheat so that it is healthier.)
- 1 ¾ teaspoon sea salt
- ½ teaspoon active rise yeast
- 1 ½ cups water
- Stir ingredients together in the evening. (No need to proof the yeast.)
- Cover and allow dough to sit over-night on the counter-top.
- In the morning, dump the dough onto a well floured surface.
- Shape it into a ball.
- Let it sit for 30 minutes.
- Preheat the oven to 450°, heating the baking dish in the oven at the same time.
- Place the dough in the hot baking dish.
- Cover and bake for 30-40 minutes.
Note: You need a covered dish to bake this bread. I found a deep-dish casserole dish with a lid that worked for me, similar to this one. But if I can save up and splurge on this one, would that not be the coolest?
When you mix it and cover it in the evening, it starts out looking like this:

In the morning it will look like this:

After you bake it, it will look like this:

And when you slice it it will look like this:

Once you serve it, it will look like this:
(There’s no picture. The bread is gone. Obviously.)
I highly recommend that you give this recipe a try, and that you consider serving it with this wonderful Calico Beans dish. It’s a wonderful combo!

If I had a dish like that, I would be giving this one a try tonight. It will have to go on my wishlist though.
I’ve tried various diff no-knead bread recipes & I love them all… gotta try this one now, too! :)
That looks easy enough, I may have to give it a try!
Wow…This might be my saving grace of breadmaking…With 5 little ones, 7 and under, I’m having a hard time finding time to make bread…Schooling, Cleaning, Feeding, Washing seems to take precedence over bread making…Can’t wait to try this one!!!! Thanks so much Laura
ahhh….thanks, sweet lady! That’s what friends are for:)
Can’t wait to try this!
My friends are undeserved…so thankful for them.
Can’t wait to try it tomorrow! And yes, friends who share great recipes really are the best!
Oh…I am soo trying this. Thanks for sharing!
Looks like my kind of recipe!
I have never made home made bread. I may just try this. Thanks for showing what the dough will look like through all of its stages!
Wow, that inspires me to make delicious bread for my family!
I’d like to try this–how much water?
Oops, left out the word “cups” didn’t I? Thanks for pointing that out so I could fix it! That would be 1 1/2 cups of water. :)
Laura, Thanks for a wonderfully easy recipe. I actually have the Sassafras covered baker already (the round one but the french loaf pan is calling out to me too). This recipe looks so much easier than the one I have been using with the baker. You always have a way of making life so much easier. Love that! Love to you and your sweet family! & Thanks again! Karen
:)
I can’t wait to try this…although kneading dough is so therapeutic!
This seems very similar to the recipe in a book I just checked out from the library. It is called “My Bread, the revolutionary no-work, no-knead method” by Jim Lahey.
I would like to try this recipe also – I think we are all wondering how much water?– I am assuming that it is 1 1/2 cups. :-) thanks Laura for all that you do to make this site so fun and useful!
Yup, left out that word “cups”. :)
Perfect timing! I’m wide awake (midnight my time), I have a chicken, onions, carrots, & celery cooking in the crock-pot all night so I can prepare a fabulous soup tomorrow, and there is not any reason to mix some up! I am going to try half wheat flour and half white. I’m noticing there is no oil or butter in the recipe – hmmmm.
Sounds so simple I’ll have to give it a try, thanks!
A couple questions. I do not have a covered baking dish. What exactly did you use? Also, I have a question about the water temp and the yeast. Do you need to let the yeast sit in warm water first before putting it in the refrigerator? I
I used a glass casserole dish similar to this: http://www.amazon.com/gp/product/B0000CF3UW?ie=UTF8&camp=1789&creativeASIN=B0000CF3UW&linkCode=xm2&tag=wwwheavenlyho-20.
All you do is mix the ingredients, no yeast proofing needed. And just leave the dough on the countertop all night, you don’t need to refrigerate!
Thanks! Can’t wait to try this. Do you ever cook with vital wheat gluten?
Do you leave it sitting on the counter or put it in the frig?
Counter is best for this recipe. :)
Love my friends, and I think I’d love this bread!
I love my friends!
looks really good.
I’m blessed to have great friends
This looks great. I have recipes similar to this that I cook in my big cast iron pot and lid. It works perfectly and gives it a perfect round base.
Similar to a recipe I use from “Artisan Bread In 5 Minutes a Day”
If you liked this, there is a book called “artisan bread in five minutes a day” that I can’t recommend enough. No covered dish required. (if you need to borrow it, we have a copy)
One question – do you proof the yeast before mixing the flour and salt in?
Nope, just mix the ingredients together and that’s it. :)
Love homemade bread. Used to make all of ours. Unfortunately we have wheat intollerances at our house. May have to experiment with some other flours.
Speaking of friends…I have a great one that got me hooked on your blog several years ago!
Artisan bread in 5 minutes a day has a gluten free book too! : )
I sent this post to at least 5 friends that I think would enjoy having the opportunity to make healthy bread easier. Thanks!!
Oh wow!! This looks fabulous!! Thanks!!!
We just moved, and I’m really missing my friends! It’s not been easy to make friends here, for any of my family, but I know God will provide friendships for all of us in time. Thanks for sharing the recipe!
Just prayed for the Lord to bless you with a good church and friends. Have a beautiful day! He is there for you and loves you all so much!
Thank you for stopping to pray for my family, that was very sweet of you!
Looks like Artisan Bread in 5 Minutes a Day to me!
Do you suppose instead of getting one loaf, you could divide it into “rolls” (maybe to be used as the bowl for some stew or chili) and bake the same “sort of” way?
What do you think the baking time would be?
Just thinking….with it cooling off….it would be nice to have a fast and easy roll too. : )
I’m really not sure – I would imagine that it would work, but I’d have to experiment with it before I could give you baking time and etc. Good idea!
I just made some sprouted wheat flour. I am so trying this tonight. Thanks!
Wow….I can’t wait to try this bread….thanks for the recipe
Do you need to grease the pan or anything? I’m excited to try this! I’m guessing I can put it together now (in the morning), and then bake it up at night…that wouldn’t really be different than the reverse…
This sounds like a very good & healthy recipe. Thanks, I’m anxious to try it.
That sounds wonderful! I think I’ll start some tonight so we can have it with dinner tomorrow!
What a great friend! I’m going to try this recipe this weekend with a nice, big pot of soup.
Looks delicious. I am gluten free these days, so, none for me…..but the family would probably love this! Thanks for sharing.
Do you think I could add a couple of Tablespoons of apple cider vinegar to the water ? To reduce the phytic acid in the wheat. Or do you think the apple cider vinegar would affect the rising of the yeast? Thanks!
Love this recipe. Have made it lots in the winter with hearty soups or bean dishes. Yummy!!!!
I have made this many times. So easy! I’ve made it in my stainless steel cookware that is ovenproof and has lids. I’ve also made it in a loaf pan, using another loaf pan as a lid–this way, it cuts easily for sandwiches. I have also added things to the dough (add at the initial mixing)like red pepper, garlic or onion powder, cheeses, rosemary, nuts, and cinnamon. This recipe/technique is so easy and so inexpensive that it is okay to play around with to find new ways to use it. It may seem pricey at first to buy a whole jar of the yeast, but it lasts for many, many, many loaves of bread.
Mary Beth:
Do you just add chunks of cheese in the AM and then bake it? Sounds delicious!
I just add a handful when I first mix the dough.
Can’t wait to try this!
def. trying this one!
Thanks so much for this easy recipe!! I found a Nutrimill at our Community Wide Rummage Sale last week for only $30! Can you believe it? $30! And to think I was saving up to buy one for $260. I can’t wait to grind my own wheat with it and try this recipe. :)
Can’t wait to try this after I find a covered dish to bake it in! :) Thanks.
I can’t wait to give this a try.
looks so good. i have recently stopped making bread since i just has a baby, #5, all uner 10, but this is something i could fit in. craving some homemade bread now :)
can’t wait to try this bread recipe. Looks easy and delicious.
This sounds wonderful, especially with some of the add-ins that Mary Beth suggests! One question…do you greased the covered baker that you bake it in? Usually if a recipe does not say to cook in greased baker then I don’t, but just thought I would check. Thanks for so many great, healthy, EASY ideas, Laura! I appreciate your blog so much!
I actually don’t mind kneeding, that’s why kitchen-aid invented the dough hook. However, with carting kids back and forth to school, preschool, activities, etc. I find that I am often not home long enough for making bread that needs multiple rises. I super excited that this bread can be mixed up the night before when kiddos are in bed and baked off in the morning. Cant wait to try a slice with a hearty fall soup.
When my youngest child was born and spent weeks in the hospital, one very special friend went shopping and bought us oodles of groceries, spoiling my older kids tremendously!
That looks delicious!
I made your Calico Beans last night and they were a big hit. Wouldn’t this bread be yummy with the beans?????
CANNOT wait to try this. I tried your whole wheat bread recipe the OTHER way and it took waaaay too long. Not your fault, I’m just inexperienced. Sooo looking forward to trying this! Yay! Thanks!
Love No Kneed bread! We keep a tub in the fridge to make a loaf when we are craving it. Just form, allow to double and the bake on a stone. We tried the cast iron covered pot and that works nice too but the stone gives it a nice European style crunch. Also there are 2 “Bread in 5 minutes” books we use too. Check them out! Great pictures too Laura!!!
Can’t wait to try this bread recipe! Have to get a a dish first.
That’s about as neat as sliced bread haha! I do have some wonderful friends! My best friend being my husband tee hee
I am going to make this tonight
That looks good. I think I would mix it in the morning, so I could bake right before dinner. My entire family likes homemade bread, so I would like to get better about it. This would be a good start, I think.
Just wondering – do you really have to punch it down and reshape it? Seems like you could just heat the oven and bake as is the next morning and it would be even lighter???
You could sure try it and see how it goes!
My family loves homemade bread. Can’t wait to try this!
I love this idea as my family loves warm homemade bread! Especially in the morning! Thank you for your website–I am thoroughly enjoying it!
My husband loves this bread! We’ve been making it for a few months and it is such a time and money saver! I usually double the recipe so it makes a bigger batch. It amazes me how simple it is! Glad to see you like it! :)
This sounds like the “casserole bread” that my Mom used to make. I’m sure she didn’t let it sit overnight though, maybe a little while on the counter? Looked just like yours and tasted like heaven.
Thank you so much for this! It’s exactly what I need right now. With 5 big kids and a newborn to boot, I’ve not been able to bake bread like I used to or would like to. I found the Sassafras oblong stone baker on ebay brand new for $39.99 with free shipping! I can’t wait to have fresh, healthy bread again!!
Jesus, the friend who is always there!
John 3:16 For God so loved the world, that He gave His only begotten Son, that whosoever believeth in Him should not perish, but have everlasting life.
I have to try this! Thanks for the post.
AWESOME. Except I’m going to call it “Gone for the Workday Bread” :) Mix it in the morning, bake it at dinnertime! (And give family the illusion that I am, in fact, Super Woman. This recipe rocks.)
I cannot wait to try this bread! And since the majority of my friends call me for the recipes I will look like I worked really hard to find this how fun!! thanks
for us working moms, think this would work by mixing in the morning leaving sit all day (say from 7am-5 pm) then and baking in time for dinner at 6? Seems like the time for raising might a be a little shorter?
Yes, I think that would work great!
A friend finds time to sit with my dd and me after a medical procedure and even brought us a meal for that evening so that my dh wouldn’t have to cook.
Do you know why it has to be covered?
No, that’s just what my friend told me when she game me the recipe. :)
Sounds divine! Something I must try. My husband wants me to try something not using the bread machine.
Yummy can’t wait fir the morning for fresh bread.
Thanks for a simplified version of this! I’ve seen this recipe and everyone makes it sound ‘so easy’ and yet kind of complicated! This I know will be easy and that you’ve done it with fresh ground wheat like we use too!
Thanks!
Heather
I am going to try making this soon! I just love the recipes I find here, thanks so much Laura!
Would a 3 qt. baking dish be enough or too much to bake it in?
Thanks!
One of my friends brought a meal for our family BEFORE and AFTER our 3rd baby was born this summer. She knew I was feeling extra tired and one night decided to bless me with supper. It was so nice.
This is awesome! I can’t wait to try it. It reminds me of Cottage Bread that my mother made when I was a kid. Thanks Laura!
I have a dear friend who prays for me daily. She keeps a list of prayer requests close by so she can refer to all of our needs.
This sounds great. I’ve been wanting to make my own bread but have been a little nervous about how it would turn out. Thanks
This looks yummy. And easy. Thanks for sharing. I think this would be good with the Tomato soup I made from your recipe, last week! Only wish I had more tomatoes to make more. Keep the easy tips coming!!!!!
I’ve done this before, but never with a covered dish. I will have to try it this way.
Can’t wait to try this! We love having fresh baked bread.
can’t wait to try this. hopefully i’ll remember to start it tonight.
I have a similar recipe, but this one looks even easier! Thanks for sharing!
I’ve made bread similar to this before. I don’t even bother to knead the dough. I just mix it all up, cover it, and put it in the oven overnight (with the heat off). Then in the morning I take it out, and put my dutch oven in and turn the oven on. When the dutch oven is hot, I dump in the dough and bake it!
What size of a dutch oven do you have? Mine is pretty large and I’m wondering if it might be too big.
I wonder what would happen if I just baked it in a loaf pan without a cover. I have made no-knead cinnamon bread before, and I do it in a loaf pan. I just brush the top with water before baking to help it steam some. hmmm…
This is the recipe I use
http://budgetbytes.blogspot.com/2011/01/cinnamon-raisin-bread-124-recipe-10.html
Definitely going to try this! I hate kneading, and my stand mixer gave up the ghost on me!
Well now that my two favorite blogs have shared the recipe from this site…
http://simplysogood.blogspot.ca/2010/03/crusty-bread.html
I’m certainly going to have to try it! And I have the glass Pyrex type dish, so I will be testing that one out.
Thanks for the double confirmation, Laura!
I also added a third of a cup of honey, and cooked it at 375, rather than 450 and it turned out beautifully! I made two small loaves so I could use them as bread bowls for soup tonight. The texture and taste is exceptional! Thanks for the recipe! (I made a comment above so this is not my entry, I just wanted to share with everyone the changes I made). I also live in high altitude and added 3/4 cups more flour.
I wonder if you could use a bean pot? Time to dust it off & find out!
This recipe sounds similar to the bread you mix up and keep in the refrigerator and pull off what you need for drop rolls.
My dad often would mix up dough in the AM and put it into a gallon zip lock bag and keep it in the refrigerator until he would make rolls or pizza. Keeping it in the refrigerator just makes the rising go more slowly.
This looks great! I will have to try this. Thanks for sharing.
Sounds wonderful – time to go see if the cast iron camping pot can be found.
I cannot wait to try this!!! Thank you for sharing – how awesome!
Great recipe–I will have to try it. My friend always seems to sense when I need to talk and calls me.
I can’t wait to try this!Mahalo!
This bread is amazing. You can also add all kinds of add ins. I have a fabulous friend and she loves grainy bread. So when I make it for her I add oats sunflower seeds flax seeds and some spelt flour! She loved it. Tasted like we picked it up from a fancy bakery. I have figured out I can fit a glass Pyrex casserole and a cast iron one in the oven at the same time so I always bake 2 at a time! I have had this bread with white chocolate chips and craisins! It is very versatile! Glad you found this recipe.
This looks wonderful. Would love to make it and share with a busy friend.
This will be great for those days I do not have 2 days to wait on my sourdough or we are out and need a yummy loaf!! Thank you
I can’t wait to try this. It looks wonderful!
Looks great..I am Gluten free and wondering if this would work with GF flours.
If you try it, be sure to come back and let us know!
Very interesting…. I’m going to try it, once I locate a proper dish.
Did you need to add more than 3 cups when you used freshly ground flour? Mine first loaf is on the counter waiting for me in the morning! I am so excited!
I use freshly ground and stick with the three cups no problem.
I’ve been wanting to try this method (cooking inside a covered pot, but didn’t know if the crust gets hard or is softer? I don’t like a really hard crust on my bread. I would love to hear your feedback about this.
Thank you,
Lisa (SAHM to 8 yo dd, 7 yo ds, 3 yo ds)
It is a pretty “crusty crust” – harder than I prefer, although still really delicous!
If you wrap it in plastic wrap for a day or so it will soften up the crust.
I love finding easy bread recipes…and I have some of the best friends ever. One of my friends and I both read your blog, and when we get together we talk about all of the things we have been trying that we read here!
I am going to give this a try!
I’m also curious if it will work with a gluten free flour.
What is active rise yeast? Sorry for the nubile question. I use a Breadmaker and have only used fast rising yeast.
I believe those yeasts are the same and can be used interchangably. :)
This looks so easy!! I am a working outside of the home mom, and this would be great for any day. Even if I have to work that day!!
ok i’ll try the bread you sayed 3 flour well i put 1 1/2 cups white flour 1 1/2 wheat flour you sayed 1 1/2 water well had to put 2 cups water it raised up fine over night about 10 hrs ecry thing from there turned just fine raised up the 2ed time the heat was to high i backed down to 350.o for 40 min well it worked out just fine yummmm honeybutter yummm
Could you add seeds to this? I would love to add sunflower and pumpkin seeds and maybe sesame seeds for extra texture but worry it would affect the rising process!
Yes, I think you can add most anything to this!
going to try this today!!
Can’t wait to try this recipe! So easy and we love bread.
Made this last night and am wondering how big the covered dish needs to be to bake this?? I assume a casserole dish would work.
A 2 or 3 quart dish will work fine.
I can’t wait to try this!! PRobably tonight! I would love to have the aroma of fresh baked bread to wake my family in the morning, ready for them to grab as they head out to various directions this busy Sat. Thanks for the recipe!!
I’m kind of clueless when it comes to yeast…is active DRY yeast the same thing as active RISE yeast?
I believe they can be used interchangably. :)
Sounds easy enough-love the smell, and taste of fresh baked bread!
Yay I will try this!
Will be trying this very soon! One question: so there is no honey or sugar in the recipe? I’ve never seen a bread recipe without a sweetener (for the yeast). If we don’t need it, great! :) Thank you!
Right, I thought that was weird too when my friend gave me the recipe! It works without it though. :)
I always either soak my grains or use sourdough (my youngest has dental issues) but really want to try this recipe…do you think I could reduce the water and add some ACV? Any idea how much? Thanks so much for the recipe!
I think it should work, but not sure on the measurements. :)
Perhaps trying this recipe using sprouted flour? It’s fairly easy to make on your own :)
Unfortunately, from what I’ve read I can’t make my own…I don’t have a way to dry the soaked wheat at the correct temperature…:(
Did you try the bread with soaked grains? I would like to try that too. If you have any tips let me know. Thanks!
Thanks for sharing!
Looks fantastic! And I LOVE the bowl you would like to get – just might have to save up and splurge on that one myself!
I had seen recipes like this, but they were always made with white flour. I didn’t know you could do it with whole wheat! Great!
Would it work to cover my dish with aluminum foil if I don’t have a covered casserole dish?
I can’t wait to make this! Having it ready to pop in the oven in the morning!!! LOVE THAT!
This is a smaller version of the Artisan Bread in 5 Minutes a Day recipe. That version will make 3 one pound loaves that you can make all at once or keep the dough in the refrigerator for up to two weeks (more sour doughish at the two week point). My family LOVES that bread. So glad that cold weather is coming so I can start making bread again.
laura-
I prepared my dough last night and just finished baking this afternoon. It worked just like you said , i have always had a fear of using yeast the whole kneading and proofing etc. but this was super easy and my family loved it!! thanks I will be making this again and again!!
My friend Lisa has shared with me so many of our super healthy recipes… I love it and I love her!!
Made this last night, and the kids and I had it for breakfast, WOW so yummy! I had to make another for Daddy to try because there wasn’t even a crumb left!! He loved it too!! I’m so excited it’s so easy to make and everyone likes it!! Thanks for sharing
I can’t wait to try this. I have some wonderful friends as well. Some of them turned me on to making my own bread and grinding my wheat. That got me started on this fun ride to switch to no processed foods.
I can’t wait to try this. I have some wonderful friends as well. Some of them turned me on to making my own bread and grinding my wheat. That got me started on this fun ride to switch to no processed foods.
Can’t wait to try this. Love having friends that challenge me.
I just want to caution you…it wasn’t clear from your post visually, but if you are cooking in a Pyrex-type bowl, Pyrex strongly cautions against not putting one of their glass items into an oven that is not fully preheated, as well as NOT putting something cold into a hot container. http://www.pyrexware.com/index.asp?pageId=32 The dramatic temperature change can cause the glass to shatter and I would hate to see you or anyone else hurt. Most recipes that I have seen that use this style of bread-making call for a cast iron or ceramic-coated (similar to Le Cruset) style of Dutch Oven, which allows the bake ware to be preheated in the oven before adding the much cooler bread dough.
As for the recipe, I think I just might give it a try this weekend. I have made Jim LaHey’s No-Knead bread before, but this one seems even simpler. Thanks for sharing!
So you cover the bread while baking or only cover it overnight?
I think you cover the bread while it is baking too. I just made a loaf this morning and covered it in the oven. It was so amazing how easy it was and how yummy too!! Love it!
Do you have to use seasalt? My husband is on a low iodine diet for the next few weeks and cant have seasalt.
You can leave out the salt if you need to.
Sounds too good to be true…so easy, I can’t wait to try it. Actually going to have my daughter do it (she’s the first one up in the morning :)
Yummy! This looks like my kind of recipe!
I think you just handed me a recipe I’m not afraid to try. I’m not good with bread products. I ruined pizza dough. Seriously. So I’m pinning this for when the weather cools down just a wee bit more so that i can make it.
Ok. I have that exact covered baker and have yet to use it. I’m curious if this recipe will fill it full. I am going to try. Maybe double it.
Looks simple and absolutely delicious! We’ll have to try it! Loved the first commenter’s suggestion about white choc chips and craisins!
I am soooo trying this recipe!!! Thank you for sharing! I can’t make bread or anything involving yeast to save my life. I just can’t knead correctly I guess. I even watched your youtube video Laura where you show how to knead bread…yeah, didn’t work for me. I think I need someone in my kitchen teaching me!
This sounds so easy!!! I’ll have to try it!
I cannot figure out how the science works on this bread since there is no sugar! I am anxious to try it though!
SO trying this tonight! :oD
This is very similar to a recipe for English Muffin Bread that Crystal Paine posted on her blog, MoneySavingMom.com. I have used it a few times, it is very easy, and my family really enjoyed it. That recipe does use a bit of sweetener though, so I am eager to give this one a try. This is perfect for those busy times when doing a yeast recipe seems just too big. Thanks for sharing.
I’ve seen this recipe many times but have never tried it because although it is no knead it seemed complicated. Also, I only ise freshly ground hard white so I was concerned thst would be an issue. Thanks for testing it out and simplifying the directions enough to actually make me do it. I have my first batch on the counter right now :)
I can’t wait to try this!!
Baked my first loaf this morning – it is AMAZING!!!!!!!!! This will be a new regular in our house!! Thanks, Laura!!!
One question: I wasn’t sure if I was supposed to grease the dish before baking, so I went ahead and did it – but do I need to?
I don’t typically grease mine, but it won’t hurt if you do!
What will happen if you don’t use a lid?
The bread would not cook through and through. :)
I greased mine.
I made my first loaf today and I love how super easy it is! Question, when I take it out of the oven should I cool it on a rack? Also, when I put it on the floured surface this morning, before I baked it, I was afraid of overworking it trying to get it into a ball..I tried getting it into a ball shape and then it would just kinda spread out from there…hope that makes sense, so it didn’t stay in a ball shape. I’m wondering if I should have mixed it more the night before….?
When I took mine out of the oven I did put it on a cooling rack. I also rubbed butter on it to soften the crust. I did not work mine much. I split it in two, put it on the floured surface, rolled it a few times, then put them in their baking dishes. This way they were the perfect zsize for bread bowls for soup. If yours did not stay in the ball you needed to add more flour.
Thank you so much, I will try with more flour next time! It was a big hit here! The flavor is wonderful and with the process being so easy I could see myself making it a couple times a week! Thanks for sharing.
I don’t think you need to change anything about the mixing. It is just kinda funny to shape into a ball when it really just wants to flop around. :) Just work very lightly on the counter (about 20 seconds) then let it take on the shape of your baking pan. I don’t cool mine on a wire rack – I typically just put it on the stovetop, but you sure can put it on a wire rack if you want.
I have a friend that is so great she GAVE me a grinder to grind my grain!
My first loaf is in the oven, but I’m a little concerned it won’t turn out… the 30 minute “Resting” on the counter didn’t make the dough rise at all. I’ve never had bread rise more in the oven and I’m thinking this is going to come out like a dense brick :( I’ll let you know, but is it supposed to do a full rise again after you shape it?
No, it doesn’t rise much after you shape it, but I try not to over work it when I’m shaping it so it keeps some of its “puff”. Mine usually comes out more dense than a regular loaf of bread. Hope yours turned out okay!
Well, it didn’t rise much, like you said, but it was still very nice! I have the sassafras oblong baker so it made a nice “french bread” looking loaf, although kind of short. The bread is nice and chewy, like a sourdough. Thanks so much for sharing this! With regular bread rising time I could never have fresh baked bread for breakfast, but with this method, I could have it every morning!
This looks amazing…gonna try it this week!
Guess I’ll be making this tonight.
Turned out pretty good….a little “chewy”, but good.
thanks for the recipe looking forward to making it
I am sorry to ask this question that it may be obvious to everybody. But I am not sure if I am understanding this correctly. When you say to put the dough in the hot baking dish and cover. Do you mean the same baking dish used for he overnight? Or it could be any other baking container or sheet? Thank you in advance, for any imput.
You can use any baking dish as long as it has a lid!
Thanks you!
Thanks for this great recipe! We tried this morning and everybody loved it, especially my husband and asked me to make it again. So simple, a few ingredients and even my kids can help. Thanks a lot Laura, you really inspire me!
My own personal tastes….I don’t love the bread. It’s a bit too chewy for me and the crust is quite crisp. I like my bread a bit softer on the outside. I think this would be great for bread bowls or for sopping something or another, but not for just eating (for our fam anyway:)
I was wondering how long this bread needs to sit before its baked? I am asking because I want to bake it and eat it hot for dinner. So, could I make it early morning so that I can bake it right before dinner? And if so, how early would I need to mix I t if we wanted to eat it at 6:00 pm? Thanks for the help?
Yes, you can definitely do this in the morning and have it ready for dinner. If you start it around 8ish you’ll be good to go!
Thanks for replying. We are really enjoying this bread. Probably a little too much. ;)
What do you think if I let it rise even longer? Would it be too long? Like if I mix it at night for dinner the next day?
I have a similar recipe. It says you can leave it on the counter
10-12 hours. After that you can put it in the fridge for up to 7 days.
Remove from the fridge about 1 hour before you bake.
I look forward to making this bread that can stay in the fridge for up to 7 days
I agree. I think leaving it to rise longer will be just fine.
Has anyone tried this with instant yeast? It’s all I have right now. I’m going to give it a try and will post back with an update! Excited for fresh bread for breakfast! :)
Do you have an easy recipe similar to this for a cinnimon raisin bread?
No I don’t, but I bet you could adapt this one to make it into cinnamon raisin!
Has anyone broke any dishes making this? I did small loaf in spelt and 1 regular loaf in wheat and white. When I took the spelt loaf out and set the small casserole dish on top of the stove it shattered. Maybe my kitchen was too cool or maybe the glass wasn’t tempered enough. Anyways the bread was great :)
sorry about your dish! i am curious if you adjusted the recipe at all w/ your spelt loaf; spelt is my flour of choice, although i haven’t used it a lot yet, but i know substituting it doesn’t always work really well.
I may have added a little extra spelt flour but usually I just sub it 1 for 1. Also I have learned with spelt that its good to add the reccommended amount of flour and let the mixture sit for about 15 minutes to let the liquid absorb the flour.
ok, thanks for the tip & info!
Can you use regular loaf pans or do you have to use a baking dish that has a lid?
This does require a lid – weird for a bread, huh?! :)
It’s because the lid captures the moisture and lets the bread steam and bake at the same time.
It’s what gives it the nice texture. :)
I baked this in the normal aluminum pans and it turned out great. I added abt 1/2 tbsp of butter to the dough and it was very moist. Also, i didn’t use a cover while baking.
Thank you for sharing this recipe! I gave it a try and improvised lid onto a dish. I had my doubts that it would turn out well but when it was done it looked beautiful and artisan and tasted lovely. Thank you for sharing.
My family loves this bread, and we, especially, like it with this infused olive oil that I thought I needed to share. It is a healthier alternative to butter.
Infused Olive Oil
1-2 cups (this depends on how spicy you like it) organic extra virgin olive oil
1 tsp freshly ground pepper
1 Tbsp chopped fresh basil (or 1 tsp dried)
1 Tbsp of fresh rosemary (or 1 tsp dried)
1/2 tsp real salt or sea salt
1 pinch of crushed red pepper (or more to your liking)
1 clove fresh garlic, minced
(Optional: freshly grated Parmesan cheese)
In quart-size mason jar mix all ingredients; shake well; allow it to “infuse” for about an hour before serving. Use as dipping sauce for bread. You will need to refrigerate if using cheese.
Homemade infused oils can allow development of botulism; garlic and herbs naturally have botulism on them. Use infused oil within a day or so of making. Refrigeration and/or salt do NOT retard the development of botulism. The FDA says only commercially made infused oils are to be trusted, because it is so difficult to everything right and ensure botulism does not develop. There’s a lot of easily available info. on the internet about this; for example, see http://theolivepress.com/news-blog/be-aware-of-the-risks-of-botulism-with-homemade-garlic-infused-oil
Acids can retard botulism, but since acids & oil won’t easily mix together, that won’t help with homemade infused oils. (You add acid when canning tomatoes because today’s tomatoes are less acidic than in the past. “Doctoring” safe recipes for things like salsa can end up decreasing the required acid, and you end up risking development of botulism.
I totally forgot to put this bread in the oven this morning. I wonder what it’ll be like after sitting out for 24 hours!
I’ve been wanting to make this for months, but I don’t have a covered dish. Tonight I was determined I would find a way, and I am going to try it in a Pyrex mixing bowl (oven safe according to their website), improvising with a Pyrex pie dish for a lid. Wish me luck! :P
I have always made mine in a pyrex covered casserole dish. It works great!
Have you cooked this in Cast Iron? I have done many sourdough loaves this way and they always turned out great. TIA
I haven’t, but I would imagine that would work great. Thanks for the idea!
Wanted to tell you I ended up going for it the other day! It turned out beautiful in the Cast Iron. I used a deep one and a smaller one for a lid. Greased it in a little lard and sprinkled cornmeal on the bottom. I did take it out once and tap on the bottom and decided it was not done enough and put it back in for a few mins. but it turned out great!
I am sorry one more question what is the temp. of the water need to be?I just noticed that.
It needs to be warm, but not so hot that you can’t poke your finger in comfortably to test it. :)
Wish I would have known the water needed to be warm when I mixed my dough. Recipe didn’t say warm water so I took it at face value. Hope that won’t make it flop. Also I only had instant yeast so am hoping that will be ok as well
Hi, this looks great! I was wondering if I could add some dried herbs to the dough? Thank you.
I don’t see why that wouldn’t work!
I had to add almost a cup more flour because it wasn’t holding a shape….I used fresh ground white wheat….any reason this may have happened? Thanks!
Mine never holds a shape either. It still works and makes a really tasty loaf.
I just came across your site and this recipe sounds divine! Since I dont own an ovenproof dish,do u think this would work in a disposable aluminum deep pan with a cover?
I’ve never tried it that way so can’t say for sure. But I would imagine it would work. :)
Thank you for responding. I will definitely let you know how it came out once I try it!
I made this bread and it was very dense in the middle. So I baked it for another 15 min. It didn’t improve on the texture. I did not warm the water before pouring it into the flour mixture, because it wasn’t stated in the recipe. I also used sprouted white wheat flour. Could that have been the reason my bread didn’t turn out? Thanks. Maybe I’ll try it again.
Perfect for the lazy mom! Thanks :)
I’m sure you meant to say busy mom…
cause mom and lazy are two words that just don’t go together! :D
I don’t think ANY mom that provides a fresh loaf of bread on the table is lazy!!!!
this looks amazing! i can’t wait to make it! i currently am making our bread (6 loaves) & freeze the extra, which keeps us in bread for a few wks. however, during busier seasons w/ farming, sometimes i cave & buy bread (gasp!) due to lack of time. that’s not happening anytime soon now! =) thanks for making my day…literally!
I bake this in a loaf pan and cover loosely with foil. It creates the same effect as a lid and gives a better shape for sandwiches. I also store it wrapped in plastic wrap or in a baggie while it is still a little warm to help soften the crust just enough for easier slicing.
You can also substitute the plain water with water you have boiled potatoes in for a potato bread. Tastes very good as well.
has anyone ever tried to sub some buttermilk for water to soak the grains?
Not sure what I did wrong but this came out super dense and heavy. Minimal handling, fresh, just opened yeast. After 50 minutes @ 450, it was still wet/shiny on the top. Another loaf bites the dust.
All I can think of is that maybe your water was too hot and killed the yeast? Super bummer that it didn’t work!!
I used a thermometer and the water was 104.3?
I’ve been trying to make bread for years and they always come out like this! I can make your one hour rolls, though, apparently. That’s something at least! Lol
Glad the rolls turn out well! 104 should be fine – not sure what’s going on!
Very nice! If my husband hadn’t taken it out when the timer went off at 30 minutes, the center would be as fluffy as the rest of it. The taste and texture are amazing. Thanks for sharing!
Our family loves this bread! It also makes the most amazing pizza dough.
Thanks for sharing the recipe.
Made it last night at around 11:30PM
Baked this this morning around 9
Baked up perfectly.
I used the kitchen aid mixer and my dough was pretty wet and airy. and put a tsp of olive oil in before dropping the dough. I was worried that it would stick. Just seemed counterintuitive to not grease the pan but I am sure it would likely have worked just as well without it.
I used my LeCruset Dutch oven
So I was worried but, it cooked up perfect!
Kids ate with cream cheese and me with real butter!
Thanks for sharing. Nothing like a good recipe that turns out just right the very first time!
God bless.
I just made it and it wasn’t bad. I probably worked it too much as it was somewhat dense. I want to mention that I have never made bread! I’m in the middle of reading Michael Pollan’s “Cooked” -chapter 3 (“Air”) talks all about bread, and the info. on commercial baking was enough to get me surfing the internet. I’m really interested in doing sour dough (which is a better approach if you want various nutrients to remain in the bread or become accessible).
I don’t have a grain mill but thought I’d go in baby steps and when I came across this recipe, it seemed the place to start. I used Bob’s Red Mill Whole Wheat – it came out fine, although other kinds of wheat (especially if you have a grain mill) probably would be better. I’ll be trying again!
I summarized the comments at the bottom of the document I made for this recipe (I overworked the dough because I hadn’t read the comment!). I thought I’d share:
Water should be warm but not hot (don’t want to kill yeast)
Covered dish size should be at least 2 quarts
Can grease the baking dish but don’t have to
Doesn’t rise much in the 30 min resting period
Don’t overwork it when you’re shaping it – you want it to keep the air that it has in the dough. 20 sec of working.
Can substitute spelt flour 1 to 1. With spelt, add the recommended amount of flour & let the mixture site for 15 min to let the liquid absorb the flour.
Can use regular loaf pans (2); can tent loosely with aluminum foil (but others have reported success without cover)
Good for pizza dough
If possible, could you explain how you soak spelt flour for this recipe? Do you mix the (warm) water + spelt flour for the recipe together with 1.5 T acid (buttermilk/whey/plain (cultured) yogurt/lemon juice), and let it soak for 7-24 hours (and as I understand, longer (up to 24 hours) is better)? Then do you mix in the yeast & let it sit for another 24 hours, then shape it and let it sit another 30 minutes? I’ve never done this soaked grain thing, but wanted to try this with spelt flour, and in another comment, someone mentions soaking spelt flour makes for better results. Are there any adjustments necessary for this recipe? Thanks again! I’m still eating my first loaf made with Bob’s Red Mill Whole Wheat – as I said before, it was heavy but edible. Perhaps soaking that flour would have helped!
We can’t be too much help on that one as we haven’t used spelt flour with this recipe. Hope it works out well for you!
i have made this several times and it turned out great! I used the white whole wheat flour. Recently I made this in a loaf shape with half unbleached flour and half white wheat. I buttered the pan and cooked it at 425 for 15 minutes and then reduced the heat to 375. The bread came out great. It made a nice loaf for slicing for sandwiches etc. my hubby loves it and so do I! I haven’t been brave enough to
make bread with kneading etc. maybe that is on my future:) at least I have found a way to have healthier bread. Thank you for all your recipes!
This was very easy to make and delicious! I used all purpose flour this time. I’ll try a blend of whole wheat and all purpose next time. Thanks for sharing this great recipe!
4/28/18
Still haven’t made this bread yet, but want to…. got lots of good reviews…..yeast just scares me….. but I just think I will give it a try….
Still reading your blog Laura, how are you doing with the baby?
I think the last I read you were adopting the baby right , or just being a foster parent ?
Since you don’t have a girl, you just might not want to let her go, and adopt her yourself…..I think you’d love it….all Mothers ‘ need a daughter and now you have your chance….go for it……God Bless you Laura and your husband and your boys…..and the little girl you have….
We aren’t adopting her – we were the family chosen to take care of her until she went to be with her adoptive family. She’s moved in with them now! Now we are a foster family to a 4-year old boy. :)