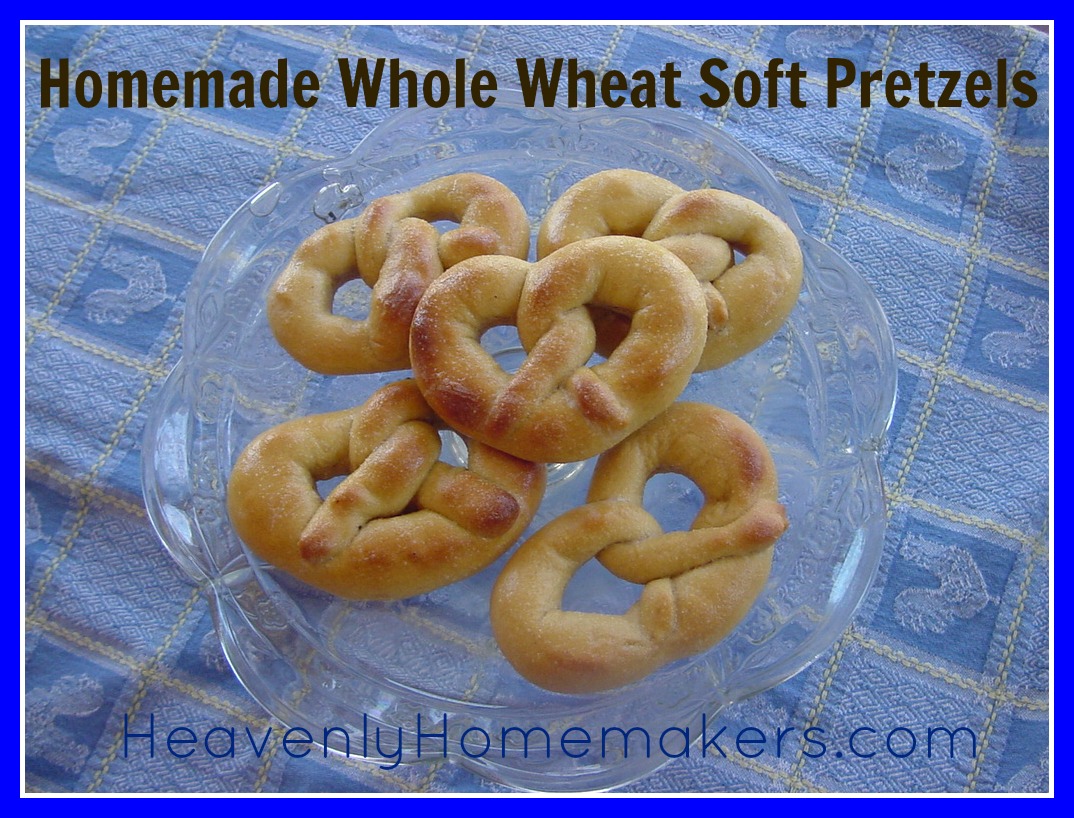
Brace yourself. The Soft Pretzels recipe I am about to share with you is INCREDIBLE!
Ask anyone who’s ever tried them. People have even called me the “Pretzel Lady”. (I’m sure they’ve even called me the “Beautiful Pretzel Lady” and the “Unbelievably Intelligent and Witty Pretzel Lady” behind my back.)
I used to sell these at our local farmers market each week. On my best week, I sold over 100 of them in less than 17 minutes (yes, I timed it).
Here is the recipe and the step by step tutorial on how to make Laura’s Amazing Soft Pretzels:
Whole Wheat Soft Pretzels
- 1 cup water
- 2 Tablespoon yeast
- 2 teaspoon honey
- 2½ cups milk
- 1 stick butter
- ½ cup honey
- 4 teaspoon sea salt
- 8 cups whole wheat flour (more or less as needed)
- butter
- salt
- In a large bowl, mix 1 cup warm water, yeast, and honey.
- Stir this together and kind of mush the yeast around.
- Let this sit for a few minutes while you do the next step.
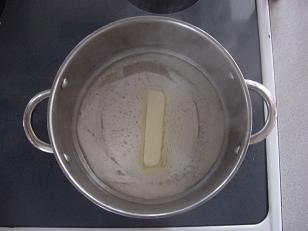
- Melt a stick of butter in a large saucepan.
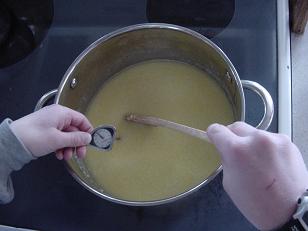
- Add honey, butter, salt, and milk. Heat this to 120 degrees.
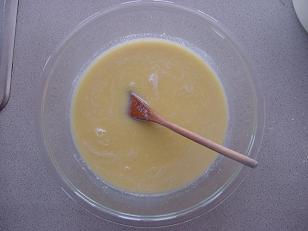
- Pour milk mixture into yeast mixture and stir.
- Stir in 8 cups of flour, 2 cups at a time. (add more if you need it)
- Knead the dough for 5-10 minutes.
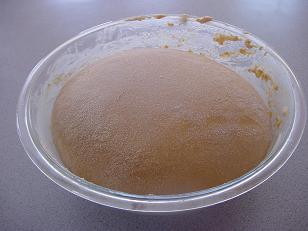
- Plop it into a bowl, cover it and let it rise for 1-1½ hours.
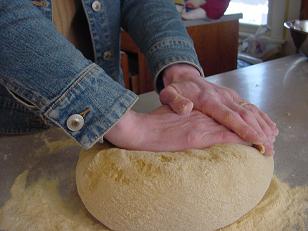
- Pull it out of the bowl and knead it a few times to get the air out.
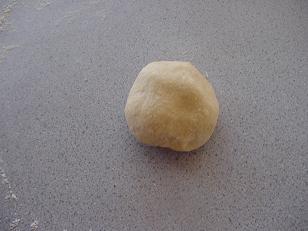
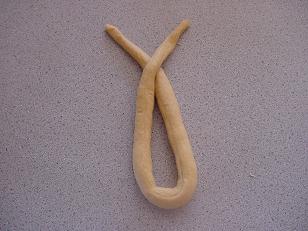
- Pull a ball of dough, about the size of your fist off and get ready to make your very first pretzel!
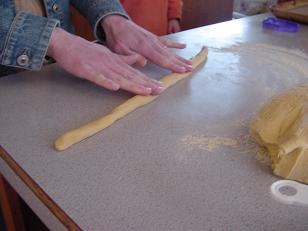
- Roll it into a long snake.
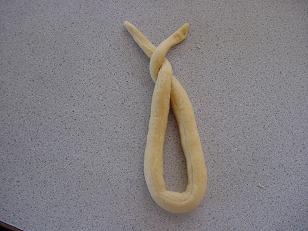
- Twist the ends together, then twist it again (pictures below are helpful)
- Pick up the ends and pull them down to the bottom.
- After you shape each pretzel, put them on a cookie sheet about an inch apart.
- Bake for 20 minutes at 350 degrees.
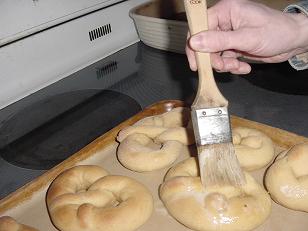
- Melt a stick of butter in a saucepan.
- Right when you take the pretzels out of the oven, slather them with butter. Lay it on thick. Don't hold back.
- Sprinkle salt over the buttered pretzels.
(You can make these with white flour and white sugar if you want to have a delicious mound of empty calories…but I have found that using these healthier ingredients does not make us like these pretzels any less!)


Please make no snide remarks about my blueish, boney hands. It is always a little cold in my house and my hands are never quite warm AND I inherited my Nana’s boney hands and I know my Nana would have never allowed her hands to be put on a blog while she lovingly told you how to shape a pretzel because she was ashamed of her boney hands, but I’m okay with it. I’m not embarassed at all. Not one bit.

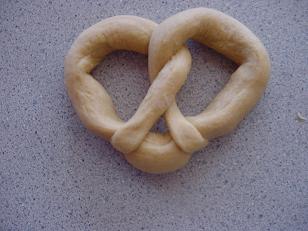
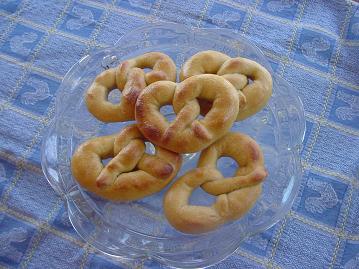
After all the pretzel twisting, it should look like this. If it doesn’t, just undo it and try again. By the time you get to the end of shaping your big blob of dough into pretzels, you’ll have the hang of it and be able to talk on the phone, make a grocery list, check your email, tie someone’s shoe AND shape a pretzel, ALL AT THE SAME TIME!

If at all possible, eat one right out of the oven. They are good two days later too, but OH MY GOODNESS, you HAVE to eat one right out of the oven!
With a glass of milk.
If you really want to have fun, shape some into hearts for Valentines Day!


Thank you for posting this tutorial. I am always on the lookout for new recipes.
Ok…I am SOOOO excited about the sharing of this recipe. Soooooooo excited. And can I just say that your step by step pictures are awesome…and I am so impressed and glad and I will have my laptop on one counter…and the pretzel dough on another counter.
Ok…great job witty and intelligent and beautiful pretzel maker. What i wouldn’t give by the way…to have the bony hands on a pretzel maker. Instead of …. chunky ate tooooo much sugar and drank tooo much pepsi for toooooo many years before I noticed hands.
And by the way…I looked longinly at the cinnamon sugar too shake all over my toast this morning…but I resisited. :)
You’re AMAZING! Thanks for the great tutorial!
Yay – I had this recipe at one time, and then lost it. I love having it with PICTURES! But wait, are we allowed to eat these on the “no-sugar” plan? Honey is ok, right? :-)
I’m off to make something healthy for breakfast.
Oh, oh YUM! I absolutely love, adore, crave soft pretzels. It’s right up there next to chocolate and that’s saying a lot! I’ve tried several recipes over the years but never one that is just right. Thank goodness this one seems to be “it”. Thank you!
Those look really yummy! I have always been afraid of baking bread products from scratch, but I may have to try these. Thanks for sharing!
MMM how about a little SUGAR on top???
Okay, that was the addiction talking.
I am going to make these today!
ah! Fabulous! Inspiring!
These looks sooooo good. It’s been a long time since we’ve had soft pretzels. Ugh! I really need to find a good gluten free version of this recipe. Yum!!
Perfect timing for Valentine’s Day! I made a batch of these today and they are delicious! I twisted them as you said, then I pinched the bottom to make a point. They look like hearts and are a gift for my hubby.
I made some with salt and some with cinnamon/sugar. Scrumptious!!!
Thanks for sharing!
I think I may have to give those a try today. Wouldn’t the kids just love me if I presented them with those for an after school snack?
And yours turned out so pretty too!
Oh goodness! These look so good! I’ll have to try them here sometime during Lent with my kids!
These look so very awesome!
Love the step by step instructions… These look so good and easy to make :-)
So glad I bumped into your site, have copies allot of recipes..thanks for posting them. Looking forward to making them! :)
Oh my son’s Kindergarten class will be so happy to have these as snack on Friday, thanks so much for the great recipe. I love your site keep up the great work.
Mine didn’t raise very well. I am very new at freshly ground WW flour. I used half hard red wheat and half hard white wheat. I did have my milk/butter pretty hot, didn’t use the thermometer. Could it have been too hot? They taste good but just didn’t rise like yours…
Thanks! and Merry Christmas!!
Misty
How many pretzels does this make and how much of the day do I need to set aside for making a batch?
Hey, thank you for the recipe. I’m excited to try it. I was wondering if you have ever tried freezing them once they are baked? I am trying to find more recipes that I can stash in the freezer to use throughout the month, and I was hoping these might work…
I made these today and they turned out perfectly. Used them as Valentine’s goodies for my extended family. Rave reviews so far. Thanks so much!
Oh my goodness!!! I finally got around to making these, and I am SO glad I did! My husband loves nothing better than a warm, chewy pretzel when we go to the mall, so I couldn’t wait to serve this up to him as a snack. I used half white flour and half whole wheat because I knew he wouldn’t enjoy it if it were 100% whole wheat, but my 1/2 and 1/2 ratio worked well. This dough was really easy to work with and made the most delicious pretzels. I did some with sugar and cinnamon and some with Kosher salt (of course dipped in mustard!), and they were wonderful. Thank you, thank you for this recipe!!
mine came out so nice . Your tutorials are so clear and easy to follow. Thank you so much. You have give me more gusto to work in Homemade dishes.
Great recipe, thanks! I used the Cuisinart to knead the bread. I thought I would be the only one eating them since it was all whole wheat flour. My daughter loved them and has eaten almost the whole batch. I hid them in the fridge for my daughter in college to try this weekend!
I just put mine in the oven, they look good, although they are HUGE- either my house is too warm right now, or I used too much yeast.
Was it really 2 Tablespoons, or is it 2 teaspoons?
Either way they look and smell great.
Hello,
Unfortunately, this recipe is more like bread than a pretzel recipe. I think it is because the recipe does not call for emmersing the dough into boiling water and baking soda like most pretzel recipes require. Which is probably why my batch came out feeling and tasteing like WW bread.
Hello,
I have so enjoyed your website since finding it. I also have 4 boys, 7, 4, 2, and 9 months (along with our oldest, which is a girl, 8) and can so relate to your life on so many levels.
Anyway, I am going to make these pretzels, but was wondering, do you soak these first? If so, how exactly do you do that? I am new to this soaking thing and just trying to get a handle on it. I have a pretzel recipe that I have used in the past and really enjoyed, but I wanted to also try this one. Thanks much.
Will these freeze well? Any idea?
ok, these are AMAZING. We have to go make more now bc they’re gone. My only question is how do you store them? I put them in an airtight container and they get soggy. Any suggestions?
How many pretzels do you usually get out of one batch? What did you sell them for at the Farmer’s market? I am thinking of trying to talk the Parents association at our elementary school into selling these as a fundraiser.
You’ll get 20-24 pretzels out of one batch. I sold them for $1.00 each.
These were excellent! Thanks so much for sharing the recipe. I need to make my dough ropes longer next time, but the taste was wonderful. I’m not sure how many will be left when my kiddos wake up in the morning.
These look delishhhhh! I am making them right now! I am sure they will pass the Momma Chef test and I will have to report about them on my blog, which by the way, I just posted a blurb about YOU (go check it out!). I hope all my friend and family check out your blog. You inspire me! THANK YOU!
I made these today and they are amazing! I am interested in how you store them and would like to know if you can freeze them. Thanks!
We made these today and they were super yummy! I basted some with honey butter and sprinkled them with cinnamon. Mine tasted a little yeasty so next time I will let them rise for a lesser amount of time. I use a heating pad under my dough to make it rise faster and I let it rise for an hour. How do you store these? Thanks again for another WONDERFUL recipe:)
If you’re making them from freshly ground flour, you’ll need to store them in the fridge because there are no preservatives at all. I usually keep mine in a ziploc baggie.
They freeze well in freezer bags as well!
I just made these last night for my husband but my 2 yr old got to them first. I made mine into pretzel stick shapes for easier handling. My son loves pretzels when he doesn’t feel good. He can eat all these he wants! He’s not feeling well so he’s been munching on them all day, it’s the only thing he wants.
Delicious! Naptime got pushed back two hours because the kids wanted to help. By the end of the pile of dough, my three year old was forming the pretzels right along side me! We all had a blast. Thanks for the great recipe.
i just wanted to say that i split this dough in half and used 1/2 to make 12 pretzels and the other half i threw in a bread pan and it made the most delicious light soft easily sliceable bread for sandwiches. i even sliced it all up and put it in a leftover bag from store bought bread. it’s so good! i highly recommend!
I can’t wait to try your recipe thank you for sharing!!!
Just made these again! Yes, we love them. I made a double batch of dough and have cinnamon rolls in the fridge for breakfast. The kids had tons of fun with creative pretzel shaping! Love your recipes.
OOOOHH, I’m really excited to try making these. I’ve had the ones you used to sell at the Farmer’s Market and let me say….YUMMY!! Thanks for sharing your recipe! :)
This tutorial with pictures really is one of the clearest recipes I have found on the internet! Thanks for taking the time to share this with us.
My dough was rather sticky and hard to roll & shape, and was much more wet looking than in your pictures. It seems that I would need more flour, but I had already added more than your recipe called for and didn’t think they would rise if I added too much more. I used fresh ground 100% winter wheat. Can you think of any thing to try for next time? They did turn out great, but were really more like fresh, delicious rolls rather than pretzels. I haven’t had much experience eating fresh pretzels, so I don’t know exactly what they’re supposed to be like, but they’re a little different than plain bread, right?
Thanks!
Maybe try rolling the dough a little thinner. And now that you mention it, they aren’t really like what you’d think of as a “pretzel” like you’d get at the mall. They are a little more like a really great roll…shaped like a pretzel and SLATHERED in butter!!
I am about to try these! Once you shape the pretzels, do you let them rise again?
Nope, you can bake them right after you have a pan full shaped and ready to go!
We’re making these tomorrow for St. Patrick’s Day – in shamrock shapes, of course. I can’t wait! I’ll be sure to share photos on my blog – and to send you the link – as soon as the first ones come out of the oven… or more realistically, as soon as the boys are in bed!
Well, I FINALLY posted a photo of our shamrock pretzels!
http://mcquill-land.blogspot.com/2010/03/luck-o-irish.html
They were indeed wonderful! The boys took the pretzels to our CC co-op the next day as a part of their presentation on St. Patrick and the shamrock. The pretzels were an instant hit! Thanks for another fabulous recipe (we had your popcorn chicken for dinner tonight)!
I made these yesterday for our snack and they were fabulous fresh out of the oven. I was skeptical about the honey because I just don’t like the flavor of it but you do not notice it at all. How great to find another healthy alternative to feed the family. The kids are always so thrilled to come home to something fresh baked.
Thank you
I think it’s fine to adapt traditional recipes and it sounds like you have a winner of a whole wheat bun, but if you choose not to boil them…how come? Submersion in a baking soda bath for a quick boil before baking is what makes a pretzel, a pretzel. Bagels require a boil, too, and if the dough isn’t boiled, it isn’t a bagel, it’s a bun. While the end-product of your pretzel-shaped twisted buns may be great, is there a reason you skipped this important step? I think explaining the traditional method and then explaining the adaptation, would be both helpful and interesting to your readers.
Kate, thank you for your comment!
I was wondering why these “pretzels” turned out just like yummy bread, rather than actually being pretzels. I figured I just did something wrong.
It’s nice to know what the missing step is!
Can you briefly describe the baking soda submersion? Does it work with this recipe?
I don’t know if the traditional boil step would work with this recipe or not, which sounds like a really yummy, sweet buttery WW bun recipe, because I don’t bake that often with WW flour (I know, the horror!) and thus am not an expert on how it responds, but as it is heartier than other white flours, I’d give it a go with just one or two pretzels out of the batch. It’s so quick and easy to do, and such an important step (I adore real soft pretzels and make them often) that it wouldn’t be a pain to draw up a bath and try just one or two and bake them side by side with unboiled, and see the difference for yourself.
In fact, that could be a fun experiment. Boil 2 and bake, and just bake 2, and look at them, taste them, side by side!
Historically, after the pretzels were formed, they were boiled briefly in a lye bath, but that’s too dangerous for the home cook. It’s been baking soda for ages now with similar results.
That brief bath is what gives bagels and pretzels two very important characteristics: 1) The glossy, caramel colored sheen and 2) the distinctive, chewy skin. Without it, you have … bread!
There are some who just boil them in plain water too, but I think that baking soda is an important component. Google “pretzels boil baking soda” and “pretzel baguettes” and you’ll see numerous blogs debating the topic (as well as dozens of recipes for the bath).
Bring a large pot of water to a boil to which you’ve 2-3 tablespoons of baking soda. Slip 1-3 raw pretzels into the bath and boil 1 minute on each side (flipping at 1 min). Remove, blot dry with a clean dish towel, and let rest for 1 minute. Then, proceed with baking and salting as usual!
That is fantastic, I will try that.
I just made a batch of these pretzels, using your directions, only boiling them first. They turned out pretty good. Getting the bagels out of the water bath intact was a bit of a challenge. I think when I make these again, I won’t bother with that step unless I’m feeling really ambitious. On a side note, I didn’t know how much “a stick of butter” was, since butter generally isn’t sold like that in my area, but a quick google search and I had my answer that it is the equiv. of 1/2 a cup.
My daughter and I really like these. She said she wanted me to freeze some and put them in her school lunch. She isn’t fond of sandwiches, but likes the idea of a nice soft pretzel in her lunch. Sounds like a good thing to include in her lunch, to me! I think this would be easily adaptable so that you could make Pizza pretzels, too. Thanks for the great recipe and the awesome blog.
I was wondering how do you store these?? On the counter or in the fridge?? Also can you freeze the leftovers?? And how do you thaw them if you can?? Haha I think that is all of my questions. Thanks a ton.
oops sorry I saw that you already answered my questions except thawing them out. I don’t want them to get soggy. Thanks
To thaw them, I usually just leave them in the freezer bag I had stored them in. I haven’t found them to get soggy, but I always rewarm them for a short time in the oven anyway.
I wish I had read the comments before I made these. I made a 1/2 batch, and with a ball the size of my fist (I was using my closed fist as a guide) I only got 6 pretzels. They are crazy large! They’re in the oven right now, but I think I’ll have to cook them a little extra to make sure they’re done. Next time I’ll divide the dough into 12.
I cooked them a little extra, and they are huge but they’re delicious! Thank you so much for the recipe!
These were perfect! The kids and their friends got off the bus and devoured them quickly.
I had some leftover dough and made pretzel dogs. They were great too!
I’m not trying to promote my blog at all- I prefer not to, but I wanted to share a picture of what the pretzel dogs looked like.
http://recipes2love.blogspot.com/2010/05/pretzel-dogs.html
Thanks for this recipe and all your others!! You have been a huge part of our adventure to eat healthier!!
These were so yummy! I topped some with butter and cinnamon sugar and they were absolutely delicious. Thanks so much for this recipe.
Your pretzels are awesome and all your other recipes we have tried as well. Thank you! We made the pretzels and made a solution of warm water and baking soda and brushed it on before baking and sprinkeld them with poppy seed and sesame seed and they were awesome! Some I shaped as pretzels and some I did a braid. For the braids I didn’t use the baking soda/water solution, those I did with butter. Thanks again for sharing such awesome recipes. I’m excited to try your sourdough. Growing up in Germany that’s all we ever ate.
Just made these with the kiddos this afternoon. They were yummy. We dipped them in a cinnamon/sugar mixture and they were soooooooo yummy. They think I’m the best mommy ever to make these! ;)
How do you store these pretzels? I made some (and they were delicious, by the way), and then I stored them in plastic baggies. The salt dissolved after being in the baggie for awhile. I was wondering if anyone had a better way of storing them?
I usually store them in plastic baggies too. I’ve found that when we’re ready to eat those that have been stored, I reheat them in the oven for a while, then spread on a little more butter and salt. They taste pretty much like fresh ones when I do this!
Can these be frozen?
Yes, these freeze very well! I reheat them in the oven and sometimes spread more melted butter and salt on the top!
YUM!!! This is the first weekend of summer break for us and I am looking for healthy snack options I can make at home!! So excited to make this one and the bagels. Thanks so much for sharing your recipes!
that looks great!
These look so good! I’m very new to all this so if I do use white flour/white sugar instead of whole wheat flour…how much of the flour and sugar? And leave the other ingredients as the amount you have them, correct (except leave off the whole wheat flour of course)?
Also, does T mean tablespoon, t means teaspoon? Sorry, but I’m very new to all of this!
Same amount of white flour and white sugar. And yes, leave the other ingredients the same. Capital T means tablespoon and lower case t means teaspoon. No apology necessary!! Great questions. Hope these turn out well for you!
HI,
Just wondering, how much do you sell your pretzels for?
Thanks,
Molly
I sold them for $1 each, but I was using white flour and white sugar instead of whole wheat and honey. I think I figured that my cost per each pretzel was 12 cents or so…but of course they did take a little time to make!
What temperature do you bake these pretzels!!!
Thanks so much!!!
Molly
350 degrees! : )
So instead of 8 cups of whole wheat flour, I would use 8 cups white flour and 8 cups of sugar?
no…its 8 cups flour and about 3/4 cup sugar.. bc one cup honey is equal to 1 1/4 cups sugar
Could the unbaked pretzels be frozen and still bake well later? Can’t wait to try these. Thanks! (my first comment on here, came across your blog about a week ago)
I THINK so but I’ve never tried it. I really SHOULD try it because what a great idea!!!
I need to make 250 soft pretzels for a “project.” I like the idea of the whole wheat and the honey over the white sugar and white flour…..When you baked pretzels for your farmer’s market, how did you store them until you went to market? Separate packaging? airtight containers? Baggies? Or did you freeze them until the day of and then package them? Thanks.
I made them ALL the day before and the day of the market so I didn’t have to freeze them or anything. I wrapped some of them individually for single pretzel sales. I put five in a bag so I could sell them by the bag and I kept the rest in a big tupperware type container for packaging as needed.
I am going to make as wedding favors. I can do these a week ahead and put in tupperware air tight containers? Can these be dipped in chocolate?
Hi! I found this recipe some time ago and decided to try it for my husband´s b-day party. They were awesome and very loved!! I made half a batch with cinnamon and sugar and they looked and tasted great! There´s a pic here of how beautiful they turned out (http://goodrandomthoughts.blogspot.com/). Thank you so much for sharing the recipe!!!
Aline
what can i do to make them ahead and have the dough ready for a school lesson (the dough-making will be a “free-time” lesson)?
I guess you can get the dough mixed and ready to rise, then put it in the fridge to slow it down. I’ve never done this before so I’m not really sure what would work best!
This recipe looks great and I would definitely love to make these for my family along with some of your whole wheat crackers, etc. I’m enjoying browsing through your site. I’m always looking for healthier recipes to make for my family, but I do have a question. I always try to stay VERY light with fats in recipes (butters/oils) so, is there a way to cut down on the butter in this recipe without it ruining it? Do you think I could substitute with something else or at least cut it in half somehow?
Thanks so much.
Hmmm…I’ve never tried cutting down on the fat on this recipe. I think if you used half the butter it would still turn out okay…just maybe not quite as soft and maybe not as nice of flavor. They’d still be yummy though I think.
My husband was asking if it was possible for me to make some pretzels and I immediately thought of your blog. Looks like we’ll be having pretzels for snacks soon. :)
Oh, and about your “bony hands,” I think they are beautiful. Partly because mine are the same way, but mostly because they are a mom’s hands; a mom who serves her family with them. Thanks for sharing the many ways you bless your family. It helps me bless mine too! :)
Great recipe! Thanks a lot for sharing this to us. I would definitely give this one out a try as I have been wanting to make a home made pretzel. Great pics too. It would go really well with a hot cup of coffee made from my automatic espresso athome Kudos!
I’m making these tomorrow! On another note, my hands are the same way-veins and bones poking out. You should be proud of them. I am of mine. The way I figure, if my hands are “skinny” the rest of me, by default, must be, too!
My 15yr old son and I, just made these and they are great! He’s not crazy about whole wheat flour
(even though I always bake healthy), but, he loved these. I’m going to making these for my home school group.
Great recipe!
I’m going to make these today for my kids. I’m trying to find new homemade snacks that aren’t always cookies. These will be perfect.
In high school I worked for a “pretzel place”…(memories). I wander how long until I can get back to shaping them as quick as I use to :)
Thank you for your site!!! I always check here when I don’t know how to do something (which is ALL the time).
I made some of these today with 100% whole wheat flour. They are ok, but not what I would call good. I think next time I will try them with half unbleached white and half whole wheat. These are too grainy.
Hopefully, the next ones will be much better.
Linda
It can also depend on the whole wheat flour you are using. I’ve found that”stone-ground” is too coarse. Whole wheat pastry flour works well. I bought a Nutrimill recently and it makes wonderful, fine flour.
How many days ahead can these be made if they are stored in an airtight container?
These will stay good for 4-5 days on the counter if airtight. They also freeze well and will be fine for several weeks in a freezer!
I made these yesterday exactly the way you showed. They only difference was white flour instead of whole wheat flour. When it was all said and done the pretzels turned out really heavy…almost doughy on the insides…yet cooked thoroughly. It was so strange. My family said they liked them which was nice after I spent hours on them. But I was a little disappointed. Any idea why they turned out this way?
The first time I made these, they turned out the exact same way!! Tasted okay, but they were pretty doughy. :( I think the trouble when mine were doughy is that I got the milk too hot and it killed the yeast, so they didn’t rise enough, then they were just doughy inside. Not sure if that is what happened with yours, but I’m guessing it’s a yeast issue.
i had a yeast issue also but my water was not hot enough in the
first step. so i figured that i would overheat the milk/butter/honey
a bit to compensate for the lukewarm water. it wasn’t until after i
added the milk/butter/honey that i realized that if the yeast wasn’t
good i’d just wasted a bunch of expensive ingredients. well, the yeast
didn’t froth but i continued with the recipe.
when the first batch came out doughy i kneaded some baking soda and
baking powder into the rest of the dough. they rose a bit in the oven
and tasted fine but i’m off to try again because laura’s look so delicious.
That’s what I was thinking…it must have been the yeast. I figure either the yeast got too hot or it wasn’t fresh enough. Thank you for your reply.
I would like to make these and was wondering if you need to grease the cookie sheet prior to putting the pretzels on it and how many does the recipe make based on the whole wheat method?
Thank you for all you post :)
I usually do not grease my cookie sheet, but I use a baking stone…so I suppose a metal pan might need to be buttered just a little. Actually…come to think of it, when I have used a metal pan in the past, I didn’t grease those either. So nope…I think you’re good to go without it!
I just made these and they are awesome.
I was a little worried at first because my initial dough was quite sticky and wet (didn’t hold it’s shape). Some of the liquid was absorbed by the flour during the rise however and it set up OK.
I divided into 12 pretzels and they are huge. I will probably divide into 18 next time. I also have to work on my shaping skills- I had problems getting the dough snakes to be even before knotting them.
I didn’t have 8 cups of any one flour in my pantry so I used 2c all purpose, 2c bread flour, 2 cups barley flour and 2c white whole wheat- all King Arthur brand. I added 1 Tbl of vital wheat gluten to balance all the whole grain flour.
They are fluffy, slightly sweet and very very yummy. They are bread-y. I might go with half high gluten flour next time to see if I can get them to be chewier.
Easily could add a little vanilla and cinnamon into the mix and raw sugar on top with the butter for sweet pretzels.
Thanks very much for the recipe!
I’ll be trying out your crackers next.
I made these Friday night and took them to a work Christmas party on Saturday. I almost cried because my dough didn’t rise AT ALL. (I suppose I killed the yeast, but my thermometer read 120 degrees.) I added some baking powder in an attempt to make them come out okay. Well, they were actually really good! My husband loved them, and so did the fellow partiers. Thanks! :)
I’ve got a 5lb bag of whole wheat flour thats been sitting in my pantry intimidating me since i first discovered your site THIS SUMMER…and now its almost feb…I did try a graham cracker recipe and the cheese one too but other than that bread wise i’ve been a chicken. I’ve got to get over this fear and use this flour…hopefully its not bad already.
ok here goes nothing…i’m actually really excited to try making these!
What kind of milk do you use? percentage ? skim, whole, 2% etc….
and salted or unsalted sticks of butter?
I use whole milk, and either kind of butter is fine. I think I usually use unsalted. :)
I used almond milk and they were GREAT!!!!!!!!!!!!!!!!!
Oh, I have a question, too! We like hard pretzels for the crunch, and the kids like the little pretzel sticks… Do you think I could make some tiny pretzel sticks with this recipe and bake them until they’re crunchy?
I’m not sure this recipe would work to make a crunchy pretzel. I’ll have to play with that idea a little bit!
Laura – I tried it – and while I thought it would be a flop, the kids LOVE them!
I used your pretzel recipe and Alton Brown’s technique here: http://www.foodnetwork.com/recipes/alton-brown/homemade-hard-pretzels-recipe/index.html
It was very time consuming and turned up some very ugly pretzels – I didn’t even offer them to the kids. But my 5 yo son saw them on the counter and wanted one of the
“big funny sticks” – and he asks for them all the time! Now if I could just get my 3 yo to stop asking for goldfish….
I’d love to see your take on hard pretzels – I’d like to see if I can get these smaller, too…
Thanks so much!
I do know that baking any type of bread with a dish of water in the oven with it, gives it a nice, crunchy outside!!
Soooo incredibly good!!!!! My daughter and I made them today – her comment: “This recipe is going to be in our family for a long time!!!!!” :) Thanks!!!!
those look supper yummy & better for you! thanks for sharing!
I have tried to make these twice and all I end up with is a big lump of dough that doesn’t rise. I did the warm water, it was steaming. I made sure the milk was 120 but still ended up with a big lump. Hate to throw it away but I don’t know how to fix it. Help. I really want to make these. I am using the regular whole wheat flour from the grocery store.
how old is your yeast you are using? Also you might want to stor it inthe fridge until you are ready to use it, thats what I do with mine. A good tip for heating the milk is just add the solid butter and milk and honey and salt together in the pan over med heat til the butter is mostly melted. Its the right temp at that point. Also with the water run your tap on hot til its almost too warm to touch it. I did these things and my dough turned out great. I hope this helps some!
Hi,
My daughter can’t unfortunately, have milk. Butter is fine with her little body. But could anyone tell me if they have made these with only water? Or like one commenter, used Almond Milk and that is the way to go. Any comments on coconut milk instead of regular milk?
Thank and thanks for the detailed recipe.
Both of my kids have dairy allergies and I have made this
recipe many times with rice milk. I would assume coconut milk would
also work– might give them a coconut flavor???
Good luck!
I just made these and they were delicious! My family’s still trying to get adjusted to ww flour, but I heard no complaints on this one! One question though: how many pretzels should this make? After reading the comments, I used dough slightly smaller than my fist and got 16 pretzels out of this recipe. The only problem? They were HUGE! And they only slightly resembled a pretzel and looked more like a knot, if that makes sense. I’ll definitely be making them again, but was wondering what I should do differently…
I usually get about 24 pretzels out of this recipe.
How would you go about soaking this recipe?
Also, how would you go about soaking your honey wheat bread recipe?
I am really thankful for your website! My family is just beginning this journey of milling our own wheat and we have also bought shares in 2 CSA farms. We are excited!!
I really don’t know, on both recipes. I haven’t attempted to soak either of them. I do soak grains when I can, but I don’t feel bad when I can’t either. I just sort of compromise and feel good that we’re eating whole grains that are so good for us.
Really awesome recipe, Laura! We just made these into pretzel hearts (made 32 of ’em) and slathered with melted butter and sprinkled with cinnamon/sugar. YUM! Thanks Laura!
if i wanted to soak the four for this recipe would i just use cultured butter milk with the flour and let it sit over night?
Yes, you could try that. I’ve not tried soaking this recipe before.
hello michelle, how many pretzels do i get if i use this ingredients?
thank you, and your recipe is really mouthwatering! =)
You should get between 20-24 pretzels with this recipe.
I tried this recipe – but instead of putting salt, add cinnamon and sugar! SOOO Goooooooood
I made these today and all I can say is WOW!! I made these to go along with your chicken noodle soup. The kids loved them, my husband loved them and I loved them! Thanks so much for such a yummy recipe!
My first pan of pretzels just came out of the oven! They are so delicious! The only thing is, my first pan I didnt roll it out thin enough and when it baked it came out more as a “roll” than a pretzel. My second pan is in the oven now, and I rolled it out much thinner, but same thing. It rose so much that there are no pretzel “holes” So I will have to roll these puppies out super thin for them to look like pretzels. I can see this recipe being good for a bun too. They are so soft and good!!
I did do 1/2 white and 1/2 whole wheat flour though because I am too scared to do all whole wheat because I have red wheat and I am a little afraid to do 100% whole red wheat. And also because I have about 12lbs left of white flour that I want to use up before switching to 100% WW.
Made half a batch and they were delicious. THey didn’t get very golden and I was wondering if I could to an egg wash on the outside of them to help get them golden and then slather it with butter when they were done??
Yes, an egg wash should do it. They may have just needed a couple more minutes in the oven to make them golden!
Laura,
You have sent me on quite a quest!
I tried your receipe and was disappointed because it was more like a pretzel shaped (delicious) dinner roll than an actual pretzel. Having lived in Germany, this got me craving a real soft pretzel. So I found some other recipes, but, while they were delicious, they were really unhealthy. So, I decided to try going back to yours with some modifications.
After forming the pretzel, I froze it. They I boiled some water, baking soda and brown sugar and boiled the frozen pretzel in it for about 1 minute. Then I refroze the preztel, salted it and baked it at 350 until almost done and then at 400 for the last minute and it has that pretzel taste! It still tastes “healthier” than the other recipes, but I use store bought flour. Hopefully someday I can save up enough to get a nutrimill!
I love your site! Thanks for all you do!
Read through the comments but didn’t see the answer to my question here =)
I have soft white whole wheat and hard red whole wheat….which one should I use for this? I’m afraid the hard red wheat may be more heavy….
You won’t be able to use the soft white wheat because that type of flour only works for NON-yeast recipes. This recipe has yeast in it, so you’ll need to use the hard red. The hard red may make it too heavy, like you said. I prefer to use HARD WHITE if you have that available to you!
This is something I’ve had on my mental ‘to do’ list for awhile! But I couldn’t seem to find a simple recipe. This one looks easy enough! I HAVE to try these this week now that I’ve seen all those pics.
So I’m thinking about sourdough pretzels…cause we have to soak or sourdough our grains due to family allergies. Hmm. I might have to play with that one.
If I wanted to soak the whole wheat flour ahead of time how would I do it?
I’ve not tried this recipe with any kind of soaking method, so I can’t say for sure. I think eventually I’ll try to figure out how to make pretzels with sourdough to see how that works!
oh, YUMMY…… I’ll skip the milk, but definetley have some mustard on hand. ;) Thanks for the recipe!! We WILL try it soon!!
Wow! Those look GOOD and EASY! I might make some this week!
Hi,
How can I substitue honey for something else in your recipes? I made your honey wheat bread and it was so good. I’d love to try these as well, but I have a 9mo old who loves to eat what we eat and it isnt recommended for babies to have honey before they are 1. Can I use brown sugar, if so how much and do I need to add another liquid as well?
thanks!
Babies under one cannot have honey because it is unpasturized and can carry things that make babies sick. Honey that has been mixed with something and cooked is fine for them to have.
I also feel like it’s okay to put honey in these and your baby will be okay, but if you would like to sub brown sugar, go ahead and use 1/2-3/4 cup. No other liquid is necessary!
I have an 11 mo. old and was always told that honey in baked goods is fine for babies. The baking process will kill any botulism spores that may be in the honey.
Thank you!
I read on wholesomebabyfood.com that cooking it didnt make whatever it is in the honey safe for babies to have (not even to give them store bought honey graham crackers) so I was alittle worried about it and stopped feeding him the bread.
we went to the doc today for a well baby check and he said that it is fine to give him food that has honey cooked in it just not to give him uncooked honey.
Anyway, I will feed him the rest of the yummy honey wheat bread (he thinks its yummy too!) I’d much rather give him baked goods sweetened with honey than sugar!
Very good to know. Glad you asked your doctor and came back to share the info with us!
It’s the bacteria in the honey that is the issue. So cooking it is fine, because it kills the bacteria. http://www.askdrsears.com/faq/fit22.asp
I was wondering about how many pretzels this made? I might try to make them for an event and want to have enough. Thanks!
This recipe makes about 20 pretzels.
Looks delicious! My daughter is very excited to try these. Thanks so much for sharing!
I’m trying to make these pretzels right now and the dough is really stiff. I’m using Bob’s Red Mill whole wheat flour. I only used 6 cups as I can’t knead anymore. Is this normal?
Bob’s Red Mill flour is going to give you slightly different results (I use freshly ground). So, just stop adding flour when the dough is not sticky anymore and it should be fine, hopefully!
Okay, just one look at this post and it’s pretzel mania here! I just showed my hubby and boys these pictures and it looks like pretzels are on the menu for tomorrow. I have visions of soft pretzels with course sea salt sprinkled across the top, gently dipped in mustard – mmm! And I think I’ll dip some of them in cinnamon sugar (using coconut palm sugar)! I don’t have whole wheat, so I will have to use whole spelt instead. Hope that works! Thanks for sharing! I am sure we’ll be calling you The Pretzel Wonder Woman! :)
Hey, I wanted to try this recipe for my job (I work at a school) And we are having an international night and our room is Germany and we are making pretzels. I wanted to know how long can this dough be stored before use? And once it’s made do you have to shape the pretzels immediately (we wanted to make it before hand and have our little ones shape their own dough)
I’ve never tried storing it before use, so I can’t say for sure, but I would think that if you mix it up and put it in the fridge right away, that will stop it from over-rising, then you could get it out once you’re at school for an hour or so before you’re ready to use it and it would be ready to go. You may want to test that method ahead of time though, since I’ve not tried it to know for sure!!
I previously made the recipe for the cinnamon rolls, let the dough rise once and then cut the dough in half. I froze one of the halves for later use. Yesterday I pulled the dough from the freezer and let it thaw in the refrigerator. Today I let it rise one more time before shaping into pretzels. It turned out beautifully! Thanks for sharing delicious recipes Laura!
Has anyone tried using a gluten flour mixture for these?? A mixture of flours like rice, tapioca, potato starch?? If I have time I might try it.
I am in the process of baking these and main are they good! BUT! I could not for the life of me get them to make a nice pretzel shape! I attempted and the dough scrunched right back up so those they were supposed to be pretzel shaped are now big blobs :( oh well they still taste good!
Would you mind sharing what price you sold these for at farmer’s market? I’d love to do the same at our market, but didn’t know what to ask.
Thanks
I charged $1 each.
These turned out great! My only complaint is that I only got 2 before the kids and their friends finished them all off! I just made the standard salt pretzels…they asked that next time I do half salt and half cinnamon and sugar. I plan to do that, but want to try your bagel recipe, first ;).
How many pretzels does this recipe make?
About 20-24.
Hello.
My dad LOVES pretzels and Saturday is his 72nd birthday. My 7 year old and I are making this recipe for him tonight but I don’t have whole wheat flour, is this ok? Also, after the heating of the wet ingredients can I put everything in my mixer and let the mixer knead the dough? I have arthritis and 5 minutes of kneading would definitely get my bones barking in pain.
I will let you all know how these turn out.
PS. what about doubling the recipe? would I have to half the mound of dough to let it rise or will it be ok all in one mound?
Thanks for sharing this recipe. :)
You can double this recipe, but it makes such a big batch of dough, it’s hard to get them all shaped into pretzels before the dough gets stiff and funky. I speak from experience. :)
Thank you Laura
I will leave it at original recipe then.
Hi! I knead help! (get it?) I live in Albuquerque, New Mexico, about 5,000 feet above sea level. I have made these twice and both times they have been very dense and hard and not cooked through. I was so excited. I can only assume its because we are at such a high altitude. How would I change the recipe for the altitude? help….starving for pretzels!!!!
Oh dear, I have no idea how to adapt this recipe for high altitude (she says, as she sits on the plains of central Nebraska). Maybe someone else will see this comment and be able to help!!
I LOVE Nebraska! That is where I went to get fertlity help at Pope Paul VI Institute…now we are having our fourth boy in June!
I just googled adapting recipes for high altitude and found a few sites like these with general tips that hopefully should help.
http://notecook.com/bread/how-to-adapt-recipes-for-high-altitude-baking/
http://www.brettagold.com/worksamples/articles/highaltbake.pdf
p.s. A friend told me his mom’s prized soft pretzel recipe contains lye. What?! I’m excited to try your recipe as it looks yummy AND healthy and natural besides!
would i use the same amount of yeast if i cut the recipe in half?
Yes probably, or a little bit less would be fine.
I tried this recipe and it was so good. I love the pretzels!!!!! Now I tried something with the dough since I had extra dough leftover. I made strombolies out of the extra dough and it tasted heavenly. Thought I would share that with you. This has become a hit in our home. :)
Our weather has been unseasonably cool here this week. Praise the Lord. So this has been our first chance to try your new pretzel recipe. They look yummy! We used soft wheat instead of what I call regular hard white. Yum! Can’t wait.
Thanks- it made times table go faster.
Thank you so much for this recipe. I just made them and they are DELICIOUS!!!
Ok, I’ve been reading your blog off & on for a while now. I’m using it as an inspiration to take baby steps to feed my triple threat (my 3 boys! lol)healthier homemade fare. I do have a pretty dumb question though. I’ve never baked w/ yeast & I see this recipe says add really warm water to the yeast but … how warm is too warm? Do you use a candy thermometer? I thought if your water was too hot, it could kill the yeast. How do you figure that out? My boys would be forever grateful to you!
If you can put your finger in the water comfortably – not too hot – then you’ve got the right temp!
Question!! I am in the process of making these right now and your pretzels look very light for having used wheat flour. They look like they will taste better and not so wheat-ey because they are lighter haha. My dough looks dark. What flour did you use exactly?? I use King Arthur whole wheat flour. Also, it took a LOT of extra flour to make the dough not sticky, and it still was kinda sticky when I just said forget it.. I don’t want to be adding so much extra flour. Any clues why that would be?
I use freshly ground whole wheat made from Hard White Wheat. The consistency of King Arthur’s flour is a little different, which is why it maybe took more flour. Go ahead and use however much it takes to make a nice dough – it should be fine!
I think I will be trying these today! But since it makes such a large quantity I was thinking of halving the recipe or freezing half of it. If I freeze half at what point should I freeze them? Before or after baking or at done other point?
*some other point. (fat fingers on an iPhone)
I freeze them after I’ve baked them (and let them completely cool) and it works very well!
I’ve used this recipe numerous times. It’s just my husband and me though, so I’ve halved the recipe and it’s been great! My husband works construction and is usually eating on the go. I like baking, but have chosen the eaaasy route. After rolling the dough like snakes, I just cut them into pretzel sticks. That way hubby can dip easy and everyone is happy. Thanks for such a great recipe!
hi
I just tried these and they didn’t turn out all that great – i think because 1.I tried to incorporate coconut flour (you know for the extra fiber and protein, only 1 cup); 2.I used Xagave instead of honey (‘cuz it’s way better for you, if you don’t what it is, google it – you’ll love it); and 3.I used soft wheat instead of my normal hard white wheat (yes, I mill all my own). I have been reading so much lately about coconut flour baking with wheat flour and for some reason I thought I saw on your recipe to use soft wheat instead – bummer.
Anyway, I don’t know if I just tried too many “new” things at once, but could you please help me with this? I sure would like to make them with Xagave instead of honey, and incorporate the extra fiber and protein the coconut flour gives you, but maybe this just isn’t the recipe for that.
Yeah, I don’t think this recipe would work very well with coconut flour, or soft wheat, unfortunately. :( Coconut flour is a different beast, and soft wheat can only be used in non-yeast recipes.
Honey needs to be used to activate the yeast, I’m not sure agave would have the same effect.
Sorry it didn’t work for you!
I was wondering if you had a calorie count for these and do you have them for any of your other recipes? Can’t wait to make these among with some other things I found! Would really appreciate calories if you have them…thank you!!!
Sorry, I don’t. :( Wish I could be more help!
I was wondering when you sold these at the farmers market if you warmed them up or just served them at room temperature. I am also from Nebraska but on the Eastern side.
I served them at room temp – although it was so hot out at the farmer’s market usually that they were already kinda warmed up. :)
How did you display them in a glass case or individual baggies?
At the farmers market? Also how long do you re heat them
for?
Are they heated from freezer frozen or do you thaw them out first?
Do you have mustard on hand? Do you make any with other flavors
for the farmers market?
Thank you so much in advance I am so new to all this and have no idea.
I did individual baggies at the farmers market. If I reheat them, I just put them into the oven for 5 minutes or so at 350. I don’t thaw them before reheating them.
I don’t have mustard on hand or anything else for the farmers market. They just buy them as is.
How much butter is “one stick”? Up here in Canada, butter is sold in 1 lb (2 cup) bricks. I was thinking that 1/2 a cup would proportionate to the rest of the recipe, but I then I thought I should double check and ask. :) Can’t wait to make these!!
… just curious. If you were selling 100 of them, did you make ahead and freeze? Or did you get up early? :) Our farmer’s market is Saturday mornings, so it’d make a pretty early morning to make so many fresh.
I checked it out online, and it sounds like a “stick” of butter is indeed usually a 1/2 cup of butter. I found this link, however – maybe it would be a good idea to clarify how much butter rather than using the “stick” measurement. Australia and Europe do things differently, too. :) It wasn’t hard to figure it out, though, so that’s just a little suggestion. Can’t wait to try these out. I’m going to get going on it now that the hottest part of the day is over, and I can think about turning my oven on in a couple of hours. You don’t let them rise before putting them in the oven, eh? Just thought I’d clarify that, too, although I’m sure your method is laid out exactly how it should be. :) Thanks!!!
ooops. Forgot to attach the link. (one of my “duh” moments for the day, perhaps?)
http://www.thriftyfun.com/tf69154249.tip.html
YES, I try now to always put exact measurements as you are not the only one who has asked this!! I’ll go edit the post to say 1/2 cup! :)
I have to watch my cholesterol so I modified this a bit. I used extra virgin olive oil instead of butter and water instead of milk. I rolled these out between parchment sheets to 1/4″ thick, dipped them in a baking soda wash and baked until brown. They made fantastic crispy pretzles!! (I also made some bigger ones with the wash and they were very crispy on the outside – I did splurge with a little butter on top of those…)
Did you still bake at 350 for 10 minutes after doing the baking soda
wash?
Do you think you’d be able to make up a batch, bake it completely, and then freeze these? My hubby & I like to get frozen pretzels and take them out every once in awhile for snacks.
Yes, that will work fine!
How do you store the pretzels once they have been cooked? I put mine in a container on the counter and came back the next day and the salt had almost kind of melted and they were kinda wet on the top. Did I not let them cool enough before storing them? Thanks! By the way, my hubby LOVED your recipe. He even snuck one before dinner :)
Yes, it sounds like they were still too warm when you covered them for storage. They steamed up in the container and got soggy. :(
Glad you like them!
I am so going to have to try this recipe – I absolutely LOVE soft pretzels. Thanks for posting this!
Wow! It made a lot of dough! I ran out of flour at the end for kneeding, and I used a little coconut flour. Hope they turn out just as good!
you do not boil your s where some recipes say to boil also how do you arm up after frozen
Right, these are a little different from regular soft pretzels because they aren’t boiled, but we love them! We warm ours in a toaster oven or regular oven after being frozen.
After you’ve baked them and let them cool and frozen them, do you
defrost before heating again or do you put them in the oven frozen?
What temp and for how long? Thanks!
YOu can put them directly from the freezer into the oven to thaw/reheat. I do 350 for about 15 minutes, or until they are as warm as I want them to be.
Laura,
I’m so sorry to bother you again, but I am a nervous baker.
In one place above you say to reheat frozen pretzels for about 5
minutes at 350 and then just above around 15 minutes. I am having the whole Girl
Scout troop over and will be trying to rewarm multiple appetizers
that they made and brought for part of a cooking badge (my daughter
is doing your homemade pretzels in stick form along with sliced
fruit and fruit dip – she figured everyone could dip the pretzels
in the same dip too since she doesn’t like mustard-based pretzel
dips). Anyway, because I will be managing the rewarming of a lot of
stuff, could you just confirm the closer to 10 to 15 minutes instead
of the 5 mentioned in an October 4th post? Thx and sorry!
Marie,
Sorry for that confusion. This is a tough one because ovens can vary too. I owuld put them in for the 5 minutes and keep an eye on them. If it seems like they need more time, keep them in closer to 10 minutes and check on them again. I hope that helps! :)
I made these today and can I just say YUM!?! You are absolutely correct when you say that you must eat one warm out of the oven! My kids thought they were “amazing” and “yummy, doughy goodness”. I am sure when my Hubby gets home tonight it will be the first thing he goes for– thank you so much for all of your wonderful recipes! On a side note, my dough doubled in size in about 45 minutes which I am sure is because I am in Arizona. If you are in a warmer climate, it might take a little less time for the dough to rise, which means you can eat these yummy pretzels that much sooner:-)
God bless!
Do you use hard white wheat, hard red wheat, a combination or soft wheat for these? I am going to make these today with my kiddos!!!
I use hard white wheat for these.
This is the perfect recipe that I have been looking for. For Halloween, I am making witches fingers out of the pretzel dough. Thanks so much for sharing.
For us “Lazy bones”( or in my case mom of 3 under 5) could you modify this for a bread machine( smaller batch) and if so how. I’ve really been wanting to do this with the kiddos! Thank you… Oh and we would use regular flour too( would I need bread machine flour, self rising, or all purpose)Thanks for any tips… If not can I make the dough when the kids are in bed and then store in the fridge until time to shape?
I’m sure this can be adapted for a bread machine, but I don’t have one, so I’m unable to advise you on how to do it. I know there are lots of comments on this post to sift through, but I think maybe someone left a comment at one time sharing how they do this in a bread machine?
Just have to say that I got a good laugh b/c I’m a mom of 3 under 5 looking throught the comments for bread machine modifications, too! Did you find or try one?
My dough didn’t raise very good and and my pretzels turned out dense….i think i will end up having to throw the whole batch out:-( I can’t figure out what went wrong. Do you have any ideas?? Any help would be appreciated:-) Thanks
It sounds like your yeast died somewhere along the way. This can happen when it gets too hot or too cold. My test for adding yeast to a liquid is: If I can put my finger in the liquid comfortably, without burning my finger, then it won’t kill the yeast. It needs to be warm to the touch, but not hot or cold.
We tried this recipe and it was wonderful. I did a soaked version and it turned out fine. The night before I soaked the flour, milk, butter, and 1/2 of the water. The next day I put the 2 T honey and yeast in just 1/2 C warm water and that worked. After putting the additional honey (I used 1/2 the amount) and salt in the soaked mixture I mixed it all into the yeast mixture.
Delicious. We put cinnamon sugar on a couple for dessert tonight.
Forgot to add… I also went ahead and shaped some and put them in the freezer for later. I plan on thawing, then baking so they’ll taste fresh.
How did you keep them fresh until you went to market?
I made the the day of the farmer’s market and kept them in plastic bags until sale time.
Wow! These are hands down the best soft pretzels I have ever made. I made them for my daycare kiddos for snack tomorrow but had to try one right out of the oven tonight. The taste and texture are just perfect. I think these are going to become a staple snack around here.
2 Tablespoons of yeast? I’m new to working with yeast doughs so i don’t know for sure, but that really seems like a lot of yeast for one recipe to me… i mean my bread recipes only use 1 or 2 teaspoons, and even other pretzel recipes i’ve seen only use as much as 1 tablespoon… SO, i’m just curious is there some advantage to using so much more?
I was surprised when I first saw that it had this much also. But I’ve been making these for years and it works great for me every time!
Hi! A pretzel newbie here. Can you tell me what the purpose of a baking soda soak in other pretzel recipes is and why this one doesn’t do one?
Hello, I just have to post that I made these tonight and OMG is right! They are so good! The reason I wanted to post is because I used my bread machine for this. I have a zojirushi (2lb loaf) machine. I started by adding the liquids in the pan, then the flour, then I put the butter, salf and honey off to the sides on top of the flour. I made a little well for the yeast (I use SAF). While I was watching the dough being kneaded by the machine, it looked awfully sticky to me, so I added about 3/4 cup more flour. It still looked sticky when it was done and left to rise, but I let it go anyway. It rose fine and I kneaded with air out with a ton of flour. The rolling of the pretzels was a little difficult for me…it didn’t really want to “roll” but I made them no problem and they are delish. Oh, I only made 1/2 the recipe. My machine could probably handle the whole recipe (or maybe just 3/4 of it). Thanks so much!!
We are making these right now! =] I didn’t have a way to watch the temp of the butter and milk and what not so I just stuck my finger in to make sure it wasn’t too hot =] The dough is rising right now, and I am sooo excited! My two year old was chanting “Heaben Pretz, Heaben Pretz!” since I told my husband I was making Heavenly Homemakers pretzels =] She has her nicknames for everyone now lol. Moneysaving Mom is piggiy lady (since she has a piggy bank on her website =] ) Thank you so much again! Later I am making your pasta!
Just had to share. I made pretzel bites today with this recipe. They are soooo yummy. Made just as said except cute rope into little 1 inch or so sections. My kids love them! The big pretzels were a little much for them but they love their pretzel bites!
How long do you bake the bites? They are only 1 inch so fast right?
They took about 12 minutes to bake. I just watched for them getting too brown on the bottom. Still having issues with my salt “melting” away after I store them though! I let them cool completely and it still happened. Should I let them cool and then butter and salt them? Anyone, help??
I freeze mine…………take out of freezer and they are a
little damp so I
put more salt on and bake in toaster oven 5 min………….
I like Nancy’s suggestion! I am not sure why your salt isn’t sticking
but I think if you buttered and salted them after cooling it should work
fine…hopefully! :)
This recipe is a staple in my house. We like the texture of these so much I have adapted them into our “family bagels”. Before setting to rise I split the dough in 2 and add various add-ins (cinnamon & raisin, craisins & lemon rind, flax & seeds) then I let it rise. After rise I shape them into bagels and bake. Everything else is the same. I usually make about 30 or so depending on size. I freeze 2/3rds and leave the rest out for breakfasts. Laura, you are a genius yet again. Thank you for all you share.
yummy, so yummy…..we love them
WOW! I just made these because I saw them in your post today. Holy cow, they are good! Mine look like fat puffy pretzels, but they taste incredible! Since it made so much dough, I still have plenty of dough left to practice, but Gideon and I are seriously enjoying them right now! Thanks for sharing this recipe!
LOVE this!!!! Miss you guys!
I made these for the first time last week, and before they were even gone, my kids were already asking me to make more. Thanks!
These look so yummy! Do you ever make a cheese sauce or something to dip them in?
That is really good idea to sell them at a Farmer’s Market… I might have to do that this summer. :)
I went to a pretzel rolling demo in Frankenmuth, MI (a German Village) and they said that there was meaning to the way they are folded. According to them, the “inventor” wanted to teach his kids how to pray, so the folding and twisting was to represent the arms being folded in prayer and the 3 holes to be the Holy Trinity. After doing a quick search, there is no documented evidence of this, but it seems Italian munks used it in the same way to reward kids who they taught.
hi . do you really use 4t. salt? sounds like a lot. thanks
Yes, it does sound like a lot, but that is the correct amount.
How much did you sell them for at the market?
$1 each!
We tried this recipe and it was great!!! I ate most of it cause I’m a bread freak but
It was amazing!!! Thanks for this post! Gonna try the honey whole wheat bagels recipe next.
Hi, we just tried these pretzels and they were fabulous. One question: how do you store them? We covered the leftovers in a plastic container, but in the morning they were mushy and the salt had been absorbed. Thanks!
I make sure they have completely cooled, then I store them in a ziplock freezer bag.
Hi! I have my first batch in the oven, as I type! Do they freeze
well or do you store them on the counter?
I hope you and your family are doing well!
Yes, these do freeze well, but I also store them on the counter if I know we’ll be eating them within a few days. We’re doing great – awesome to hear from you!
Hi Laura,
Thanks for all your wonderful recipes. In your recipes that call for milk do you use whole, 2%, 1% or skim? Does it make a difference to the pretzels?
I use whole milk, but I think any kind will work in this recipe.
HI Laura,
Approximately how many pretzels does this recipe make? Because I’m the only who is going to eat it and I might need to halve this recipe! Also, can I leave out the butter? I’m on search for the healthiest whole wheat pretzal!
Thanks (:
I don’t recommend leaving out the butter – I think that would change the recipe too much. However, I feel that butter is a very healthy ingredient – it is a “real fat” that our bodies recognize and can utilize. This recipe makes about 20-24 pretzels.
I tried this recipe yesterday, and my dough did not rise. Any ideas why? The yeast undoubtedly activated, I didn’t heat the milk mixture past 120 degrees, and I kneaded the dough for 7 minutes. They only thing I can think of is that I kept adding more flour since the dough seemed interminably sticky during the kneading process. I don’t know much about bread-making, but would too much flour inhibit the rising process?
No, adding more flour would have been fine. I’m puzzled by why the yeast died on you, especially since your milk wasn’t over 120 degrees. :(
You might try testing your thermometer. If it is off it will kill the yeast as you shouldn’t go above 120 deg.
Mine were huge!!! Maybe I should portion them smaller next time? But they were so yummy!!!!! My family is so proud. I need more shaping practice, but they won’t mind eating my experiments.
Thanks!!
On a whim I decided I MUST have some homemade pretzels ASAP. So I did a google search for whole wheat pretzels in hopes that I could find one that didn’t have any “junk” in it. That’s how I found you. I am in love with your pretzels. I melted into a puddle on the ground they are so good. You weren’t kidding. Thank you for that, now I am off to explore the rest of your recipes!
Can you freeze the dough prior to cooking? I would love to make these for a birthday party and was hoping I could make the dough in advance and just bake them the morning of???
I’ve not tried doing that for pretzels but I do think it should work.
Hi! Just wondering what kind of flour is best for these? I have soft white wheat, hard white wheat, and hard red wheat. I just hard red wheat for my bread but your dough looks like a lighter color.
My kids will love having these!
Thanks!
Misty
Any of them will work fine. Laura uses hard white wheat for hers.
would like to make these ahead and freeze, what would you recommend for reheating? absolutely love your blog and all the recipes!
Has anyone ever made these using a stand mixer or Bosch? My dough doesn’t seem to be rising, & I used my Bosch (needed for 5 minutes). I used a thermometer, too.
Did I miss it or do you not need to do a baking soda bath BEFORE baking pretzels? And if using white sugar in place of honey is that an even measurement exchange… half cup of honey is half cup of white sugar? Thank you for sharing your recipe.
I don’t do a baking soda bath on mine. You can use white sugar in equal exchange in this recipe. Hope you enjoy it!
These look fantastic! I was wondering…did you use regular whole wheat flour or white whole wheat flour for these?
I use white whole wheat. :)
I thought they’d looked white! :) Thanks…I will definitely be giving these a try!
Hi! I am just wondering if t.=tsp and T.=tbsp?
Yes!
We made these today for a special treat. I halved the recipe and used freshly ground hard white wheat and they were perfect. Thank you for a great recipe.
Hi. I’m new to bread/pretzel making. What do I do if I need to let the dough sit longer than 1 – 1 1/2 hours?
If you’re asking what to do if you aren’t available after 1 or 1 1/2 hours, the dough may rise up out of the bowl, but it will still be okay. If you’re asking what to do if the dough hasn’t risen enough in 1 1/2 hours, it is okay to let it rise longer. :)
In my search for the best storage solution I came across your recipe. I will probably trey it just because I am comparing different recipes. I find it odd that you don’t use the hot baking soda dip before baking. My better recipes have all used it.
My best recipe uses a food grade lye bath. Since I grew up eating pretzels in Germany, I can say that the lye bath has given them the best taste, texture and appearance.
One of my recipes actually requires that you freeze the shaped and risen pretzels before dipping in hot baking soda water, then spread with eggwash and sprinkle with pretzel salt. The best thing about this recipe is that you can prepare a bunch and bake only as many as you want.
Love, Love, Love this. They are so yummy, I can’t wait to eat another one right now. Thank you for sharing.
I have tried a number of homemade soft pretzel recipes and this one is the keeper. My whole family loved them and I like that it made 24 big pretzels. I’m freezing a bunch and look forward to the real treat of having a homemade pretzels a couple more times without all the work. Thank you!
Not sure if anyone has ever commented on this idea, but today I made the pretzels into “pretzel bites” like someone else suggested. We were having spaghetti for lunch so I decided to toss the pretzels bites in parmesan cheese after I put butter and salt on them. Love these pretzels with and without parmesan!
First time baking. This was a great ice breaker for me. Easy to make tastes great, I’m a huge fan now!! sent your Blog to everyone I know know. :)
I was wondering if you kept them warm while selling, perhaps in a basket with towels or foil? Did you have any condiments available such as mustard? We have a Farmer’s Market in our town, and I’m receiving an Ankarsrum mixer this week, so was wondering if I might try your idea! It’s definitely out of my comfort zone, though, as I am a concert pianist:-). Thanks ahead for your feedback.
We didn’t do anything but bag them up and sell them to customers as is. :)
Can’t wait to try these tomorrow!!
You mention putting honey in with the yeast and also honey with the butter and milk. Is the 2 tsp of honey divided (one for each part of the recipe)?
The 2 teaspoons of honey gets mixed in with the yeast to bloom it. There is an additional 1/2 cup of honey, that gets mixed in with butter.
I can’t wait to mix up a batch of these in my kitchen-Aid. I bet they will be delicious dipped in honey mustard. They will also be perfect to send with my daughter for her school snack!
Thank you, I totally missed seeing the additional 1/2 cup honey when I was reading the recipe. It must have been too late at night.
I would love to make these for my boys but a couple of them are allergic to milk, so I was wondering what you would suggest to substitute the milk and butter??
I have the same problem at my house. I was thinking I would use either soy milk or water in place of the milk, and coconut oil in place of the butter. It won’t be near the same though, I’m sure. There’s also Earth Balanace you could use in place of the butter – it has more of a buttery taste than coconut oil, but I believe coconut oil is much healthier. Let me know if you try something that works out!
where is the 4 tsp. sea salt supposed to go in? It was never mentioned in the baking method, except the sprinkling of the salt on top at the end!
Sorry I had left out that info. I just updated the post to include adding salt!
Can i use instant dried yeast? And just add it in with the flour? Instead if proofing.
I’ve never done it this way before, so can’t say for sure… :)
:) I have the same bony blueish hands. And, they are just like yours-attached to a great person..lol! :) Thanks for the great recipe!
Did you ever try putting in pumpkin puree to make pumpkin pretzels? I have seen other recipes for it, but your basic recipe is super easy and quick rather than the massive time it takes with the other ones (and one complete flopped on me even though it got great reviews and I am a pretty good baker). I was just wondering if you ever tried exploring other flavors? :) either way happy baking.
I’ve never tried. That sounds like a great recipe for fall!
Hi,
I’m wondering if you’ve ever tried making these with a sourdough starter? I kinda winged it last night with my whole wheat sourdough starter and this recipeand made them, turned out pretty well but they could use a little tweaking. Thought I’d see if you’d tried them this way and/or if you had any suggestions.
I haven’t tried it with sourdough starter. Glad to hear you gave it a try!
So I tried the recipe again yesterday with whole wheat sourdough starterand they turned out great! Here’s how I subbed for ingredients.
Omit water and yeast for 2 cups of sourdough starter
reduce flour to 4.5 cups of flour (4.5 cups-ish) :)
reduce milk to 1.5 cups, I also used buttermilk
I mixed all ingredients in my stand mixer then allowed it to rise as the original recipe states
I then formed the pretzels and allowed them to rise once more overnight. I did not do this the first time and I think it made all the difference! I made these alongside this recipe for regular whole wheat pretzels and I think the texture of the bread was almost exactly the same.
I also used coconut oil and cinnamon/sugar at the end and they were so yummy! I think next time I might actually roll the dough into the cinn/sugar before I shape the pretzels for an added touch of sweetness. I really love this original recipe as well as the sourdough. The only reason I made them with sourdough was because I had starter overflowing on my countertop and I just couldn’t bare to throw it out!
Thank you Laura for the fabulous pretzel recipe! We really love it! and it feels so good to feed your family yummy food they love that’s truly wholesome!
Our family has recently had to go dairy free. I made these today and subbed Palm shortening for the butter and almond milk for the milk! They were delicious and the “littles” enjoyed helping.
Thanks!
These look wonderful! Can they be made in a bread machine?
Neither Laura nor myself have tried to make them in a bread machine. Good luck if you do, hope it works great for you!
Laura, if I bake these and desire to freeze some, how do you recommend using them from a frozen state? Do you heat them up in the oven from the freezer?
Yes, I heat them in the oven from the freezer. Then they are almost just like I had baked them fresh that day!
Do you offer a printed reciepe? The tutorials are nice but my internet isn’t always working and I love to print off the recipe.
Yes, if you click on the green “Print Friendly” button at the bottom of the post, you’ll be able to print it. I’m working to get all my recipes even print friendlier, but for now, that’s what will work best for this!
Delicious! When you sold these at the farmers market, did you serve them hot or cooled? Did you serve anything to dip them in? I would be grateful for any tips you discovered selling them!
I sold them cold as it was too complicated to bake them and try to keep them hot at selling time. However, it was always really hot at selling time, so when I set them out on the table, they warmed a bit! :)