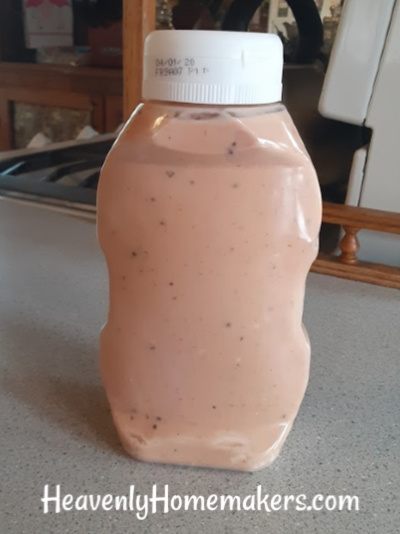
Archive for Condiments
How To Make Almond Butter
Posted by: | CommentsI am completely addicted to these Raw Chocolate Chip Cookie Dough Bites. They are made with such wonderful and healthy ingredients and are wonderful way to use your Coconut Flour if you have some.

What does my cookie dough bite addiction have to do with making almond butter? A lot. The recipe calls for almond butter – which is not something I keep around the house very often. However, I do typically have a nice store of almonds stored in my pantry. Therefore, I easily make almond butter any time I need it.
If you’ve read my tutorial for making homemade peanut butter, you’ll find that you will follow the same basic instructions for making almond butter. Nut butters are very easy to make in a food processor. The biggest thing to note: The process of making nut butter is a little bit loud. Warn the family to plug their ears before you turn on the food processor. Although the way I look at it – my family is always making a bunch of noise. When I’m making nut butter – it’s my turn. So there.
Step One: Pour almonds into a food processor. I have found that eight ounces of almonds creates one full cup of almond butter. I don’t recommend putting more than eight ounces of almonds into your food processor at one time. The process takes a while, and the more almonds you have, the longer it will take.
Step Two: Place lid on food processor and turn it on. (Plugging it in is always a plus as well.) ;) Yes, it’s loud isn’t it? Told ya.
Step Three: After processing almonds for two to three minutes, use a spoon to scrape down the sides of your food processor and shift around the almonds.
Step 4: Continue to process, but stop and scrape and stir almonds around from time to time to aid in the butter making process.
Step 5: You’re getting closer! Process, scrape, stir, and process some more. Continue until the almonds have become the almond butter you’ve always dreamed of. Because yes, we all do spend much of our time dreaming of perfect almond butter, do we not?
And there you go – lovely, smooth and creamy almond butter.
What other nut butters have you made? Have you tried making Raw Chocolate Chip Cookie Dough Bites yet?
P.S. I order organic almonds from Braga Farms. They are a wonderful company to work with and offer high quality nuts. Almond Butter will stay fresh in the refrigerator for several weeks.
Homemade Cream of Mushroom Soup
Posted by: | CommentsJust in case you lose count while reading the following sentence, I used the word ”cream” or “creamy” six times, because apparently I like these words and like to overuse them. And also because once I realized I was doing it, I exaggerated on purpose:
When I shared my Creamy Chicken and Rice Casserole recipe, I told you that I don’t usually make cream soups to replace the canned cream soups called for in many creamy recipes, but instead substitute straight cream to make the dish creamy.
(Someone give me a synonym for “creamy” to enhance my future sentence writing creativity.)
However, I have a great recipe for an easy one dish meat and potato meal that I hadn’t made for years because I wasn’t sure how to make it without the cream of mushroom soup. For this, straight cream just wouldn’t cut it. I need to make the soup.
Therefore, for all one of my recipes that need cream of mushroom soup, here is how I make it:
Homemade Cream of Mushroom Soup
1/2 cup sliced mushrooms
3 Tablespoons butter
1/4 cup organic corn starch or arrowroot powder
4 cups milk, divided
1 teaspoon sea salt
pepper to taste
Begin by sauteing mushrooms and butter until mushrooms are tender.
In the meantime, shake the cornstarch or arrowroot powder in a jar with 1 1/2 cups of milk. You probably could have figured out how to do this step without a picture, but when have I ever missed a chance to take a great photo of a jar?
Ooh, Ahh
Use a whisk to mix the milk mixture into the sauteed mushrooms, stirring constantly at medium heat. Slowly add remaining milk, salt and pepper. Stir with a whisk until smooth and thick.
This recipe will make around three cans worth of cream soup. I haven’t done it before, but I would imagine you could substitute celery for the mushrooms to make cream of celery soup instead. If you have extra soup that you don’t need, this can be frozen.
Now, that simple one dish meat and potato meal I was telling you about that requires this soup? I’ll be sharing that later in the week!
What recipes do you make that require cream of mushroom soup?
Homemade Peach Syrup (made with unprocessed sugar)
Posted by: | CommentsWe usually top our pancakes with real maple syrup or homemade applesauce. Sometimes peanut butter and jelly. Or peanut butter with maple syrup. Or honey. Or if we sprinkle a few mini chocolate chips into the pancakes, we don’t really need syrup at all.
But last week when we had some fresh, local peaches in our kitchen, I made a quick and healthy peach syrup that is oh-my-goodness good.
You need exactly two ingredients to make this: peaches and sucanat. The two together cook to form a syrup. No water necessary. :)
Homemade Peach Syrup
3 fresh peaches (or 2 cups frozen)
2 Tablespoons sucanat
Slice peaches into a saucepan. Stir in sucanat and cook on medium heat, stirring occasionally until the peaches are tender and the ingredients have formed a syrup.
You can add a few shakes of cinnamon if you like.
In case you need them, here is my Simple Soaked Pancake recipe and my Whole Wheat Waffle recipe.
What’s your favorite way to top pancakes and waffles?
Making Homemade Mayonnaise (is not my gift)
Posted by: | Comments
Who knew making homemade mayonnaise for the Heavenly Homemakers Recipe Challenge would tempt me to say naughty words? I held myself back though, and merely gave dirty looks to the ingredients in my blender that were not even trying to become mayonnaise and through gritted teeth hissed, “Would you guys emulsify already!?!?!?”
It wouldn’t have been such a big deal, except that I attempted to make mayonnaise at least four times before I could accomplish “mayonnaise emulsification”. We went through a lot of olive oil in the process, and subsequently, a lot of tuna.
Why tuna? Well, I wasn’t going to waste all those ingredients every time I had mayonnaise emulsification failure. Instead, each time, I stirred the runny, stubborn ingredients into a few cans of tuna, added some of my home canned pickle relish and called it lunch. It worked, all but one time. Yes, there was one time I did have to throw the ingredients out. That was the time I was so determined to whip the ingredients long enough and hard enough to become mayonnaise that the ingredients got so hot inside my food processor that the eggs got cooked, causing scrambled eggs to float in my olive oil. Mmmm. Gross as it is, I just had to take a picture – because I’m weird like that:
A perfect example of what not to do.
Regarding a healthy mayonnaise recipe, I do have one to share with you, and I’m sure that after all my previous, inspirational statements, you’re all ready to jump right in and give this a go. Based on all my trial and error, I have a few tips I think you’ll find helpful.
- I believe that if I had an immersion blender, this process would work much better. But I don’t have one and I refuse to buy one just to make mayo. If you do have an immersion blender, save yourself some frustration and use it for this.
- Pour the oil into the running blender so slowly you think you might fall asleep while pouring. About the time you think you’re pouring slowly enough, slow down. Slow dripping oil is key for making mayonnaise.
- Get your eggs at room temperature before starting this process.
Homemade Mayonnaise
2 egg yolks
1/2 teaspoon sea salt
1 Tablespoon vinegar
1 teaspoon sucanat
1/2 cup olive oil
Place the egg yolks, salt, vinegar and sucanat into a blender and run on high speed for about a minute. S-l-o-w-l-y pour the oil in while the blender is running. I’m talking, let the oil drip into the running blender at a horridly boring pace. Just stand there, with the blender running, dripping oil for several minutes. Don’t get impatient or you’ll be making tuna.
My mayo turned out very yellow in color because of our lovely free-range chicken eggs, which are rich with nutrients.
This mayonnaise did taste very good, as well it should have after all the work it took to figure out how to make it. But I will never be known as the Mayonnaise Queen, nor will I ever be asked to speak at the Heart of Mayonnaise Convention. I’m also pretty sure I shouldn’t be your ”I’m having trouble making mayonnaise” questions go-to gal. I do not believe making mayonnaise is my gift, nor do I wish to become a professional mayonnaise maker.
But, I am pleased to say that I figured out a healthy mayonnaise recipe and now I can move on to try and conquer the remaining recipes in the Heavenly Homemakers Recipe Challenge.
Have you conquered mayonnaise before? What’s your favorite use for mayonnaise? Ever given your mayonnaise dirty looks?
Healthy Homemade Ketchup (finally!)
Posted by: | CommentsI think I’ve been working on a homemade ketchup recipe for about forty years. (I have actually not reached the age of forty yet, but I am rather fond of exaggerating and I feel like I’ve been experimenting with ketchup for like totally forever.)
It’s taken quite a bit of trial and error to find a recipe that we think tastes good. So many recipes just don’t quite taste ketchupy enough for me. This recipe I’ve finally settled on is one I found and adapted from Happy in Dole Valley. I’m happy to say that this is a very easy recipe to make. Tastes good…healthy…and easy. Yes, this is the kind of recipe I like to share with you.
During my experiments, one of the toughest challenges was to sweeten the ketchup in a way we liked. I didn’t want it too sweet, but it did need to be a little bit sweet - and not too tomato-ee. (I’d like to see the words ketchupy and tomato-ee become a part of the dictionary someday, wouldn’t you?)
I tried making ketchup with raw honey to sweeten it, and found that the taste was too strong. Regular ol’ sucanat (dehydrated cane sugar juice) is a little crunchy in this recipe, so I finally figured out a great way to sweeten our homemade ketchup: Grind the sucanat in the blender like you’re making this healthier, unprocessed powdered sugar…then add it to your ketchup ingredients. Easy and perfect!
Healthy Homemade Ketchup
7 ounces of tomato paste
1/3 cup water
2 Tablespoons vinegar (I used distilled coconut vinegar)
1/4 teaspoon onion powder
1/4 teaspoon garlic powder
1/4 teaspoon dry mustard
pinch of cinnamon
pinch of cloves
pinch of allspice
pinch of cayenne pepper
1/4 teaspoon sea salt
1/8 cup sucanat (ground in the blender to make it less “crunchy”)
Whisk ingredients together until mixed well and smooth. Make french fries, get them nice and crunchy, salt them well with sea salt and give me a call.
Defining “a pinch”: When a recipe calls for “a pinch” of something, I usually put in about 1/8 teaspoon – an amount you could “pinch” between your fingers if you were to reach into the spice jar and pull some out. I don’t really like putting my fingers in to pinch my spices. But you go right ahead if you want to.
The true test with our Homemade Ketchup Experiment: Did the kids like it?
All of my kids love ketchup, but one particular son of mine eats ketchup on everything: eggs, green beans, broccoli… He’s also my pickiest kid (which is why he eats ketchup to get his veggies down). I hesitantly put this homemade ketchup on his plate with a nice helping of homemade fries. He ate it. He loved it. He said, “Is this the homemade ketchup?” and I said, “Yep” and he said, “Wow it’s really good!”
Score! We have a winner!
Now that I’ve conquered ketchup, I’ll move on to some of the other recipes on the Heavenly Homemakers Recipe Challenge list. I’ve gotta say, I’ve been working on mayonnaise and it is about to kill me. I can not get a homemade mayonnaise to thicken even a little bit and it’s beginning to make me mad. Those of you who make mayo…what in the world is the secret to getting the ingredients to actually thicken into mayo? Ketchup took me forever to figure out, and now the mayo. I apparently have condiment issues.
Well anyway, what’s your favorite use for ketchup? Please tell me it isn’t green beans, like my son.
Homemade Onion Soup Mix (with No MSG!)
Posted by: | Comments
So far in this Heavenly Homemakers Recipe Challenge, we’ve come up with recipes for Homemade Tator Tots, Healthier Chocolate Milk and Teriyaki Sauce. I attempted a recipe for corn tortillas and while they tasted pretty good…they were NOT easy to make, they fell apart and looked ugly. I’m going to keep working on that one until I come up with a corn tortilla recipe that doesn’t take the whole afternoon to make. :)
This new recipe in The Challenge was super easy to put together! Vicki, one of our readers, sent me an Onion Soup Mix recipe to try and WOW is it simple! I tweaked it a teeny tiny bit, but really, this recipe is more Vicki’s than mine.
What I love about this recipe is that I didn’t have to look high and low for the ingredients. Many onion soup recipes I found call for some sort of bouillon. Almost always, bouillon has MSG. There are MSG free bouillon varieties out there, but what if they aren’t easily accessible to you? And so…I was very happy to see this recipe that contained just dried herbs and spices!

Onion Soup Mix
2/3 cup dried, minced onion
3 teaspoons parsley flakes
2 teaspoons onion powder
2 teaspoons turmeric
1 teaspoon celery salt
1 teaspoon sea salt
1 teaspoon sucanat (or sugar if you prefer)
1/2 teaspoon ground pepper
Mix all ingredients in a jar, then give the jar a good shake. I’d recommend shaking the jar to mix the ingredients well before each use.
Use 4 Tablespoons Onion Soup Mix in a recipe in place of 1 packet of onion soup mix. (I actually found that 2 Tablespoons was plenty in a beef stew recipe I tried.) Store this in a dry, cool place.

I used the Onion Soup Mix in this simple, one dish stew and YUM!
I’ll be sharing the recipe eventually!
And with that…I have to ask:
SO many of you requested this recipe that I’m guessing you all must have tons of wonderful ways of using Onion Soup Mix? I would LOVE for you to share what you do with this mix!!! I have exactly two recipes that call for Onion Soup Mix . I’m so excited to use this mix in those recipes because I’ve not made them for years. But what else??? What do you make with Onion Soup Mix??
Homemade Teriyaki Sauce (No MSG or HFCS!)
Posted by: | Comments
Ever noticed how tough it is to find dressings and sauces that don’t have MSG (Monosodium Glutamate) and HFCS (High Fructose Corn Syrup)? MSG, by the way, is a flavor enhancer that is made up of a bunch of chemicals I can’t pronounce and a bunch of scary stuff I don’t want to know about. You can read all the big words here.
I’ve been so excited each time I figure out how to make a new homemade salad dressing or condiment (see the whole list of healthier condiment recipes on our site)! Making your own condiments is not only much healthier, it’s often quite a bit cheaper too. And, lo and behold, these items are easy to make.
Shall we now all take a moment and enjoy a collective sigh of wonderment? Yes indeed recipes that are healthy, cheap and easy. All at the same time.
The beauty of homemade condiments too is how delicious and flavorful they are…all by themselves. We do not need to add MSG and HFCS or BGNJ to make our food taste good. (I made that last one up just for kicks and it was very fun.)
Well, apparently that was my little “rant” for the day. Try homemade condiments. They taste so good and pure.
And now for the Homemade Teriyaki Sauce recipe!
Teriyaki Sauce
1/4 cup tamari soy sauce (I use Organic Tamari Soy Sauce from OliveNation which is gluten and MSG free!)
1 cup water
1-2 teaspoons freshly grated ginger or dry ground ginger (more or less to taste)
2 Tablespoons honey
1 minced garlic clove
2 Tablespoons organic cornstarch
1/4 cup cold water
Combine 1 cup water, soy sauce, honey, garlic and ginger in a saucepan and bring to a boil, stirring constantly. Dissolve cornstarch in 1/4 cup cold water and add to sauce. Stir constantly and allow the sauce to thicken. If the sauce is too thick, add a little bit of water or soy sauce to thin.
We LOVE this Teriyaki Sauce on chicken wings.
And with that, the Heavenly Homemakers Recipe Challenge continues. I’ve almost got another recipe ready to share. I’m not going to tell you what it is, but I will tell you that it starts with chocolate and ends with milk. Otherwise, I’m not giving any hints.
Homemade French Dressing
Posted by: | CommentsBack in the day when I didn’t know what high fructose corn syrup was or understand that it was bad for us…I used to make a killer taco salad with Catalina Salad Dressing. Man that stuff tasted good!
I’d mix up a big bowl of lettuce, taco seasoned meat, shredded cheese, chopped tomatoes, chili beans, crunched up tortilla chips…and toss it all with Catalina. Such a perfect summer supper (or dinner, or whatever).
After a little experimenting, I came up with a yummy homemade french salad dressing that tastes even better than the store bought ever tasted! It’s so easy to put together, it’s inexpensive to make and it tastes wonderful in my taco salad!
Homemade French Dressing
3/4 cup ketchup (I recommend Muir Glen Organic ketchup)
2 Tablespoons sucanat (you can substitute brown sugar if you want)
1/2 cup olive oil
1/4 cup red wine vinegar
1/2 teaspoon garlic powder
1/4 teaspoon liquid smoke
1 Tablespoon ground celery seed
Put all ingredients directly into a pint sized jar. Put the lid on and shake it well. Refrigerate.
Remember that you can also find recipes for homemade Ranch Salad Dressing, Italian Salad Dressing and Thousand Island Salad Dressing in the Condiments Page of my recipe section!
And also…if that’s just too much salad for ya…you can find a recipe for Chocolate Caramel Truffles on the Desserts Page. I’m always willing to accommodate. ;)
Homemade Taco Seasoning Mix
Posted by: | CommentsSave money by making your own taco seasoning mix. It is SO easy! And healthy! And you can put it in a jar (my favorite part)! Actually, even if you don’t have a jar obsession like I do, I recommend putting this mix in a jar as the flavors are strong and will absorb into a plastic container, or mingle with other items it may be sitting beside in your pantry.
Homemade Taco Seasoning Mix
1/2 cup chili powder
1/4 cup onion powder
1/8 cup ground cumin
1 Tablespoon garlic powder
1 Tablespoon paprika
1 Tablespoon sea salt
Put all ingredients into a jar and shake!
Um, after you put a lid on…then shake. The jar. Shake the jar. With the lid securely on the jar.

Three Tablespoons of Homemade Taco Seasoning Mix is equal to one 4-ounce package of taco seasoning mix. I would recommend adding 3 Tablespoons of mix to one pound of browned ground meat for tacos.
I would also recommend shaking again before each use to make sure the spices are well distributed throughout the mix.
The jar. Shake the jar. You can shake all you want, but if you don’t shake the jar, your spices won’t be distributed evenly.
Just wanted to be sure I made the instructions clear in regard to the shaking.
Great. I can see it now. Husbands everywhere will walk into the kitchen and see their wives shaking (boogie down).
He will look questioningly at his wife, smile and say,
“Taco night again?!”
Holiday Help: How to Make Turkey Gravy
Posted by: | CommentsI think gravy is my family’s favorite part of the holiday meal. “You want any potatoes with that gravy?!”
I know some people are intimidated by making gravy…afraid to make it lumpy and all that. (And then there are people who like lumps in their gravy. “What are these delicious lumps you put in your gravy?”)
Here’s the easiest way I’ve found to make turkey (or chicken or beef) broth gravy:
Easy Turkey Gravy
You will need:
- Turkey broth (Hopefully you saved your broth after you made your turkey.)
- Arrowroot powder, cornstarch or flour (about 3 teaspoons for every 2 cups of broth)
- Water (about 1/3 cup for each of your 3 teaspoons of arrowroot powder)
- Salt
Step One: Pour broth into a medium saucepan.
Step Two: Spoon arrowroot powder (or cornstarch or flour) into a small jar or glass.
(Surprise, surprise…I use a jar.)
Step Three: Add water to arrowroot powder and whisk smooth with a fork.
Step Four: Bring broth to a boil (Try saying ”bring broth to a boil” five times fast.)
Step Five: Slowly pour arrowroot powder (or cornstarch, or flour)/water mixture into boiling broth, stirring while you pour. (I usually make gravy with a whisk. On picture taking day, I used a wooden spoon. Either one works, but a whisk usually helps in case lumps want to form.
Step Six: Stir at medium to high heat until gravy thickens.
Turn down the heat and allow the gravy to simmer for a minute or two.
Salt to taste and serve your gravy.
Trouble Shooting:
- If gravy refuses to thicken, stir in tiny bits of arrowroot powder (or cornstarch, or flour)/water mixture until it is thick enough for your liking.
- If gravy is too thick, stir tiny bits of water or milk to thin it out.
- If gravy doesn’t have enough lumps for your liking, add sprinkles of arrowroot powder or flour and just try to stir them in. They won’t stir in no matter what you try, thus causing lumps.
- If conversation around the Thanksgiving Table is lagging…challenge your guests to say “Bring Broth to a Boil” five times fast. That’s sure to liven up any party.
This post is linked to Frugal Fridays.


